Ultralytics YOLOv5 🚀 on AzureML Quickstart
Welcome to the Ultralytics YOLOv5 quickstart guide for Microsoft Azure Machine Learning (AzureML)! This guide will walk you through setting up YOLOv5 on an AzureML compute instance, covering everything from creating a virtual environment to training and running inference with the model.
What is Azure?
Azure is Microsoft's comprehensive cloud computing platform. It offers a vast array of services, including computing power, databases, analytics tools, machine learning capabilities, and networking solutions. Azure enables organizations to build, deploy, and manage applications and services through Microsoft-managed data centers, facilitating the migration of workloads from on-premises infrastructure to the cloud.
What is Azure Machine Learning (AzureML)?
Azure Machine Learning (AzureML) is a specialized cloud service designed for developing, training, and deploying machine learning models. It provides a collaborative environment with tools suitable for data scientists and developers of all skill levels. Key features include automated machine learning (AutoML), a drag-and-drop interface for model creation, and a powerful Python SDK for more granular control over the ML lifecycle. AzureML simplifies the process of embedding predictive modeling into applications.
Prerequisites
To follow this guide, you'll need an active Azure subscription and access to an AzureML workspace. If you don't have a workspace set up, please refer to the official Azure documentation to create one.
Create a Compute Instance
A compute instance in AzureML provides a managed cloud-based workstation for data scientists.
- Navigate to your AzureML workspace.
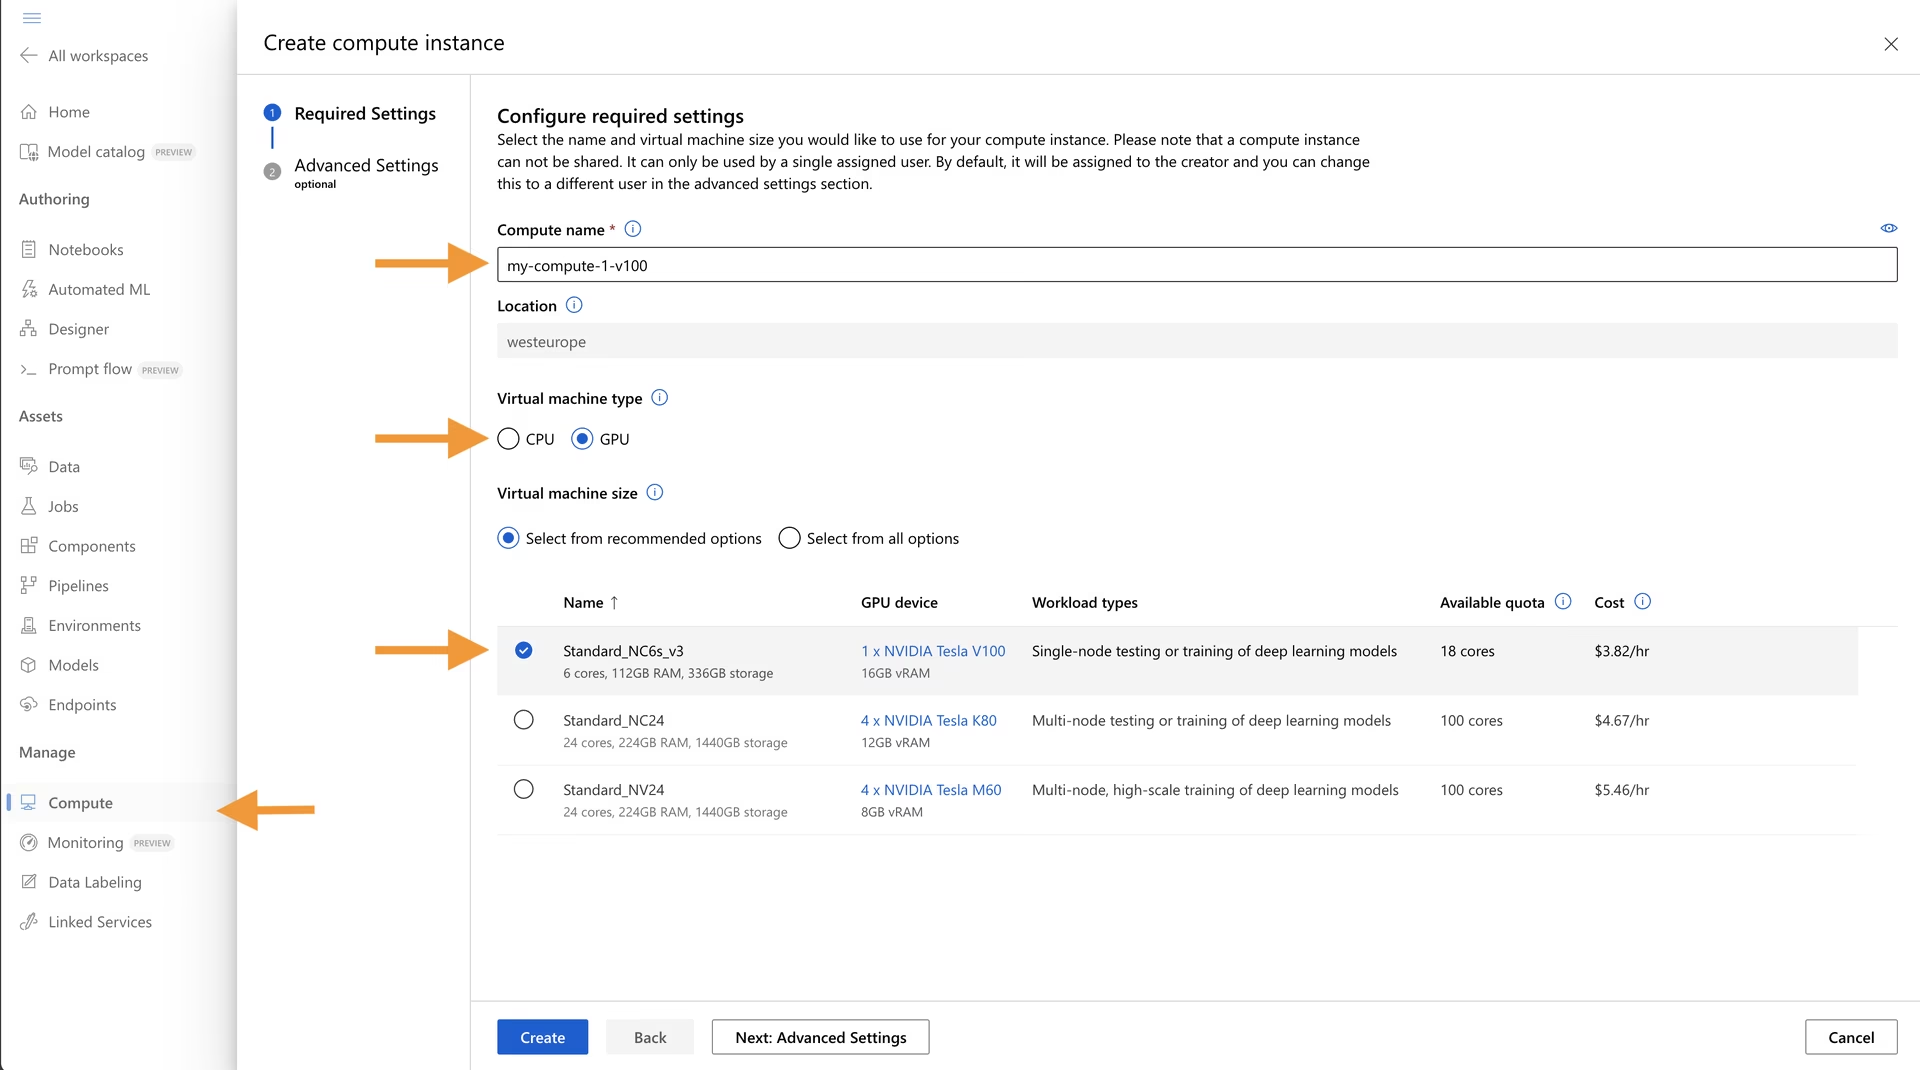
- On the left pane, select Compute.
- Go to the Compute instances tab and click New.
- Configure your instance by selecting the appropriate CPU or GPU resources based on your needs for training or inference.

Open a Terminal
Once your compute instance is running, you can access its terminal directly from the AzureML studio.
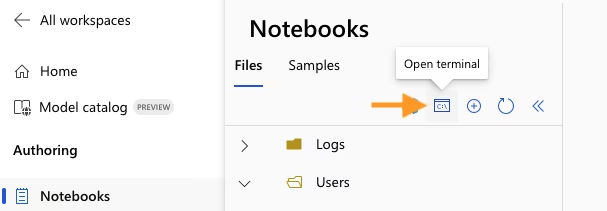
- Go to the Notebooks section in the left pane.
- Find your compute instance in the top dropdown menu.
- Click on the Terminal option below the file browser to open a command-line interface to your instance.

Setup and Run YOLOv5
Now, let's set up the environment and run Ultralytics YOLOv5.
1. Create a Virtual Environment
It's best practice to use a virtual environment to manage dependencies. We'll use Conda, which is pre-installed on AzureML compute instances. For a detailed Conda setup guide, see the Ultralytics Conda Quickstart Guide.
Create a Conda environment (e.g., yolov5env) with a specific Python version and activate it:
conda create --name yolov5env -y python=3.10 # Create a new Conda environment
conda activate yolov5env                     # Activate the environment
conda install pip -y                         # Ensure pip is installed
2. Clone YOLOv5 Repository
Clone the official Ultralytics YOLOv5 repository from GitHub using Git:
git clone https://github.com/ultralytics/yolov5 # Clone the repository
cd yolov5                                       # Navigate into the directory
# Initialize submodules (if any, though YOLOv5 typically doesn't require this step)
# git submodule update --init --recursive
3. Install Dependencies
Install the necessary Python packages listed in the requirements.txt file. We also install ONNX for model export capabilities.
pip install -r requirements.txt # Install core dependencies
pip install "onnx>=1.12.0"      # Install ONNX for exporting
4. Perform YOLOv5 Tasks
With the setup complete, you can now train, validate, perform inference, and export your YOLOv5 model.
Train the model on a dataset like COCO128. Check the Training Mode documentation for more details.
# Start training using yolov5s pretrained weights on the COCO128 dataset
python train.py --data coco128.yaml --weights yolov5s.pt --img 640 --epochs 10 --batch 16
Validate the trained model's performance using metrics like Precision, Recall, and mAP. See the Validation Mode guide for options.
# Validate the yolov5s model on the COCO128 validation set
python val.py --weights yolov5s.pt --data coco128.yaml --img 640
Run Inference on new images or videos. Explore the Prediction Mode documentation for various inference sources.
# Run inference with yolov5s on sample images
python detect.py --weights yolov5s.pt --source data/images --img 640
Export the model to different formats like ONNX, TensorRT, or CoreML for deployment. Refer to the Export Mode guide and the ONNX Integration page.
# Export yolov5s to ONNX format
python export.py --weights yolov5s.pt --include onnx --img 640
Using a Notebook
If you prefer an interactive experience, you can run these commands within an AzureML Notebook. You'll need to create a custom IPython kernel linked to your Conda environment.
Create a New IPython Kernel
Run the following commands in your compute instance terminal:
# Ensure your Conda environment is active
# conda activate yolov5env

# Install ipykernel if not already present
conda install ipykernel -y

# Create a new kernel linked to your environment
python -m ipykernel install --user --name yolov5env --display-name "Python (yolov5env)"
After creating the kernel, refresh your browser. When you open or create a .ipynb notebook file, select your new kernel ("Python (yolov5env)") from the kernel dropdown menu at the top right.
Running Commands in Notebook Cells
Python Cells: Code in Python cells will automatically execute using the selected
yolov5envkernel.Bash Cells: To run shell commands, use the
%%bashmagic command at the beginning of the cell. Remember to activate your Conda environment within each bash cell, as they don't automatically inherit the notebook's kernel environment context.%%bash source activate yolov5env # Activate environment within the cell # Example: Run validation using the activated environment python val.py --weights yolov5s.pt --data coco128.yaml --img 640
Congratulations! You've successfully set up and run Ultralytics YOLOv5 on AzureML. For further exploration, consider checking out other Ultralytics Integrations or the detailed YOLOv5 documentation. You might also find the AzureML documentation useful for advanced scenarios like distributed training or model deployment as an endpoint.