掌握 Google Cloud Platform (GCP) Deep Learning VM 上的 YOLOv5 部署
当您利用云计算平台的强大功能和灵活性时,踏上人工智能 (AI)和机器学习 (ML)的旅程可能会令人振奋。 Google Cloud Platform (GCP) 提供了专为 ML 爱好者和专业人士量身定制的强大工具。其中一种工具是深度学习 VM,它已针对数据科学和 ML 任务进行了预配置。在本教程中,我们将介绍在 GCP 深度学习 VM 上设置 Ultralytics YOLOv5 的过程。无论您是迈出 ML 的第一步,还是经验丰富的从业者,本指南都提供了一条清晰的途径来实现由 YOLOv5 提供支持的 目标检测 模型。
🆓 此外,如果您是新的 GCP 用户,那么您很幸运能够获得 300 美元的免费信用额度,以启动您的项目。
除了 GCP 之外,还可以探索其他易于访问的 YOLOv5 快速入门选项,例如我们的 Google Colab Notebook 以获得基于浏览器的体验,或 Amazon AWS。此外,容器爱好者可以利用我们在 选择官方

步骤 1:创建并配置您的深度学习虚拟机
让我们首先创建一个针对深度学习优化的虚拟机:
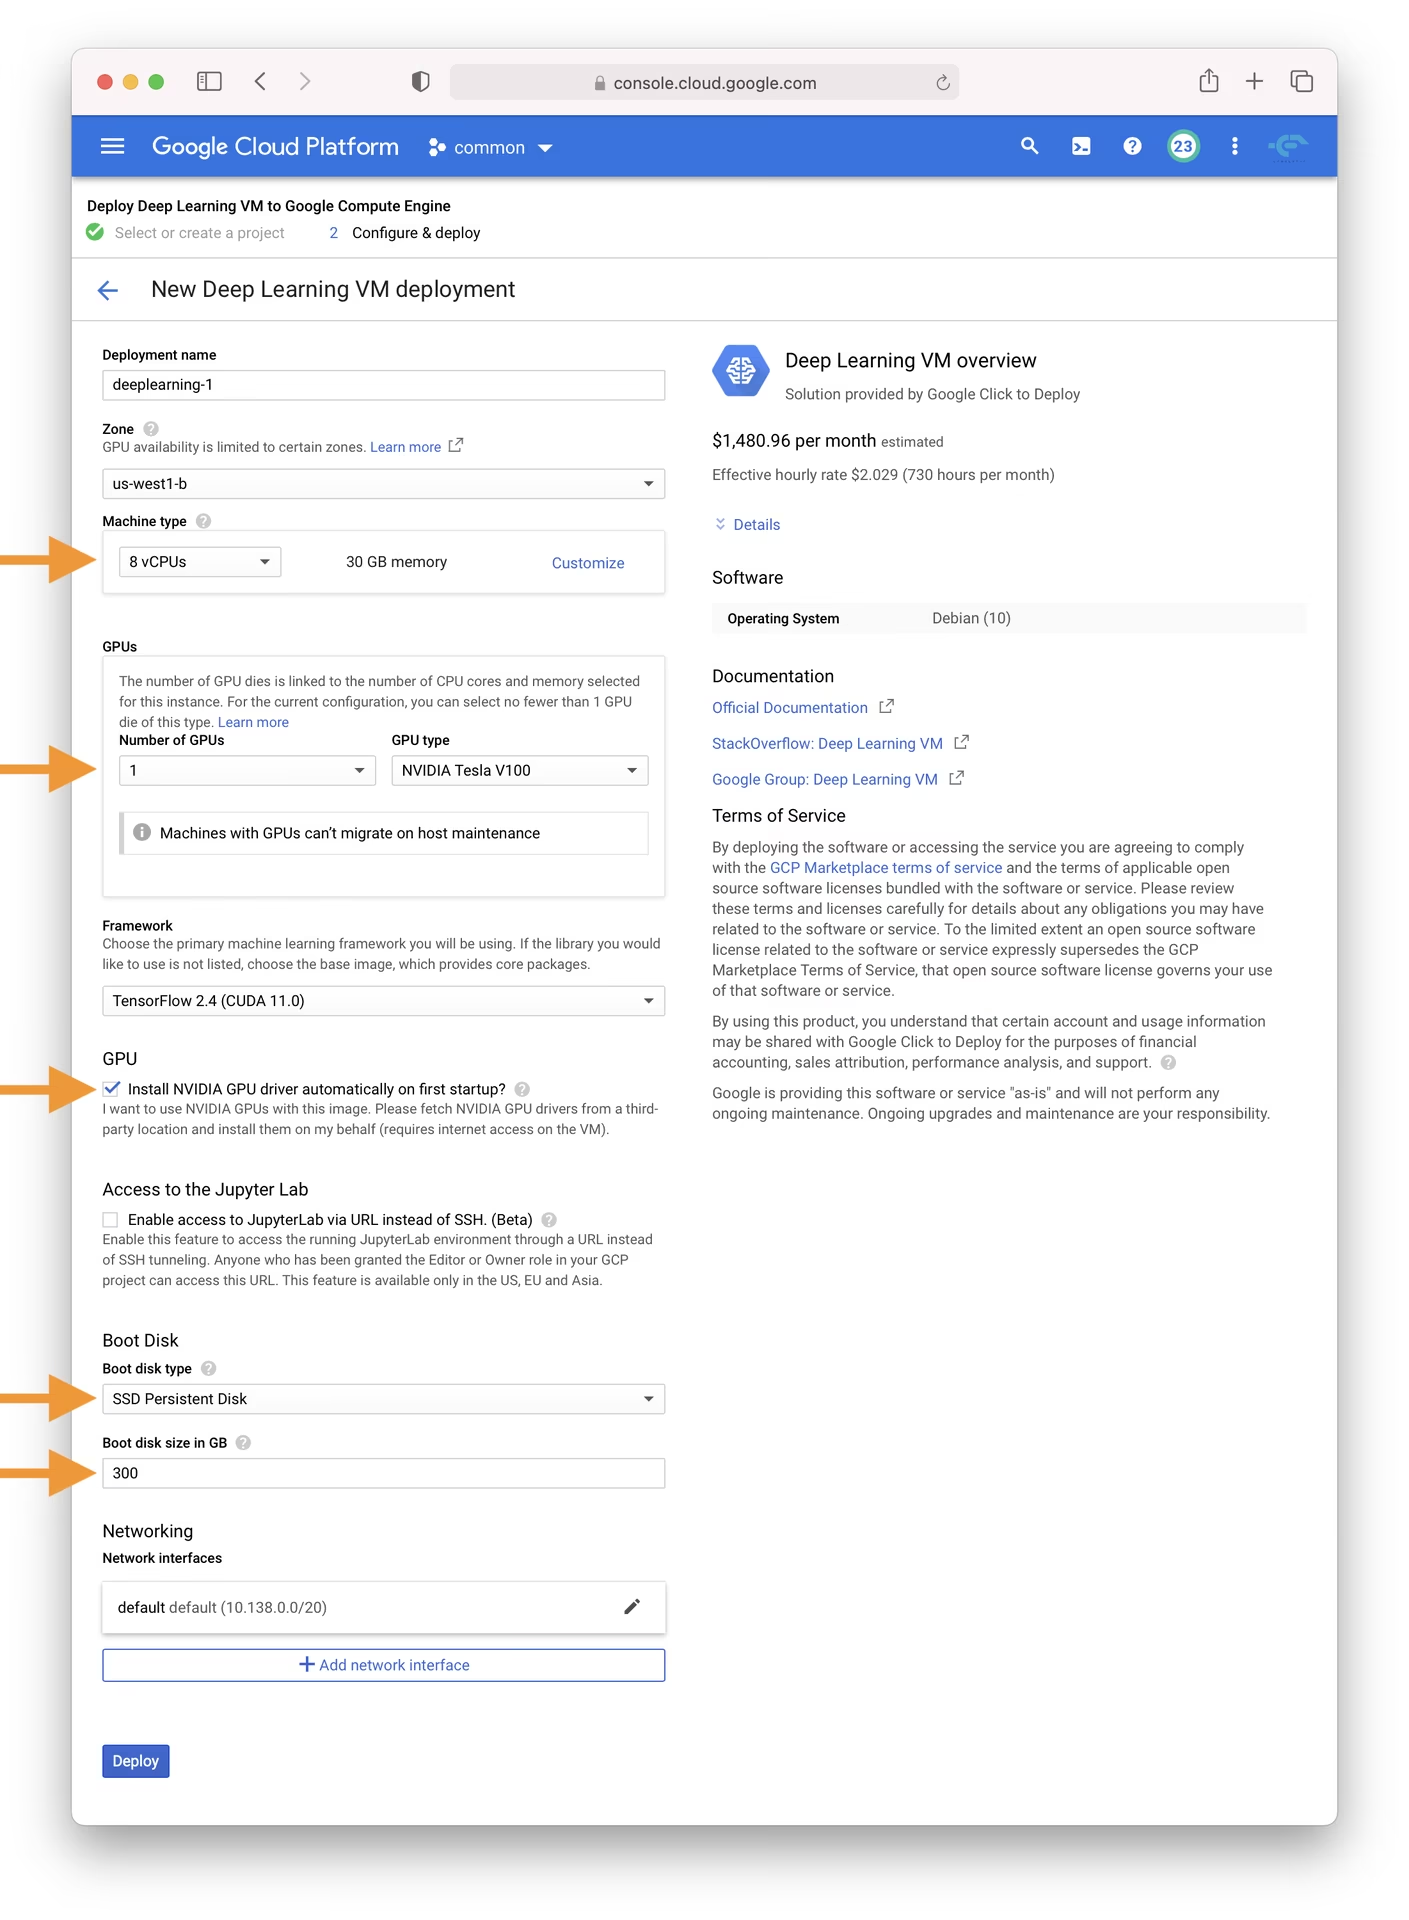
- 导航至 GCP marketplace 并选择 Deep Learning VM。
- 选择一个 n1-standard-8 实例;它提供 8 个 vCPU 和 30 GB 内存的平衡,适合许多 ML 任务。
- 选择一个 GPU。选择取决于您的工作负载;即使是基本的 T4 GPU 也能显著加速模型训练。
- 选中“首次启动时自动安装 NVIDIA GPU 驱动程序?”复选框,以实现无缝设置。
- 分配 300 GB SSD 永久磁盘以防止 I/O 瓶颈。
- 点击“部署”,并允许 GCP 配置您的自定义深度学习 VM。
此 VM 预装了必要的工具和框架,包括 Anaconda Python 发行版,它方便地捆绑了 YOLOv5 的许多必要依赖项。

步骤 2:为 YOLOv5 准备虚拟机
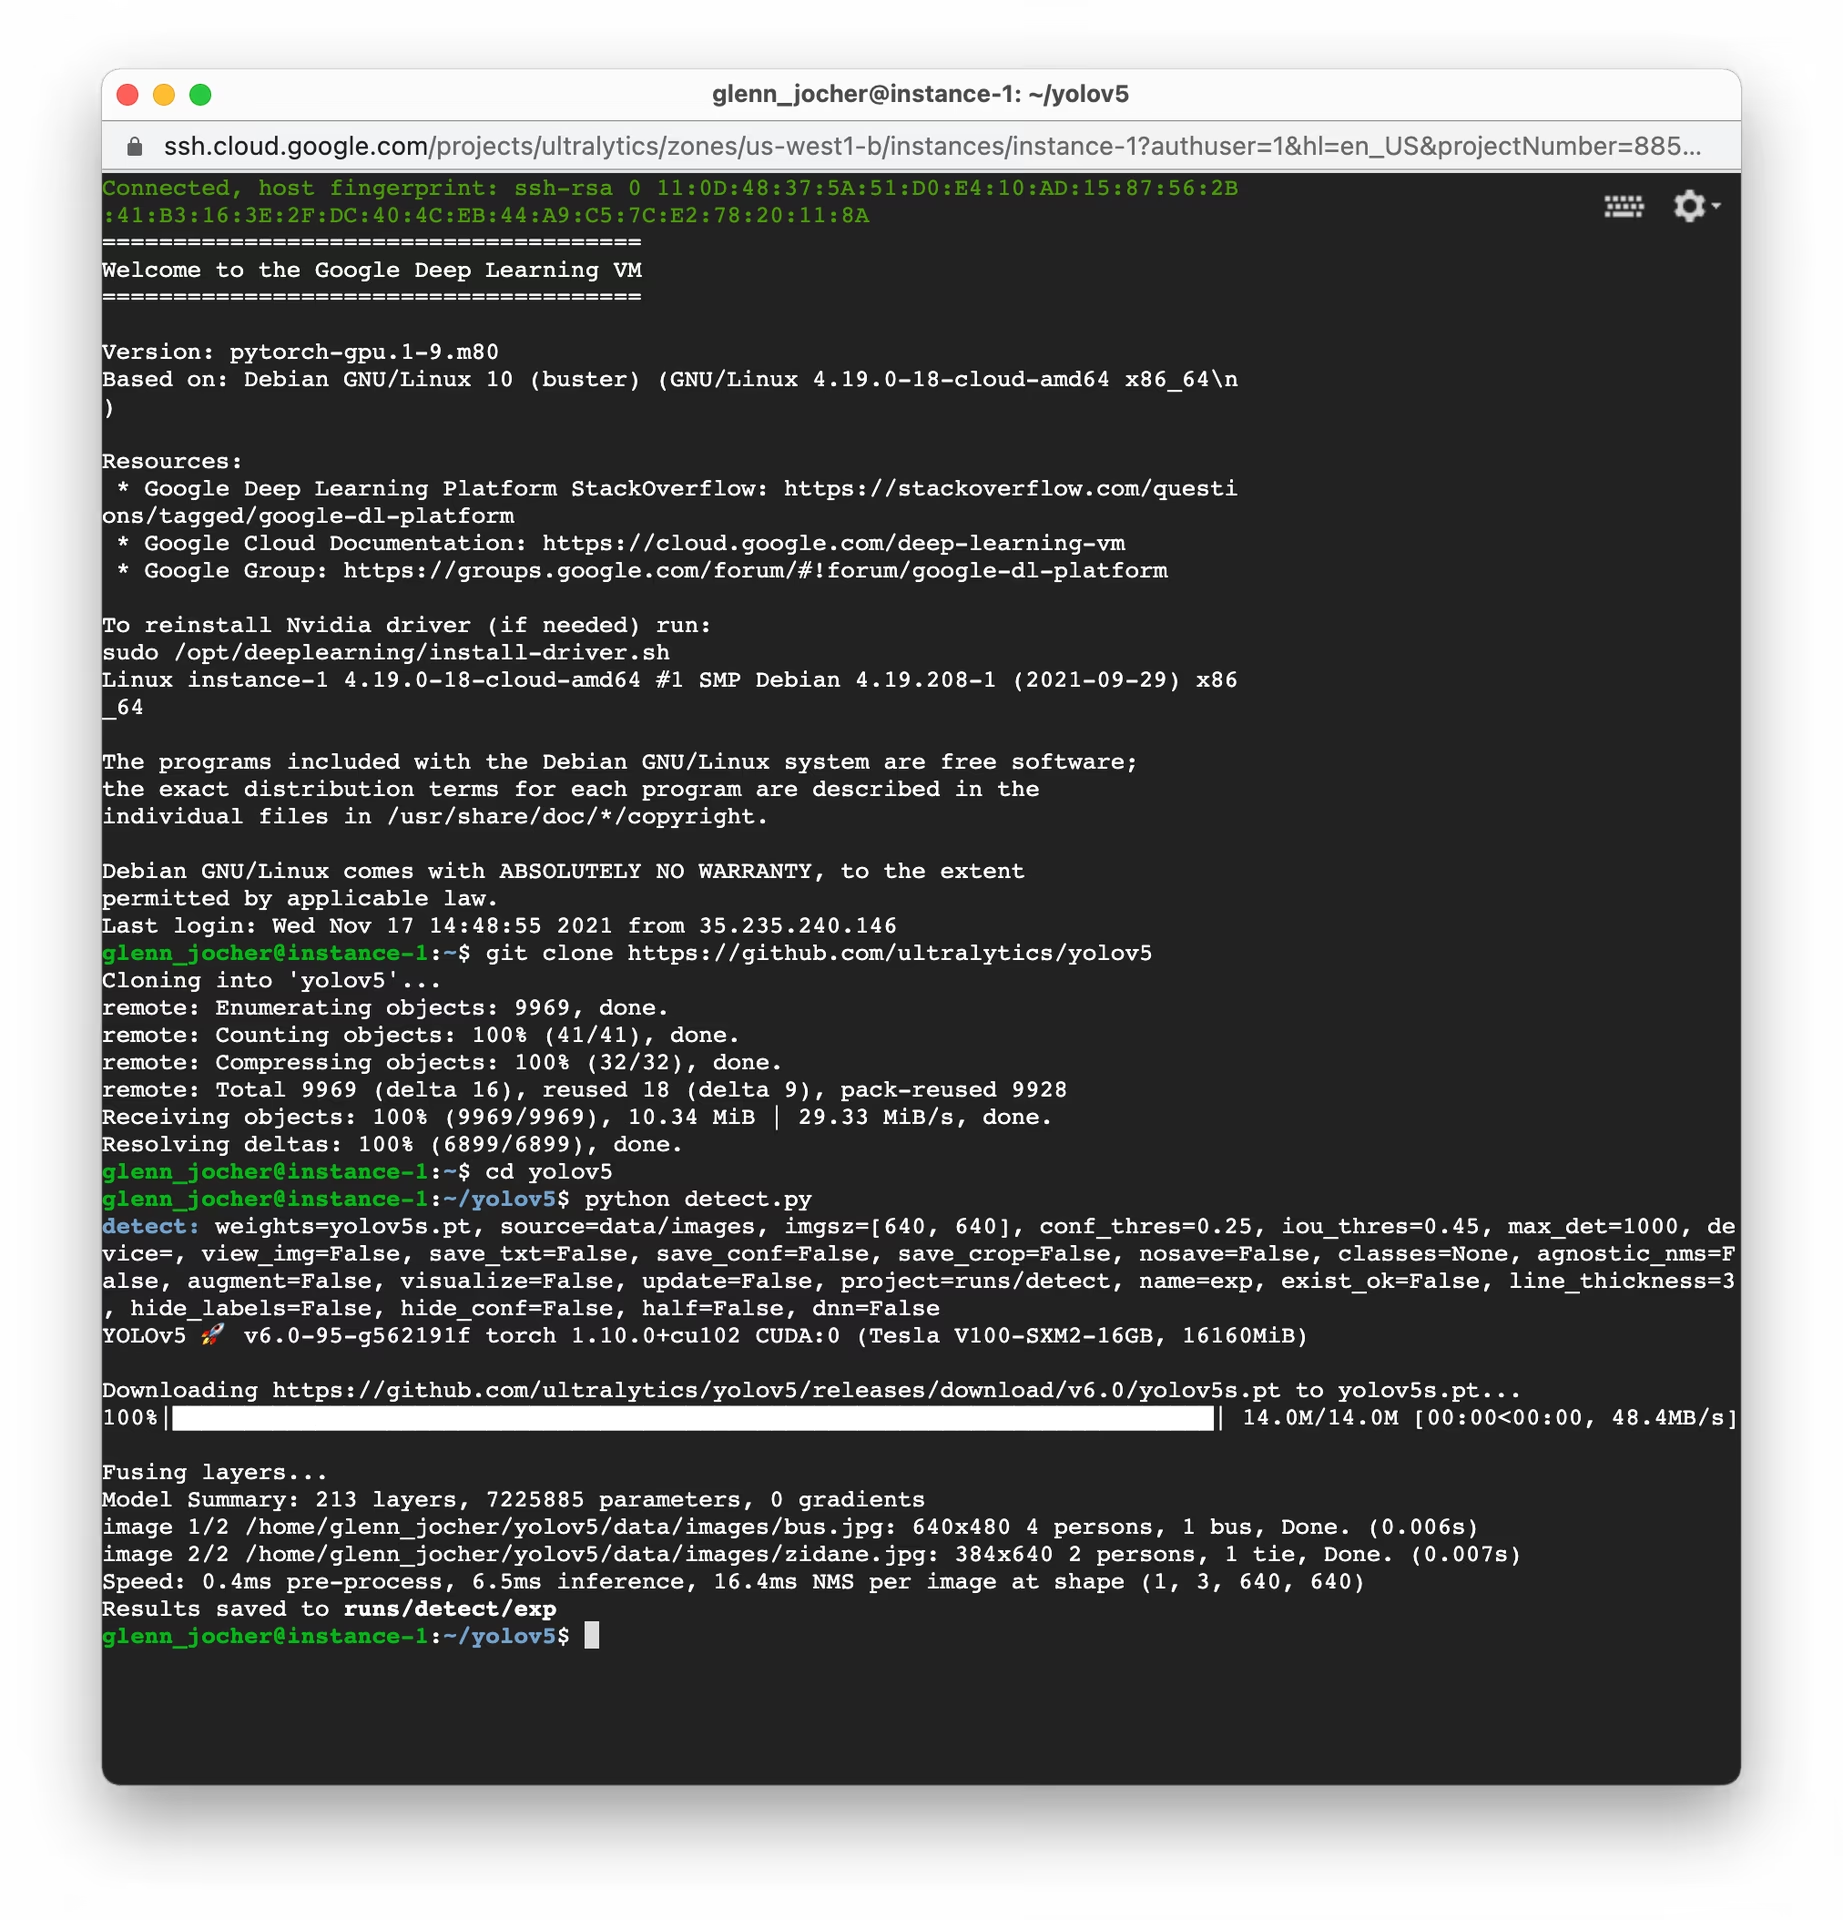
设置好环境后,让我们安装并准备好 YOLOv5:
# Clone the YOLOv5 repository
git clone https://github.com/ultralytics/yolov5
cd yolov5

# Install dependencies
pip install -r requirements.txt
此设置过程确保您拥有 3.8.0 或更高版本的 python 环境以及 1.8 或更高版本的 PyTorch。我们的脚本会自动从最新的 YOLOv5 release 下载模型和数据集,从而简化模型训练的启动过程。
第三步:训练和部署您的 YOLOv5 模型
完成设置后,您就可以在 GCP VM 上使用 YOLOv5 进行训练、验证、预测和导出了:
# Train a YOLOv5 model on your dataset (e.g., yolov5s)
python train.py --data coco128.yaml --weights yolov5s.pt --img 640

# Validate the trained model to check Precision, Recall, and mAP
python val.py --weights yolov5s.pt --data coco128.yaml

# Run inference using the trained model on images or videos
python detect.py --weights yolov5s.pt --source path/to/your/images_or_videos

# Export the trained model to various formats like ONNX, CoreML, TFLite for deployment
python export.py --weights yolov5s.pt --include onnx coreml tflite
仅需几条命令,YOLOv5 即可让您训练根据特定需求量身定制的自定义目标检测模型,或利用预训练权重在各种任务中快速获得结果。导出后,探索不同的模型部署选项。

分配交换空间(可选)
如果您正在处理特别大的数据集,可能会超出 VM 的 RAM,请考虑添加交换空间以防止内存错误:
# Allocate a 64GB swap file
sudo fallocate -l 64G /swapfile

# Set the correct permissions for the swap file
sudo chmod 600 /swapfile

# Set up the Linux swap area
sudo mkswap /swapfile

# Enable the swap file
sudo swapon /swapfile

# Verify the swap space allocation (should show increased swap memory)
free -h
训练自定义数据集
要在 GCP 中对你的自定义数据集训练 YOLOv5,请按照以下常规步骤操作:
- 根据 YOLOv5 格式(图像和相应的标签文件)准备您的数据集。请参阅我们的数据集概述以获取指导。
- 使用以下方式将数据集上传到您的 GCP VM
gcloud compute scp或 Web 控制台的 SSH 功能。 - 创建一个数据集配置 YAML 文件 (
custom_dataset.yaml),它指定了训练和验证数据的路径、类别的数量和类别名称。 使用您的自定义数据集 yaml 并可能从预训练权重开始,启动训练过程:
# Example: Train YOLOv5s on a custom dataset for 100 epochs
python train.py --img 640 --batch 16 --epochs 100 --data custom_dataset.yaml --weights yolov5s.pt
有关准备数据和使用自定义数据集进行训练的全面说明,请查阅 Ultralytics YOLOv5 训练文档。
利用云存储
为了实现高效的数据管理,尤其是在处理大型数据集或大量实验时,请将您的 YOLOv5 工作流程与 Google Cloud Storage 集成:
# Ensure Google Cloud SDK is installed and initialized
# If not installed: curl https://sdk.cloud.google.com/ | bash
# Then initialize: gcloud init

# Example: Copy your dataset from a GCS bucket to your VM
gsutil cp -r gs://your-data-bucket/my_dataset ./datasets/

# Example: Copy trained model weights from your VM to a GCS bucket
gsutil cp -r ./runs/train/exp/weights gs://your-models-bucket/yolov5_custom_weights/
这种方法允许您在云中安全且经济高效地存储大型数据集和训练好的模型,从而最大限度地减少 VM 实例上的存储需求。
总结
恭喜!您现在已准备好利用 Ultralytics YOLOv5 的强大功能以及 Google Cloud Platform 的计算能力。此设置为您的目标检测项目提供可扩展性、效率和多功能性。无论是用于个人探索、学术研究还是构建工业解决方案,您都已朝着云端 AI 和 ML 领域迈出了重要一步。
考虑使用 Ultralytics Platform,以获得精简的无代码体验来训练和管理您的模型。
请记住记录您的进度,与充满活力的 Ultralytics 社区分享见解,并利用 GitHub 讨论 等资源进行协作和支持。现在,开始使用 YOLOv5 和 GCP 进行创新吧!
想要继续提升您的机器学习技能吗?请深入阅读我们的文档,并浏览Ultralytics 博客,获取更多教程和见解。让您的 AI 冒险之旅继续!