Ultralytics YOLO 하이퍼파라미터 튜닝 가이드
Ultralytics YOLO의 하이퍼파라미터 튜닝은 학습률, 손실 가중치, 증강 강도 등의 설정을 최적화하여 정확도, 정밀도, 재현율과 같은 머신러닝 모델의 성능 지표를 최대화하는 자동 반복 탐색입니다. 이러한 값을 직접 하나씩 테스트하는 대신 Ultralytics YOLO는 유전 알고리즘을 사용하여 여러 차례의 짧은 학습 실행에서 후보 구성을 변이시키고 평가하며 하이퍼파라미터 공간을 탐색합니다.
시청: 더 나은 모델 성능을 위한 하이퍼파라미터 튜닝 방법 🚀
하이퍼파라미터란 무엇인가요?#
하이퍼파라미터는 알고리즘의 상위 수준 구조 설정입니다. 학습 단계가 시작되기 전에 설정하며 학습 중에는 일정하게 유지됩니다. 다음은 Ultralytics YOLO에서 일반적으로 튜닝하는 하이퍼파라미터입니다:
- 학습률
lr0: 손실 함수의 최솟값을 향해 이동할 때 각 반복에서 사용할 스텝 크기를 결정합니다. - 배치 크기
batch: 순전파 과정에서 동시에 처리되는 이미지 수입니다. - 에포크 수
epochs: 에포크는 모든 학습 예제에 대해 순전파와 역전파를 한 번씩 완료하는 과정입니다. - 아키텍처 세부 사항: 채널 수, 레이어 수, 활성화 함수 유형 등이 여기에 해당합니다. 이러한 설정은 학습 인수가 아니라 모델 YAML 구성에 지정됩니다.
이 네 가지 중 기본 탐색 공간에 포함되는 것은 학습률뿐입니다. batch, epochs, 아키텍처는 고정된 상태로 유지됩니다. 튜너는 또한 스케줄, 손실 계수, 증강 기법도 변이시키며, 해당 항목은 아래에 나와 있습니다.
유전적 진화와 변이#
Ultralytics YOLO는 하이퍼파라미터 최적화를 위해 진화 알고리즘의 한 계열인 유전 알고리즘을 사용합니다. 유전 알고리즘은 자연 선택과 유전의 메커니즘에서 착안했습니다.
- 선택: 각 반복에서 최대 9개의 적합도가 가장 높은 구성 중 하나를 적합도에 비례하는 가중치로 선택합니다. 결과가 30개에 도달하면 전체 결과 중 상위 20%(최대 30개)를 통해 파라미터 공분산도 추정하며, 엘리트 데이터가 쌓일수록 그 영향력이 커집니다.
- 변이: 각 반복에서 정규화된 탐색 범위를 기준으로 정규분포 단계값을 적용해 파라미터의 약 절반을 변이시킵니다. 공분산이 활성화되면 신뢰도로 가중된 비율 중 최대 40%에 상관된 단계값을 적용합니다. 반사 처리를 통해 이 단계값을 범위 내로 되돌리며, 범위를 벗어난 값이 누적되지 않도록 합니다. 개선 없이 시도가 누적되면 25회 시도 동안 단계 크기를 최대 20%까지 선형으로 줄이고, 새로운 최적 결과가 나오면 초기화합니다. 1회 반복에는 부모가 없으며 기본 학습 하이퍼파라미터를 기준선으로 사용합니다.
하이퍼파라미터 튜닝 준비#
튜닝을 시작하기 전에 다음 사항을 확인해야 합니다:
- 지표 확인: 기본 제공 튜너(
use_ray=False)는 작업의fitness점수로 실험을 순위화하고,use_ray=True는 작업 지표를 사용합니다. AP50 또는 F1 점수와 같이 확인할 보조 지표를 결정하세요. - 튜닝 예산 설정: 할당할 컴퓨팅 리소스의 규모를 정의하세요. 하이퍼파라미터 튜닝에는 많은 계산이 필요할 수 있습니다.
튜닝 루프 작동 방식#
기본 제공 튜너는 각 반복에서 다음 루프를 반복합니다:
- 하이퍼파라미터 초기화 — Ultralytics YOLO가 설정한 기본 하이퍼파라미터 또는 도메인 지식이나 이전 실험에 기반한 값 중 적절한 기준선에서 시작합니다.
- 하이퍼파라미터 변이 —
Tuner클래스는_mutate메서드를 사용해 기존 세트에서 새로운 하이퍼파라미터 세트를 자동으로 생성합니다. - 모델 학습 — 변이된 하이퍼파라미터로 모델을 학습한 다음, 선택한 지표로 학습 성능을 평가합니다.
- 모델 평가 — 평가 과정에서 해당 반복의 적합도 점수를 산출합니다. 이 점수를 이전 반복의 점수와 비교해 현재 하이퍼파라미터가 개선되었는지 판단합니다.
- 결과 기록 — 향후 참조를 위해 성능 지표와 해당 하이퍼파라미터를 모두 기록합니다. Ultralytics YOLO는 이러한 결과를 NDJSON 형식으로 자동 저장합니다.
- 반복 — 지정된 반복 횟수에 도달할 때까지 계속 진행하며, 각 반복은 이전 실행에서 얻은 지식을 바탕으로 이루어집니다. 기본 제공 튜너는 모든
iterations을 실행합니다. Ray Tune은 각 피팅 에포크 후 지표를 보고하므로 ASHA는 유예 기간이 지난 후 성능이 낮은 시도를 중단할 수 있습니다.
반복 횟수와 모집단 크기#
기본 제공 튜너(use_ray=False)에서 iterations은 순차 시도의 총 횟수를 제어하며 기본값은 300입니다. 각 시도에서는 하나의 하이퍼파라미터 구성으로 모델 하나를 학습합니다. 예를 들어 iterations=40와 epochs=50을 사용하면 후보 40개로 이루어진 별도 모집단을 한 번의 50에포크 실행에 사용하는 것이 아니라, 서로 독립적인 50에포크 학습 실행 40회를 예약합니다.
기본 제공 유전 알고리즘에는 명시적인 모집단 크기 파라미터가 없습니다. 이전 시도가 존재하면 적합도가 가장 높은 구성 중 최대 9개를 선택하고, 반복마다 후보 하나를 변이시킵니다.
병렬 시도 또는 더 고급 검색 전략을 사용하려면 use_ray=True을 설정해 Ray Tune을 사용하세요. Ray Tune은 동일한 기본 시도 횟수 300을 사용하며 iterations을 num_samples로 전달받습니다. 자세한 내용은 Ray Tune 통합 가이드를 참조하세요.
기본 검색 공간#
다음 표에는 YOLO26 하이퍼파라미터 튜닝의 기본 검색 공간 파라미터가 나와 있습니다. 각 파라미터에는 튜플 (min, max)로 정의된 특정 값 범위가 있습니다.
| 매개변수 | 유형 | 값 범위 | 설명 |
|---|---|---|---|
lr0 | float | (1e-5, 1e-2) | 학습 시작 시의 초기 학습률입니다. 값이 낮으면 학습이 더 안정적이지만 수렴 속도는 느려집니다. |
lrf | float | (0.01, 1.0) | lr0의 비율로 나타낸 최종 학습률 계수입니다. 학습 중 학습률이 감소하는 정도를 제어합니다. |
momentum | float | (0.7, 0.98) | SGD 모멘텀 계수입니다. 값이 높으면 일관된 그래디언트 방향을 유지하는 데 도움이 되며 수렴 속도를 높일 수 있습니다. |
weight_decay | float | (0.0, 0.001) | 과적합을 방지하기 위한 L2 정규화 계수입니다. 값이 클수록 정규화가 강해집니다. |
warmup_epochs | float | (0.0, 5.0) | 선형 학습률 워밍업 에포크 수입니다. 학습 초기의 불안정성을 방지하는 데 도움이 됩니다. |
warmup_momentum | float | (0.0, 0.95) | 워밍업 단계의 초기 모멘텀입니다. 최종 모멘텀 값까지 점차 증가합니다. |
box | float | (1.0, 20.0) | 전체 손실 함수에서 BBox 손실의 가중치입니다. BBox 회귀와 분류 간 균형을 조정합니다. |
cls | float | (0.1, 4.0) | 전체 손실 함수에서 분류 손실의 가중치입니다. 값이 높을수록 올바른 클래스 예측을 강조합니다. |
cls_pw | float | (0.0, 1.0) | 클래스 불균형 처리를 위한 클래스 가중치 계수입니다. 값이 높을수록 희소 클래스의 가중치가 커집니다. |
dfl | float | (0.4, 12.0) | BBox 거리 회귀 항의 가중치입니다. DFL을 사용하지 않는 YOLO26은 이 계수를 정규화된 BBox 거리에 대한 L1 손실에 적용합니다. 값이 높을수록 정밀한 위치 지정이 강조됩니다. |
hsv_h | float | (0.0, 0.1) | HSV 색 공간에서 임의의 색조 증강 범위입니다. 모델이 색상 변화에 일반화하는 데 도움이 됩니다. |
hsv_s | float | (0.0, 0.9) | HSV 공간에서 임의의 채도 증강 범위입니다. 다양한 조명 조건을 시뮬레이션합니다. |
hsv_v | float | (0.0, 0.9) | 임의의 명도(밝기) 증강 범위입니다. 모델이 다양한 노출 수준에 대응하는 데 도움이 됩니다. |
degrees | float | (0.0, 45.0) | 최대 회전 증강 각도(도)입니다. 모델이 객체 방향에 불변하도록 돕습니다. |
translate | float | (0.0, 0.9) | 이미지 크기에 대한 비율로 나타낸 최대 이동 증강 값입니다. 객체 위치 변화에 대한 강건성을 높입니다. |
scale | float | (0.0, 0.95) | 임의 스케일 증강 범위입니다. 모델이 다양한 크기의 객체를 감지하는 데 도움이 됩니다. |
shear | float | (0.0, 10.0) | 최대 전단 증강 각도(도)입니다. 학습 이미지에 원근 왜곡과 유사한 변형을 추가합니다. |
perspective | float | (0.0, 0.001) | 임의 원근 증강 범위입니다. 다양한 시점을 시뮬레이션합니다. |
flipud | float | (0.0, 1.0) | 학습 중 이미지 수직 뒤집기를 적용할 확률입니다. 항공 및 위성 이미지에 유용합니다. |
fliplr | float | (0.0, 1.0) | 이미지 수평 뒤집기를 적용할 확률입니다. 모델이 객체 방향에 불변하도록 돕습니다. |
bgr | float | (0.0, 1.0) | 색상 채널을 바꾸는 BGR 증강을 사용할 확률입니다. 색상 불변성을 높이는 데 도움이 될 수 있습니다. |
mosaic | float | (0.0, 1.0) | 이미지 4장을 결합하는 모자이크 증강을 사용할 확률입니다. 작은 객체 감지에 특히 유용합니다. |
mixup | float | (0.0, 1.0) | 이미지 두 장을 혼합하는 MixUp 증강을 사용할 확률입니다. 모델의 강건성을 높일 수 있습니다. |
cutmix | float | (0.0, 1.0) | CutMix 증강을 사용할 확률입니다. 지역 특징을 유지하면서 이미지 영역을 결합합니다. |
copy_paste | float | (0.0, 1.0) | flip 모드에서는 복사 가능한 객체 중 복사할 비율이며, mixup 모드에서는 이를 적용할 확률도 포함합니다. |
close_mosaic | int | (0.0, 10.0) | 학습 완료 전에 안정화를 위해 마지막 N개 에포크에서 모자이크를 비활성화합니다. 실수로 변이된 후 정수 에포크 수로 반올림됩니다. |
사용자 지정 검색 공간 예제#
아래 예시는 탐색 공간을 정의하고 model.tune()을 호출합니다. 이 호출은 Tuner 클래스를 실행하여 COCO8에서 YOLO26n을 AdamW 옵티마이저로 30 에포크 동안 튜닝합니다. 튜닝 속도를 높이기 위해 플로팅, 체크포인트 저장, 마지막 에포크 이외의 검증은 건너뜁니다.
이 예제는 시연용일 뿐입니다. 짧거나 소규모로 실행한 튜닝에서 도출된 하이퍼파라미터가 실제 학습에 최적인 경우는 드뭅니다. 신뢰할 수 있고 다른 상황에도 적용 가능한 결과를 얻으려면 실제로는 비슷한 데이터셋, 에포크 수, 증강을 포함해 전체 학습과 유사한 설정으로 튜닝해야 합니다. 빠른 튜닝은 일반화되지 않는 빠른 수렴이나 단기 검증 성능 향상에 파라미터가 편향되도록 만들 수 있습니다.
from ultralytics import YOLO

# YOLO 모델 초기화
model = YOLO("yolo26n.pt")

# 검색 공간 정의
search_space = {
    "lr0": (1e-5, 1e-2),
    "degrees": (0.0, 45.0),
}

# COCO8에서 30에포크 동안 하이퍼파라미터 튜닝
model.tune(
    data="coco8.yaml",
    epochs=30,
    iterations=300,
    optimizer="AdamW",
    space=search_space,
    plots=False,
    save=False,
    val=False,
)
중단된 하이퍼파라미터 튜닝 세션 재개#
resume=True을 전달하면 중단된 하이퍼파라미터 튜닝 세션을 재개할 수 있습니다. 선택적으로 재개에 사용할 runs/{task} 아래의 디렉터리 name을 전달할 수도 있습니다. name을 지정하지 않으면 가장 최근에 실행한 세션이 아니라 기본 이름인 tune라는 디렉터리를 그대로 재개하므로, 사용자 지정 이름으로 시작한 실행은 name를 전달해야 합니다. 또한 data, epochs, iterations, space를 포함한 이전 학습 인수를 모두 제공해야 합니다.
from ultralytics import YOLO

# YOLO 모델 정의
model = YOLO("yolo26n.pt")

# 검색 공간 정의
search_space = {
    "lr0": (1e-5, 1e-2),
    "degrees": (0.0, 45.0),
}

# 이전 실행 재개
results = model.tune(data="coco8.yaml", epochs=50, iterations=300, space=search_space, resume=True)

# 이름이 'tune_exp'인 튜닝 실행 재개
results = model.tune(data="coco8.yaml", epochs=50, iterations=300, space=search_space, name="tune_exp", resume=True)결과#
하이퍼파라미터 튜닝을 성공적으로 완료하면 튜닝 결과가 담긴 여러 파일과 디렉터리가 생성됩니다. 각 항목은 다음과 같습니다:
파일 구조#
결과 디렉터리 구조는 다음과 같습니다. multitrain/ 및 multitrain-2/과 같은 스윕 디렉터리에는 각 튜닝 반복의 실행 결과가 저장됩니다. 즉, 데이터셋별 하위 디렉터리에 하이퍼파라미터 한 세트로 학습한 모델 하나가 저장됩니다. 저장 공간을 절약하기 위해 튜너는 현재 최적 결과가 아닌 반복의 데이터셋별 실행 디렉터리를 삭제합니다. tune/ 디렉터리에는 개별 모델 학습의 튜닝 결과가 모두 들어 있습니다:
runs/
└── detect/
    ├── multitrain/
    │   └── coco8/
    ├── multitrain-2/
    ├── ...
    └── tune/
        ├── best_hyperparameters.yaml
        ├── tune_fitness.png
        ├── tune_results.ndjson
        ├── tune_scatter_plots.png
        └── weights/
            ├── last.pt
            └── best.pt
파일 설명#
best_hyperparameters.yaml#
이 YAML 파일에는 튜닝 과정에서 찾은 성능이 가장 좋은 하이퍼파라미터가 들어 있습니다. 이 파일을 사용해 최적화된 설정으로 이후 학습을 초기화할 수 있습니다.
-
형식: YAML
-
용도: 하이퍼파라미터 결과
-
예제:
# 558/900 iterations complete ✅ (45536.81s)
# Results saved to /usr/src/ultralytics/runs/detect/tune
# Best fitness=0.64297 observed at iteration 498
# Best fitness metrics are {'metrics/precision(B)': 0.87247, 'metrics/recall(B)': 0.71387, 'metrics/mAP50(B)': 0.79106, 'metrics/mAP50-95(B)': 0.62651, 'val/box_loss': 2.79884, 'val/cls_loss': 2.72386, 'val/l1_loss': 0.68503, 'fitness': 0.64297}
# Best fitness model is /usr/src/ultralytics/runs/detect/tune/weights
# Best fitness hyperparameters are printed below.

lr0: 0.00269
lrf: 0.00288
momentum: 0.73375
weight_decay: 0.00015
warmup_epochs: 1.22935
warmup_momentum: 0.1525
box: 18.27875
cls: 1.32899
dfl: 0.56016
hsv_h: 0.01148
hsv_s: 0.53554
hsv_v: 0.13636
degrees: 0.0
translate: 0.12431
scale: 0.07643
shear: 0.0
perspective: 0.0
flipud: 0.0
fliplr: 0.08631
mosaic: 0.42551
mixup: 0.0
copy_paste: 0.0
tune_fitness.png#
이 파일은 반복 횟수에 따른 적합도를 표시한 그래프입니다. 시간의 흐름에 따라 유전 알고리즘이 어떻게 작동했는지 확인할 수 있습니다.
- 형식: PNG
- 용도: 성능 시각화
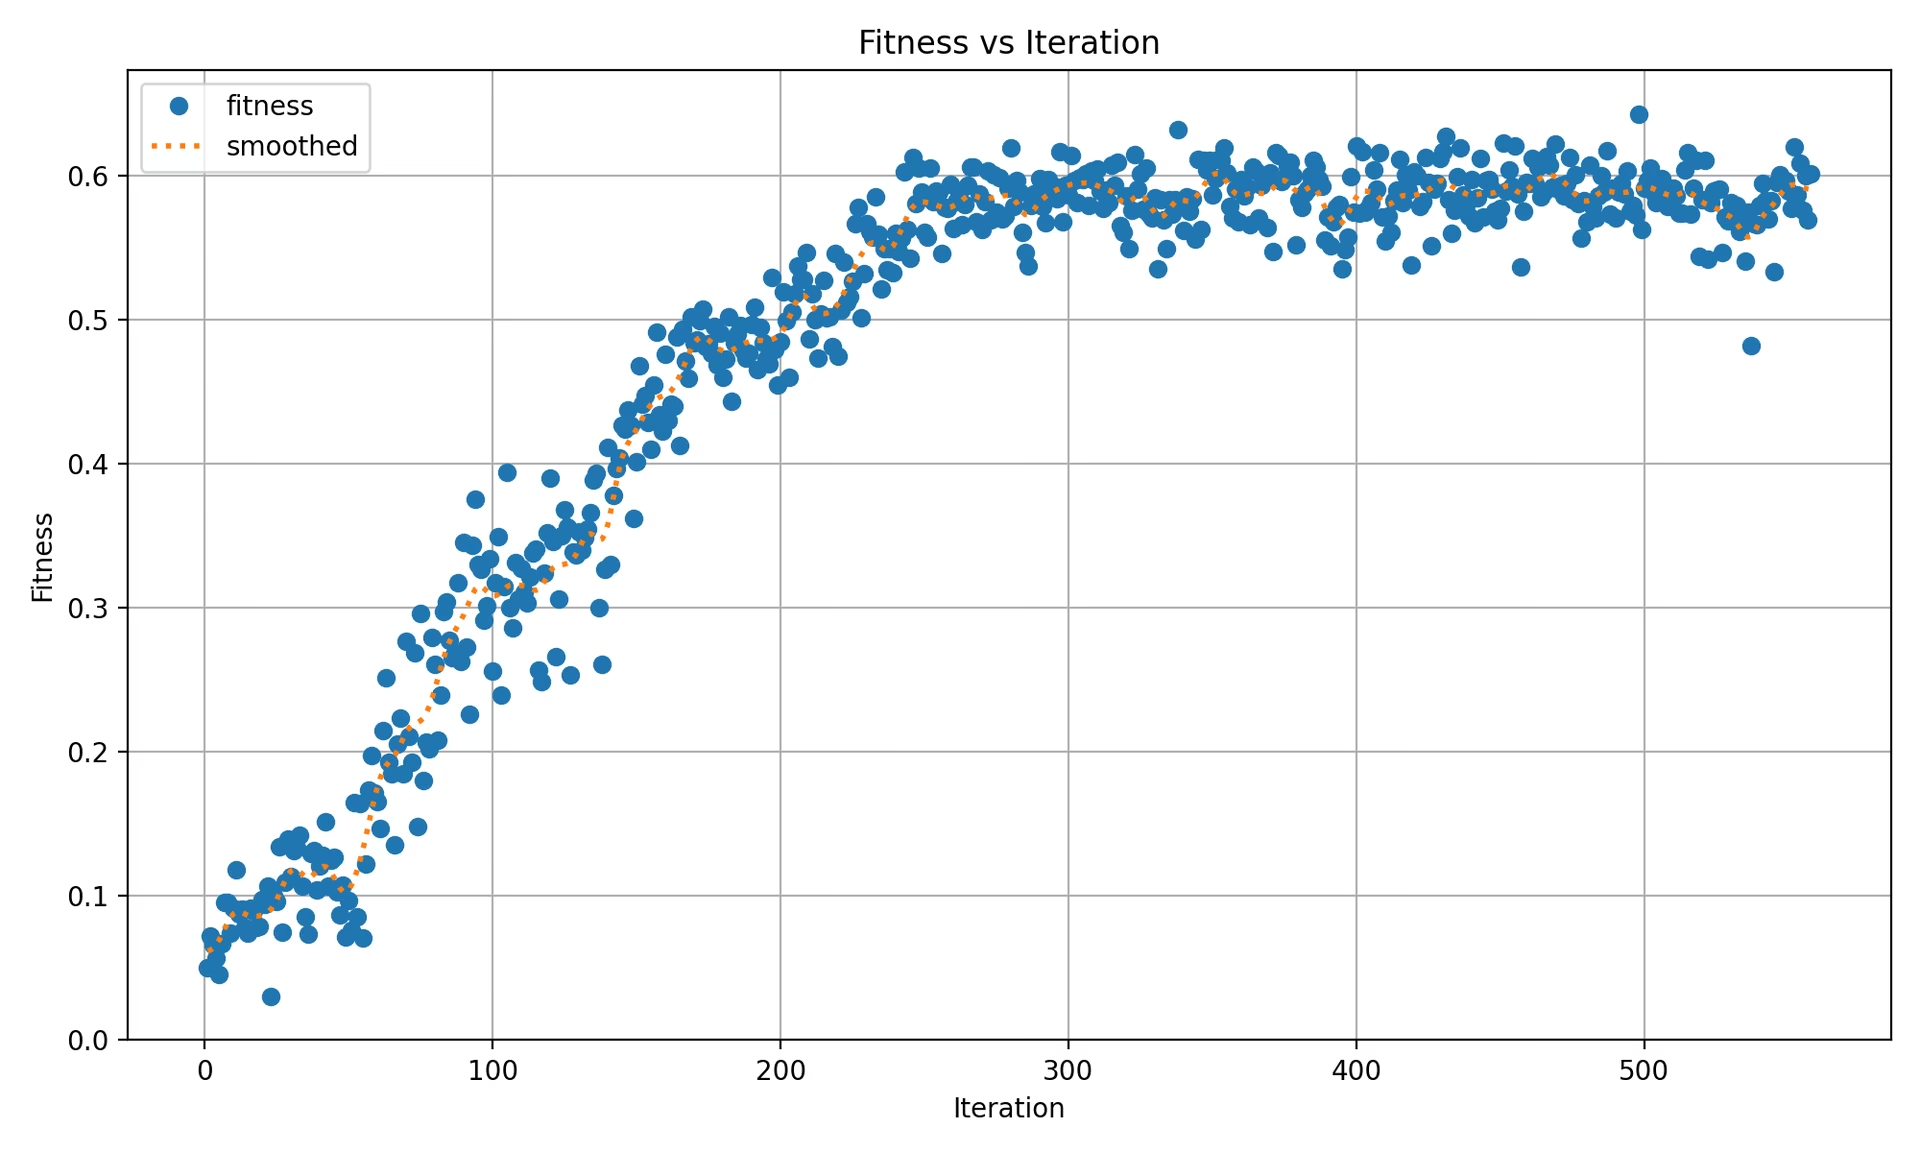
그래프에는 다음이 포함됩니다:
- 데이터셋별 각 반복의 마커 하나. 따라서 단일 데이터셋 실행에서는 반복마다 점 하나가 표시되고, 여러 데이터셋을 사용하는 실행에서는 반복마다 데이터셋별로 점 하나가 표시됩니다.
- 점선으로 표시된 '평활화된 평균' 선은 반복별 최상위 적합도 값에 가우시안 평활화(
sigma=3)를 적용해 계산합니다.
tune_results.ndjson#
각 튜닝 반복의 상세 결과를 담은 NDJSON 파일입니다. 각 줄은 통합 적합도, 튜닝된 하이퍼파라미터, 데이터셋별 지표를 포함한 JSON 객체 하나로 구성됩니다. 단일 데이터셋 튜닝과 여러 데이터셋 튜닝은 동일한 파일 형식을 사용합니다.
- 형식: NDJSON
- 용도: 반복별 결과 추적
- 예제:
가독성을 위해 아래에 보기 좋게 정렬한 예제를 표시합니다. 실제 .ndjson 파일에서는 각 객체가 한 줄에 저장됩니다.
{
    "iteration": 1,
    "fitness": 0.48628,
    "hyperparameters": {
        "lr0": 0.01,
        "lrf": 0.01,
        "momentum": 0.937,
        "weight_decay": 0.0005
    },
    "datasets": {
        "coco8": {
            "metrics/precision(B)": 0.65666,
            "metrics/recall(B)": 0.85,
            "metrics/mAP50(B)": 0.85086,
            "metrics/mAP50-95(B)": 0.64104,
            "val/box_loss": 1.57958,
            "val/cls_loss": 1.04986,
            "val/l1_loss": 1.32641,
            "fitness": 0.64104
        },
        "coco8-grayscale": {
            "metrics/precision(B)": 0.6582,
            "metrics/recall(B)": 0.51667,
            "metrics/mAP50(B)": 0.59106,
            "metrics/mAP50-95(B)": 0.33152,
            "val/box_loss": 1.95424,
            "val/cls_loss": 1.64059,
            "val/l1_loss": 1.70226,
            "fitness": 0.33152
        }
    },
    "save_dirs": {
        "coco8": "runs/detect/multitrain/coco8",
        "coco8-grayscale": "runs/detect/multitrain/coco8-grayscale"
    }
}
최상위 fitness은 데이터셋별 fitness 값의 산술 평균입니다. 단일 데이터셋 튜닝에서 datasets 딕셔너리에는 항목이 하나 있으며, 해당 항목의 fitness은 최상위 fitness와 같습니다. 완료된 반복마다 JSON 객체 하나가 기록됩니다. 실제 save_dirs 경로는 절대 경로이며, 위 예제에서는 가독성을 위해 축약했습니다.
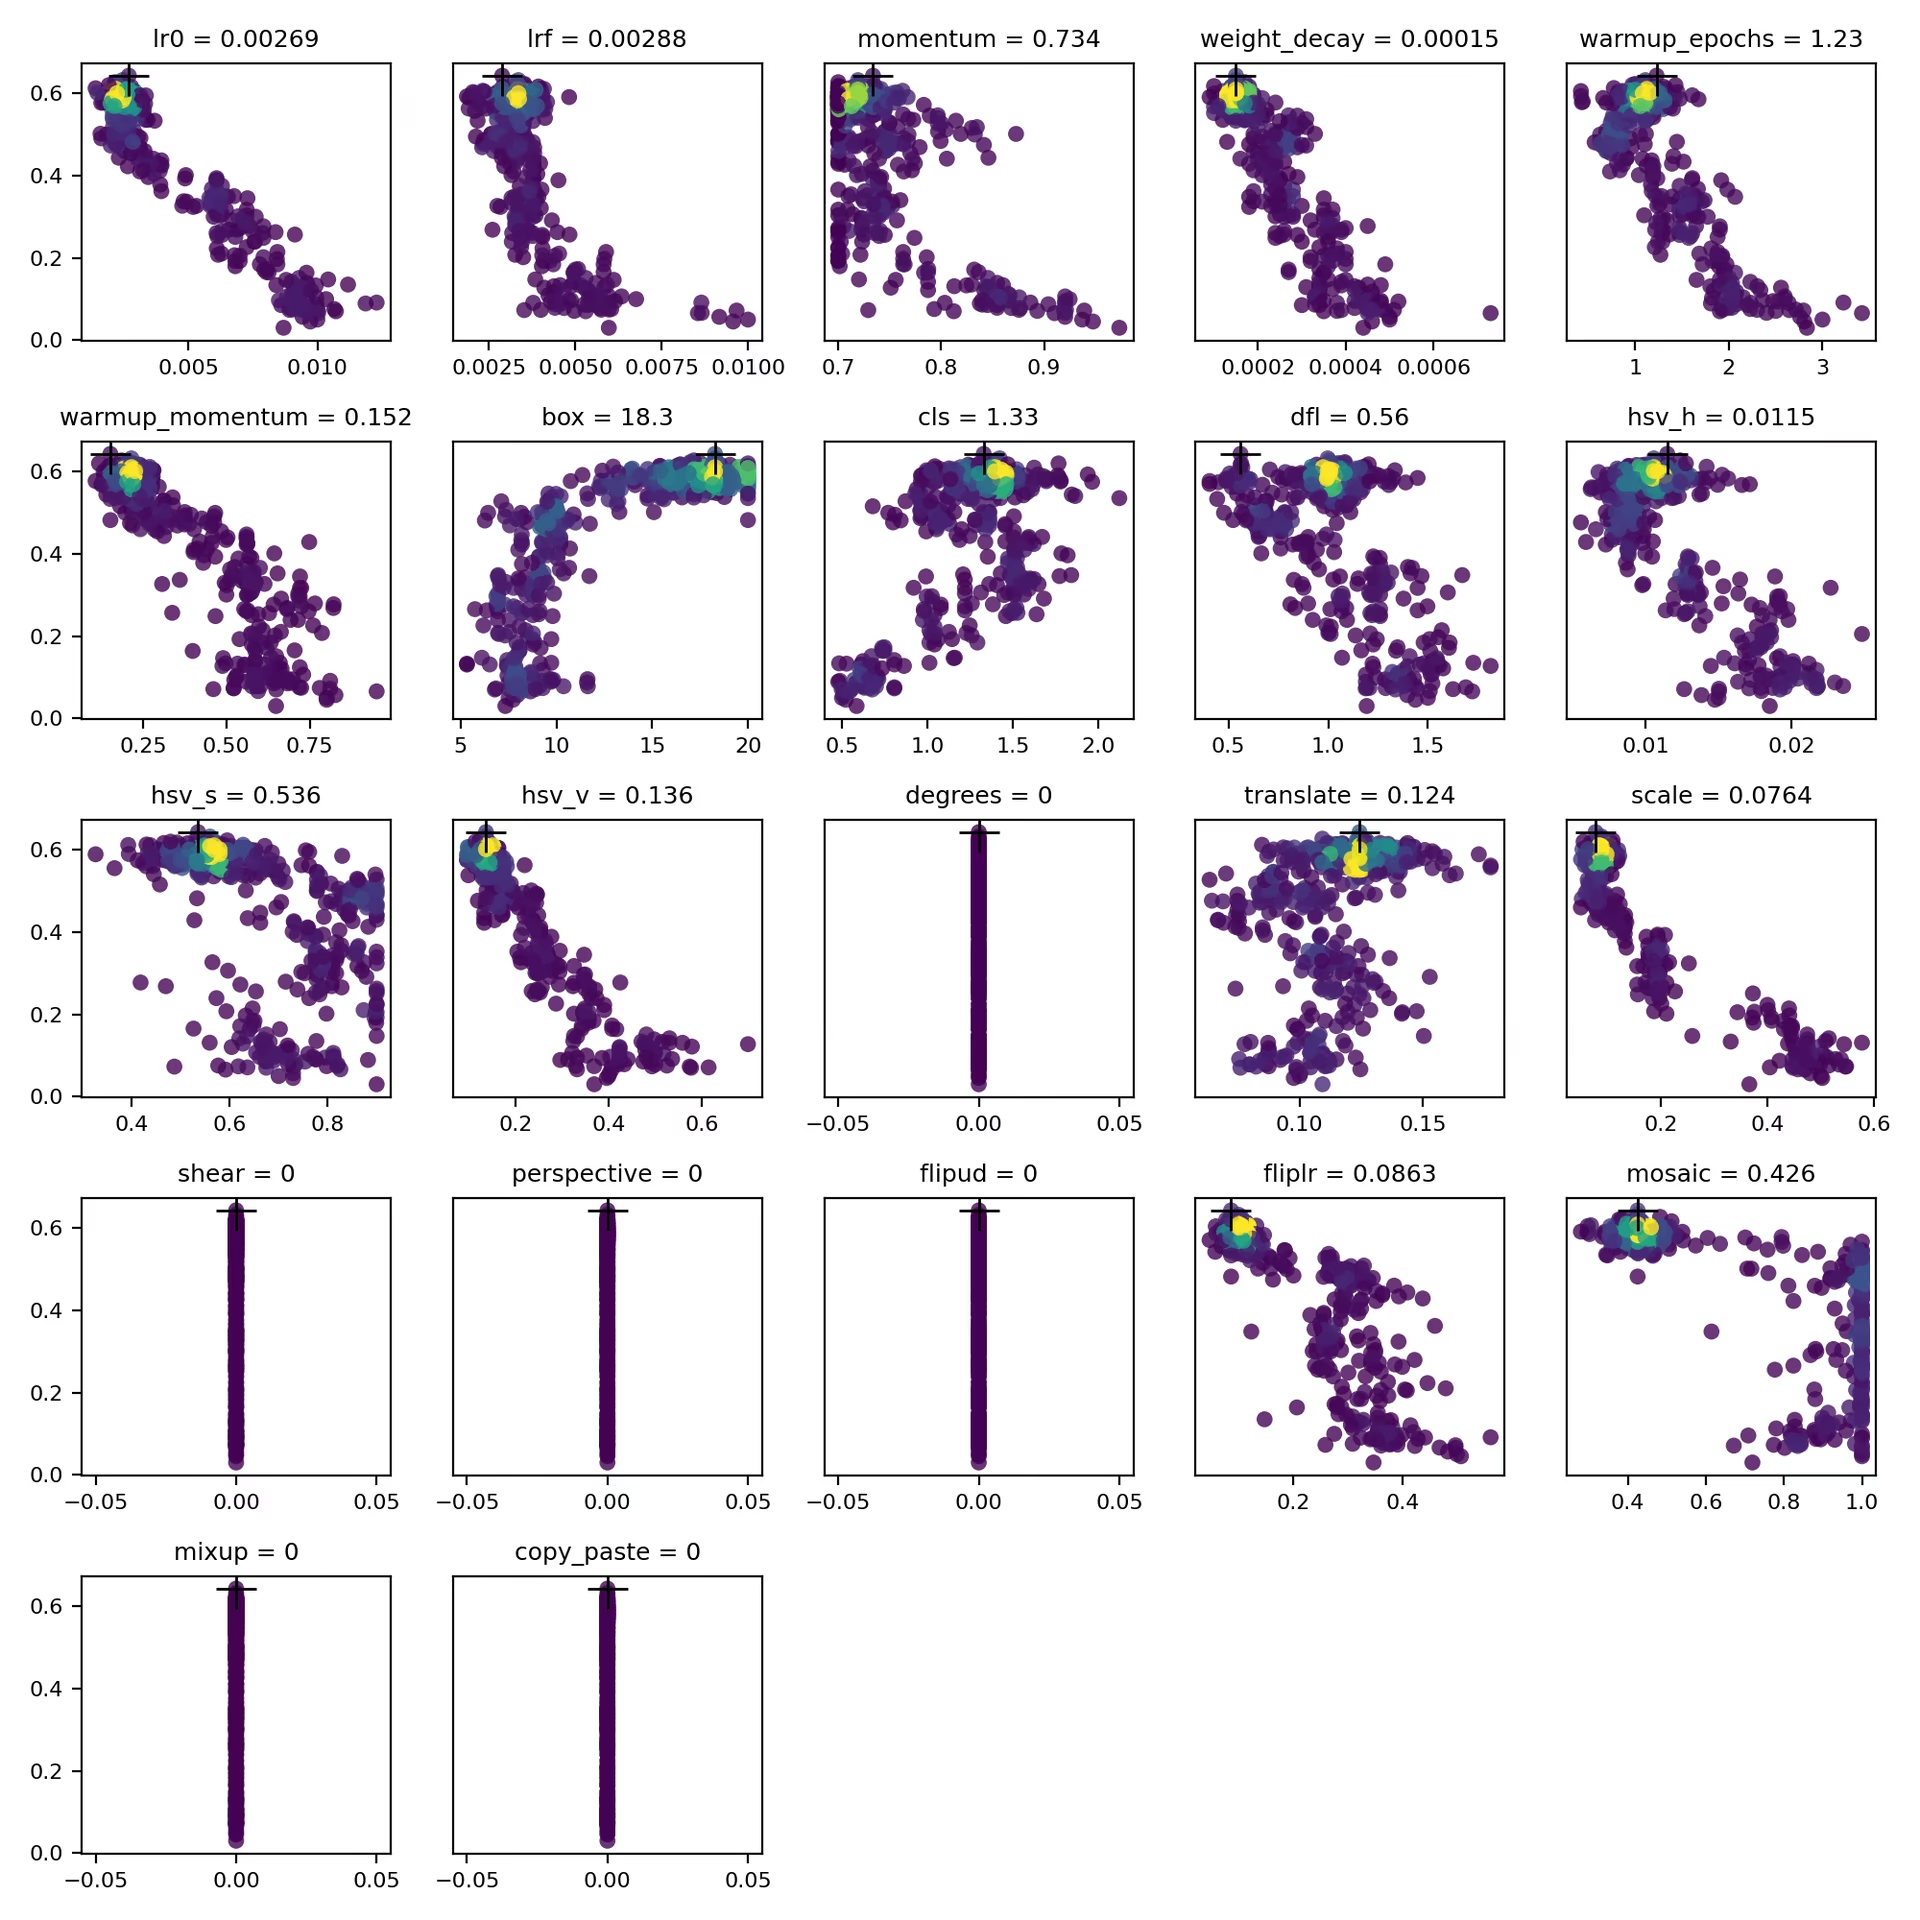
tune_scatter_plots.png#
이 파일에는 tune_results.ndjson에서 생성한 산점도가 포함되어 있어 다양한 하이퍼파라미터와 성능 지표 간의 관계를 확인할 수 있습니다. 변이에는 각 하이퍼파라미터에 설정된 범위가 사용되므로 degrees 및 shear와 같이 기본값이 0인 값도 변할 수 있습니다.
- 형식: PNG
- 용도: 탐색적 데이터 분석
weights/#
이 디렉터리에는 튜닝 실행에서 적합도가 가장 높았던 반복의 저장된 PyTorch 모델이 들어 있습니다. 두 파일은 모두 동일한 반복에서 생성됩니다:
last.pt: 해당 반복의 학습 실행에서 마지막 에포크의 가중치입니다.best.pt: 해당 반복의 학습 실행에서 적합도가 가장 높았던 에포크의 가중치입니다.
이러한 결과를 바탕으로 이후 모델 학습과 분석에 대해 더 정확한 결정을 내릴 수 있습니다.
결론#
Ultralytics YOLO의 하이퍼파라미터 튜닝은 시작하기 쉽고 내부적으로 강력한 기능을 제공합니다. 유전 알고리즘에서 적합도 가중 선택과 범위 정규화 돌연변이를 사용합니다. 이 가이드에 설명된 반복 과정을 따르면 모델을 체계적으로 튜닝해 성능을 향상시킨 다음, 결과로 얻은 best_hyperparameters.yaml을 재사용해 향후 학습 실행을 초기화할 수 있습니다. 병렬 시험과 고급 검색 알고리즘을 활용해 튜닝 규모를 확장하려면 Ray Tune 통합 가이드를 계속 살펴보거나, 클라우드 학습을 통해 Ultralytics Platform에서 하이퍼파라미터를 구성하고 실시간 메트릭을 추적하는 관리형 작업을 실행하세요.
레이어별 학습률이나 사용자 지정 적합도 메트릭처럼 인수로 설정할 수 없는 항목은 대신 트레이너를 서브클래싱하세요. 더 자세한 내용을 알아보려면 Tuner 클래스 소스 코드를 살펴보세요. 질문이나 기능 요청이 있으면 GitHub 또는 Discord로 문의해 주세요.
자주 묻는 질문#
lr0매개변수로 초기값을 설정하세요. 일반적으로 값은0.001부터0.01까지이며, 튜닝 과정에서 값을 변이시켜 최적값을 찾습니다.model.tune()메서드로 이 과정을 자동화할 수 있습니다. 예를 들면 다음과 같습니다.예제from ultralytics import YOLO # YOLO 모델 초기화 model = YOLO("yolo26n.pt") # COCO8에서 30에포크 동안 하이퍼파라미터 튜닝 model.tune(data="coco8.yaml", epochs=30, iterations=300, optimizer="AdamW", plots=False, save=False, val=False)자세한 내용은 Ultralytics YOLO 구성 페이지를 확인하세요.
유전 알고리즘은 수동으로 시행착오를 거치지 않고도 Ultralytics YOLO26이 하이퍼파라미터 공간을 효과적으로 탐색할 수 있도록 합니다. 주요 이점은 다음과 같습니다.
- 효율적인 검색: 적합도 가중 선택은 성능이 좋은 구성을 유지하고, 범위 정규화 돌연변이는 새로운 후보를 탐색합니다.
- 지역 최솟값 회피: 무작위 변이를 통해 순전히 탐욕적인 탐색이 빠질 수 있는 지역 최솟값에서 벗어날 수 있습니다.
- 성능 지표: 작업별 적합도 점수(객체 탐지의 경우 mAP50-95)를 기준으로 달라집니다.
유전 알고리즘이 하이퍼파라미터를 최적화하는 방법을 알아보려면 하이퍼파라미터 진화 가이드를 확인하세요.
Ultralytics YOLO의 하이퍼파라미터 튜닝에 필요한 시간은 데이터셋 크기, 모델 아키텍처의 복잡도, 반복 횟수, 사용 가능한 컴퓨팅 리소스 등 여러 요인에 따라 크게 달라집니다. 예를 들어 COCO8과 같은 데이터셋에서 YOLO26n을 30 epoch 동안 튜닝하는 데는 하드웨어에 따라 몇 시간에서 며칠까지 걸릴 수 있습니다.
튜닝 시간을 효과적으로 관리하려면 하이퍼파라미터 튜닝 준비에서 설명한 것처럼 사전에 명확한 튜닝 예산을 설정하세요. 이를 통해 리소스 할당과 최적화 목표의 균형을 맞출 수 있습니다.


댓글152
질문을 하거나 결과를 공유하거나 다른 사람을 도와주세요.
GengBin414(수정됨)
I tuned my defect detection dataset ,which are composed of 8000+ images, this is my tune code: model.tune( data="../data/data20260420_line_scan_merged_6ch.yaml", epochs=300, iterations=300, #space=search_space, #optimizer="AdamW", optimizer="MuSGD", lr0=0.01, momentum=0.9, shear=1, degrees=1, perspective=0.0001, mixup=0.1, cutmix=0.1, batch=20 )
I got the best mAP 0.586 at iteration 5 after tuned 30+ iterations, then I retrain the dataset with the following code: model.train( data="../data/data20260420_line_scan_merged_6ch.yaml", epochs=300, batch=20, imgsz=640, device=0, workers=16, optimizer="MuSGD", lr0=0.00721, lrf=0.01267, momentum=0.81816, weight_decay=0.00077, warmup_epochs=3.31429, warmup_momentum=0.95, box=7.11682, cls=0.48318, dfl=0.9397, hsv_h=0.00364, hsv_s=0.9, hsv_v=0.29751, degrees=0.99922, translate=0.07662, scale=0.51303, shear=0.76723, perspective=0.0, flipud=0.00019, fliplr=0.57639, bgr=0.00634, mosaic=0.62424, mixup=0.11307, cutmix=0.13007, copy_paste=0.00583, close_mosaic=10 #cfg="best_hyperparameters_map0.586.yaml" )
I copied the hyperparameters from best_hyperparameters_map0.586.yaml, but I got the best mAP 0.568, what cause the discrepancy?Can sb help me out? Thanks.
 Glenn JocherUltralytics
A small gap like
0.586 -> 0.568is usually expected becausetune()saves the best single stochastic run, while your latertrain()is a fresh run with different randomness and augmentation order; please first validate the tuning checkpointruns/detect/tune/weights/best.pt, then retrain with the exact same args plusseed=0anddeterministic=True, and make sure you are comparing the same metric (fitness/mAP50-95) described in the Hyperparameter Tuning guide. If the gap still looks too large, please share the text output from validating that checkpoint and the matching row fromtune_results.ndjsonhere in Discussions so the team can compare them directly.Thank you for your timely reply, I validated the tuning checkpoint, here is the text output from validating that checkpoint: (yolo26) ps@ps:~/Desktop/GB/ultralytics$ python val.py Ultralytics 8.4.26 🚀 Python-3.11.15 torch-2.5.1 CUDA:0 (NVIDIA GeForce RTX 4090 D, 24208MiB) YOLO26x summary (fused): 190 layers, 55,645,380 parameters, 0 gradients, 193.9 GFLOPs val: Fast image access ✅ (ping: 0.0±0.0 ms, read: 10744.4±1424.6 MB/s, size: 734.1 KB) val: Scanning /home/ps/Desktop/GB/ultralytics/datasets/Merged_6Chanel_20260420/imagesH/val.cache... 786 images, 47 backgrounds, 0 corrupt: 100% ━━━━━━━━━━━━ 786/786 412.1Mit/s 0.0s Class Images Instances Box(P R mAP50 mAP50-95): 100% ━━━━━━━━━━━━ 50/50 6.9it/s 7.2s all 786 1363 0.843 0.69 0.765 0.585 black 45 47 0.914 0.677 0.828 0.648 crack 120 145 0.681 0.517 0.55 0.334 edge 184 195 0.916 0.899 0.94 0.833 line 116 147 0.809 0.646 0.736 0.544 pit 73 89 0.775 0.543 0.642 0.447 raw 279 318 0.861 0.745 0.81 0.644 white 95 106 0.9 0.623 0.712 0.46 yellow 299 316 0.884 0.873 0.9 0.773 Speed: 0.9ms preprocess, 7.3ms inference, 0.0ms loss, 0.0ms postprocess per image Results saved to /home/ps/Desktop/GB/ultralytics/runs/detect/val81
I checked my retrain args, it show that seed=0 and deterministic=True already set: python train.py New https://pypi.org/project/ultralytics/8.4.53 available 😃 Update with 'pip install -U ultralytics' Ultralytics 8.4.26 🚀 Python-3.11.15 torch-2.5.1 CUDA:0 (NVIDIA GeForce RTX 4090 D, 24208MiB) engine/trainer: agnostic_nms=False, amp=True, angle=1.0, augment=False, auto_augment=randaugment, batch=20, bgr=0.00634, box=7.11682, cache=False, cfg=None, classes=None, close_mosaic=10, cls=0.48318, compile=False, conf=None, copy_paste=0.00583, copy_paste_mode=flip, cos_lr=False, cutmix=0.13007, data=../data/data20260420_line_scan_merged_6ch.yaml, degrees=0.99922, deterministic=True, device=0, dfl=0.9397, dnn=False, dropout=0.0, dynamic=False, embed=None, end2end=None, epochs=500, erasing=0.4, exist_ok=False, fliplr=0.57639, flipud=0.00019, format=torchscript, fraction=1.0, freeze=None, half=False, hsv_h=0.00364, hsv_s=0.9, hsv_v=0.29751, imgsz=640, int8=False, iou=0.7, keras=False, kobj=1.0, line_width=None, lr0=0.00721, lrf=0.01267, mask_ratio=4, max_det=300, mixup=0.11307, mode=train, model=yolo26x.pt, momentum=0.81816, mosaic=0.62424, multi_scale=0.0, name=train137, nbs=64, nms=False, opset=None, optimize=False, optimizer=MuSGD, overlap_mask=True, patience=100, perspective=0.0, plots=True, pose=12.0, pretrained=True, profile=False, project=None, rect=False, resume=False, retina_masks=False, rle=1.0, save=True, save_conf=False, save_crop=False, save_dir=/home/ps/Desktop/GB/ultralytics/runs/detect/train137, save_frames=False, save_json=False, save_period=-1, save_txt=False, scale=0.51303, seed=0, shear=0.76723, show=False, show_boxes=True, show_conf=True, show_labels=True, simplify=True, single_cls=False, source=None, split=val, stream_buffer=False, task=detect, time=None, tracker=botsort.yaml, translate=0.07662, val=True, verbose=True, vid_stride=1, visualize=False, warmup_bias_lr=0.1, warmup_epochs=3.31429, warmup_momentum=0.95, weight_decay=0.00077, workers=16, workspace=None
And here is the train output: Epoch GPU_mem box_loss cls_loss dfl_loss Instances Size 260/300 20.8G 0.4503 0.4947 0.004246 50 640: 100% ━━━━━━━━━━━━ 354/354 2.7it/s 2:10 Class Images Instances Box(P R mAP50 mAP50-95): 100% ━━━━━━━━━━━━ 20/20 4.5it/s 4.4s all 786 1363 0.841 0.682 0.751 0.564 EarlyStopping: Training stopped early as no improvement observed in last 100 epochs. Best results observed at epoch 160, best model saved as best.pt. To update EarlyStopping(patience=100) pass a new patience value, i.e.
patience=300or usepatience=0to disable EarlyStopping.260 epochs completed in 9.792 hours. Optimizer stripped from /home/ps/Desktop/GB/ultralytics/runs/detect/train138/weights/last.pt, 118.4MB Optimizer stripped from /home/ps/Desktop/GB/ultralytics/runs/detect/train138/weights/best.pt, 118.4MB
Validating /home/ps/Desktop/GB/ultralytics/runs/detect/train138/weights/best.pt... Ultralytics 8.4.26 🚀 Python-3.11.15 torch-2.5.1 CUDA:0 (NVIDIA GeForce RTX 4090 D, 24208MiB) YOLO26x summary (fused): 190 layers, 55,645,380 parameters, 0 gradients, 193.9 GFLOPs Class Images Instances Box(P R mAP50 mAP50-95): 100% ━━━━━━━━━━━━ 20/20 4.9it/s 4.1s all 786 1363 0.826 0.685 0.758 0.568 black 45 47 0.882 0.634 0.773 0.579 crack 120 145 0.675 0.559 0.577 0.314 edge 184 195 0.925 0.885 0.949 0.824 line 116 147 0.785 0.667 0.714 0.52 pit 73 89 0.84 0.528 0.662 0.447 raw 279 318 0.812 0.72 0.804 0.638 white 95 106 0.802 0.611 0.674 0.434 yellow 299 316 0.888 0.877 0.911 0.787 Speed: 0.1ms preprocess, 4.4ms inference, 0.0ms loss, 0.0ms postprocess per image Results saved to /home/ps/Desktop/GB/ultralytics/runs/detect/train138
And I don't know where to find tune_results.ndjson mentioned in your reply. I guess you mean the matching row from tune_results.csv then here is: fitness lr0 lrf momentum weight_decay warmup_epochs warmup_momentum box cls dfl hsv_h hsv_s hsv_v degrees translate scale shear perspective flipud fliplr bgr mosaic mixup cutmix copy_paste close_mosaic 0.58582 0.00721 0.01267 0.81816 0.00077 3.31429 0.95 7.11682 0.48318 0.9397 0.00364 0.9 0.29751 0.99922 0.07662 0.51303 0.76723 0 0.00019 0.57639 0.00634 0.62424 0.11307 0.13007 0.00583 10
- Glenn JocherUltralytics
The main issue I see is that your retrain is not matching the tuned trial: the runtime log shows
epochs=500rather than300, so the schedule driven bylr0andlrfis different and that alone can explain0.585 -> 0.568; the current Hyperparameter Tuning guide writestune_results.ndjsonunderruns/detect/tune/, but in your older8.4.26install the equivalent may betune_results.csv, so please rerun with the exact runtime args from the best trial, especiallyepochs=300and the samepatience, and if it still printsepochs=500then another override is being applied. Sorry, after hyperparameter tuning, I retrained first with epochs=500, observed mAP=0.57, then I changed epochs=300, observed mAP=0.568. In the previous reply, I mistakenly copied the retrain args from the epochs=500 run. But the train output is correctly copied from the epochs=300 run, you can tell this out from the EarlyStopping output: Epoch GPU_mem box_loss cls_loss dfl_loss Instances Size 260/300 20.8G 0.4503 0.4947 0.004246 50 640: 100% ━━━━━━━━━━━━ 354/354 2.7it/s 2:10 Class Images Instances Box(P R mAP50 mAP50-95): 100% ━━━━━━━━━━━━ 20/20 4.5it/s 4.4s all 786 1363 0.841 0.682 0.751 0.564 EarlyStopping: Training stopped early as no improvement observed in last 100 epochs. Best results observed at epoch 160, best model saved as best.pt. To update EarlyStopping(patience=100) pass a new patience value, i.e. patience=300 or use patience=0 to disable EarlyStopping.
And the retrain args of the epochs=300 run, it shows that seed=0 and deterministic=True already set: python train.py New https://pypi.org/project/ultralytics/8.4.53 available 😃 Update with 'pip install -U ultralytics' Ultralytics 8.4.26 🚀 Python-3.11.15 torch-2.5.1 CUDA:0 (NVIDIA GeForce RTX 4090 D, 24208MiB) engine/trainer: agnostic_nms=False, amp=True, angle=1.0, augment=False, auto_augment=randaugment, batch=20, bgr=0.00634, box=7.11682, cache=False, cfg=None, classes=None, close_mosaic=10, cls=0.48318, compile=False, conf=None, copy_paste=0.00583, copy_paste_mode=flip, cos_lr=False, cutmix=0.13007, data=../data/data20260420_line_scan_merged_6ch.yaml, degrees=0.99922, deterministic=True, device=0, dfl=0.9397, dnn=False, dropout=0.0, dynamic=False, embed=None, end2end=None, epochs=300, erasing=0.4, exist_ok=False, fliplr=0.57639, flipud=0.00019, format=torchscript, fraction=1.0, freeze=None, half=False, hsv_h=0.00364, hsv_s=0.9, hsv_v=0.29751, imgsz=640, int8=False, iou=0.7, keras=False, kobj=1.0, line_width=None, lr0=0.00721, lrf=0.01267, mask_ratio=4, max_det=300, mixup=0.11307, mode=train, model=yolo26x.pt, momentum=0.81816, mosaic=0.62424, multi_scale=0.0, name=train138, nbs=64, nms=False, opset=None, optimize=False, optimizer=MuSGD, overlap_mask=True, patience=100, perspective=0.0, plots=True, pose=12.0, pretrained=True, profile=False, project=None, rect=False, resume=False, retina_masks=False, rle=1.0, save=True, save_conf=False, save_crop=False, save_dir=/home/ps/Desktop/GB/ultralytics/runs/detect/train138, save_frames=False, save_json=False, save_period=-1, save_txt=False, scale=0.51303, seed=0, shear=0.76723, show=False, show_boxes=True, show_conf=True, show_labels=True, simplify=True, single_cls=False, source=None, split=val, stream_buffer=False, task=detect, time=None, tracker=botsort.yaml, translate=0.07662, val=True, verbose=True, vid_stride=1, visualize=False, warmup_bias_lr=0.1, warmup_epochs=3.31429, warmup_momentum=0.95, weight_decay=0.00077, workers=16, workspace=None
 Murat Raimbekov
quick check on what is likely going on, framed generally: tune saves the best of N stochastic trials, and a single retrain is one new stochastic draw with the same hyperparameters. bit-exact reproduction between the two is not guaranteed even with
seed=0, deterministic=True. ourinit_seeds(deterministic=True)setstorch.use_deterministic_algorithms(True, warn_only=True)inultralytics/utils/torch_utils.py, matching the pytorch reproducibility notes - cuda ops without a deterministic alternative still run non-deterministically with just a warning. over many epochs on a real dataset that variance can compound.a few practical takeaways before assuming the gap is a tuning bug:
- your trial weights at
runs/detect/tune/weights/best.ptalready validate to 0.585, so the trial result is real and reusable - if you need exactly that performance for deployment, use that checkpoint directly. - the recommended way to reuse tuned hyperparameters in a fresh train run is
cfg="runs/detect/tune/best_hyperparameters.yaml"(the commented-out line in your script). that file contains the exact values the trial used and matches the workflow described in the hyperparameter tuning guide. - to bound run-to-run variance, retrain a few times with
seed=0,seed=1,seed=2and compare the mean against the tune's reported best, not a single retrain.
unrelated, you are on ultralytics 8.4.26 and the current release is 8.4.53; for new tuning runs it is worth updating.
- your trial weights at
 User
Hi, I have a question about Hyperparameter Tuning. What value of
epochsanditerationsshould I pass to model.tune(). Default value of epochs is 100, and iterations is 10. Are the default values OK, or should I change them ? My dataset is about 10,000 images.- Glenn JocherUltralytics
For a 10k-image dataset, the defaults are fine for a quick sanity check, but for useful tuning you should set
epochsclose to your real training length becauseepochsis per trial, whileiterationsis how many different trials are tested; a practical starting point isepochs=50to100withiterations=30to100depending on your compute budget, then retrain once with the best settings frombest_hyperparameters.yamlas shown in the Hyperparameter Tuning guide.1 - User
Thank you very much ! I will try to search the best hyperparameters !
- Glenn JocherUltralytics
You're welcome — sounds good; if anything looks off during tuning, please share your
model.tune()call plus the resultingbest_hyperparameters.yamlortune_results.ndjsonhere, and we can help compare it against the expected outputs in the Hyperparameter Tuning guide.
harunemrekiran61
You’ve shown the box range as 0.02 to 0.2, but the default value appears to be 7.5. Is there a mistake here? Could you please check?
- Glenn JocherUltralytics
Good catch —
boxis a loss gain (default7.5during training), so the0.02–0.2range shown in the docs table is outdated/incorrect; the current built-in tuner boundsboxto1.0–20.0(see the Tuner class reference), and you can always override it viaspace={...}as shown in the Hyperparameter Tuning guide.
Larry-zhai
How can I directly apply the optimized best_hyperparameters.yaml to my training? In fact, when I use code similar to the following: from ultralytics import YOLO model = YOLO("yolov8n.pt") model.train(data="data.yaml", hyp="hyp.yaml") an error occurs: SyntaxError: 'hyp' is not a valid YOLO argument.
 J.Q. Pan
Hi I have used the above code to apply the tuning but neither the diagram nor the models will be saved. I only get a single tune folder with all tuning details. I may ask if someone else has also the same problem.
BrianNieuwenhuis
When running the code below the model.tune() call does not recognize my model specification. Could someone explain to me what I am doing wrong. I am using model.overrides so that I can also tune the shear and perspective parameters that are otherwise initialized at 0.
from ultralytics import YOLO import wandb from ultralytics import settings settings.update({"wandb": True})
import argparse
def main(): # parse command-line args if needed parser = argparse.ArgumentParser() parser.add_argument("--gpus", type=int, default=1) parser.add_argument("--workers", type=int, default=4) args = parser.parse_args()
# Define a YOLO model
model = YOLO("yolo11x.pt")

# Dynamically assign GPUs based on --gpus argument
device = list(range(args.gpus))  # e.g., [0, 1, 2, 3] if args.gpus = 4

# Define search space
search_space = {
    "lr0": (1e-5, 1e-1),
    "lrf": (0.01, 1.0),
    "momentum": (0.6, 0.98),
    "weight_decay": (0.0, 0.001),
    "warmup_epochs": (0, 5),
    "warmup_momentum": (0.0,0.95),
    "box": (0.02, 0.2),
    "cls": (0.2, 4.0),
    "hsv_h": (0.0, 0.1),
    "hsv_s": (0.0, 0.9),
    "hsv_v": (0.0, 0.9),
    "translate":(0.0, 0.9),
    "scale": (0.0, 0.9),
    "shear": (0.0, 10.0),
    "perspective": (0.0, 0.001),
    "mosaic": (0.0,1.0),
    "mixup": (0.0, 1.0),
    "copy_paste": (0.0, 1.0)
}

# Manually initialize certain hperparameters that would not be tuned otherwise
model.overrides = {
    'shear': 1,
    'perspective': 0.001,
    'mixup': 0.01,
    'copy_paste' : 0.01,

}

# tune the model
results = model.tune(project='./tune/crop1344',name="tune_default_batch16_v100", use_ray = False,
    data="data.yaml",
    #hyp="custom_hyp.yaml", # this does not seem to work work for tune scripts!!
    batch = 16,
    imgsz = 1344,
    device = device,
    workers = args.workers,

    degrees = 180, #these parameters are fixed in the model tune
    flipud = 0.5,
    fliplr = 0.5,
    bgr = 0,
    auto_augment = None,
    #erasing = 0,

    epochs = 100,
    iterations=10,
    space=search_space,
    optimizer="AdamW",
    resume=False,  #start over or resume previous checkpoint
    plots=False,  # don't make plots etc to save time until last timepoint
    save=False,
    val=False,
    verbose=False)
if name == "main": main()
yyagmurkyaa
Hello again, I have trained new models using the parameters you provided and by organizing my datasets. However, a common issue across all of them is that the models mistakenly classify objects like myself or nearby computer screens as the traffic sign "turn right ahead" (which is one of the labeled classes in my dataset). I have checked my dataset and confirmed that there are no such unrelated objects in the background.
Additionally, the models sometimes confuse left and right directional signs.
Why might these errors be occurring, and how can I fix them? Thank you in advance for your help.
- Glenn JocherUltralytics(수정됨)
@Fatima-khanjar to balance precision and recall in your over-predicting model, try these adjustments:
- Increase confidence threshold during inference (not training) to filter out low-confidence predictions
- Adjust IoU threshold in NMS to reduce duplicate detections
- Increase classification loss weight with
cls=1.0or higher to improve class discrimination - Check annotation quality in your dataset, especially for small or ambiguous objects
- Add hard negative examples to your dataset - images with objects similar to your classes but not actually part of them
These changes should help improve precision without significantly sacrificing your excellent recall. For implementation details, see our NMS documentation for confidence thresholding examples.
@yyagmurkyaa for your traffic sign confusion issues:
-
For the model detecting unrelated objects as "turn right ahead" signs:
- Add "hard negative" examples to your training set (images with computers, people, but no traffic signs)
- Increase
cls=1.0or higher to improve classification accuracy - Check if the "turn right ahead" sign has visual similarities to these false positives
-
For left/right confusion:
- Create specific augmentations for directional signs without flipping (as you noted)
- Ensure balanced examples of both directional types
- Consider using a slightly larger model like YOLO26m for better feature discrimination
These targeted adjustments should help address the specific confusion patterns you're seeing.
Fatima-khanjar
Hello again!!
First of all, thank you so much for your help @glenn-jocher __ you've truly helped me a lot, and I really appreciate it!
I have a question regarding fine-tuning a pre-trained YOLO model (e.g., trained on the COCO dataset) for my custom use case. My dataset includes a combination of both new classes (not present in COCO) and some of the existing COCO classes , but with different layouts or contexts.
What I’d like to do is the following:
Add my new classes starting from index 80, while still leveraging the pre-trained weights for the existing COCO classes.
Ideally, I want to preserve the learned knowledge for the COCO classes (especially the ones shared with my dataset), and only train the model further on the new classes.
Is it possible to:
Fine-tune the model in such a way that it uses the pre-trained weights for the common classes, and only learns new classes from scratch starting from a different index?
Retain and benefit from the original COCO knowledge while introducing and training on new class definitions?
Also, I’ve noticed that when I fine-tune a pre-trained model and define my own data.yaml file — completely different from coco.yaml — I redefine the class names and indexes based on my custom dataset, completely removing the COCO classes not present in my data. In this case, what really happens during fine-tuning or transfer learning under the hood? Is the model discarding unused class weights? Are shared class weights still used effectively?
I'd greatly appreciate any clarification or guidance on how to approach this setup properly.
Best regards,
- Glenn JocherUltralytics
@Fatima-khanjar great question about fine-tuning with mixed COCO and custom classes!
Yes, you can leverage pre-trained COCO weights while adding new classes. Here's how:
-
When fine-tuning a YOLO model, the model's detection head is automatically resized to accommodate your new class count. The weights for existing classes are preserved where possible.
-
For classes that overlap with COCO, the model will leverage transfer learning from those pre-trained weights, while new classes will be initialized with random weights.
-
You don't need to explicitly start from index 80 - just define your classes in your data.yaml file, and the model will handle the mapping automatically.
-
During fine-tuning, the model doesn't discard unused class weights but rather reshapes the classification head to match your class count. Weights for classes that exist in both datasets are transferred and further optimized for your specific data.
For best results with mixed classes, I recommend using a smaller learning rate initially (e.g.,
lr0=0.001) to preserve the knowledge in the pre-trained weights while allowing the model to adapt to your new classes. -
Hello! @glenn-jocher thank you so much for your explanation!
I have a follow-up question regarding class index matching. Let's say the person class in the COCO dataset is indexed as 0, but in my data.yaml file, I assign person to index 5. In this case, the model will not treat the person at index 5 as the same class as COCO’s index 0, correct?
So, to benefit from the pretrained weights of shared classes, do the class indices in my custom dataset need to match the COCO indices exactly?
Best regards,
- Glenn JocherUltralytics(수정됨)
@Fatima-khanjar you're asking a crucial question about class mapping during transfer learning!
You no longer need to keep COCO's class indices. With
cls_remap=True(the default), training copies the pretrained classification-head rows by class name, so a class such aspersonkeeps its pretrained weights at whatever index it has in your dataset, while new classes such astraffic_signstart from fresh weights. Training printsRemapped N/M cls head rows from pretrained weights by class namewhen rows are copied, andcls_remap=Falsedisables it. For example, thisdata.yamlworks:names: 0: person 1: car 2: traffic_signJust make sure the shared classes use the same names as in COCO. See the Fine-Tuning Guide for details.
@glenn-jocher Hello again!!!
Thank you so much for your clarification! I have a quick follow-up question.
Let’s say the COCO dataset defines the following class indices in its YAML file: 0: person, 2: car, 3: cat.
In my own dataset, I share only the person and car classes with COCO — I don’t want to include cat. If I define my shared classes using the same indices as COCO (i.e., 0: person, 2: car), but then replace the COCO class cat at index 3 with a new class (e.g., 3: animal), will I still benefit from the pretrained weights for the shared classes (person and car)?
Or will assigning a new class at an index previously used by COCO (like 3) cause any issues?
best regards,
- Glenn JocherUltralytics(수정됨)
@Fatima-khanjar great question about reusing COCO indices for new classes!
With
cls_remap=True(the default), pretrained classification-head rows are matched by class name, not by index. Shared classes such aspersonandcarkeep their pretrained weights wherever they sit in your dataset. A new class like "animal" at index 3 does not inherit the pretrained "cat" row, because the names do not match, so it starts from fresh weights. Reusing a COCO index therefore neither helps nor hurts the shared classes.If a new class is close to a pretrained one, give it that class's name so its row is copied. Using a lower learning rate initially (e.g.,
lr0=0.001) also helps preserve the pretrained features while the model adapts to your new classes.1
Thank you for your feedback. I trained my dataset using YOLOv11s. Although I didn’t experience severe overfitting with the current parameters, I couldn’t achieve optimal performance either. Some traffic signs were misclassified or not detected at all.
While searching for the best hyperparameters, I realized that I hadn't applied data augmentation—except for the flip parameter. I have an example parameter file, and I plan to include all relevant augmentation options except for flipping.
I would really appreciate your help in finding the most suitable parameters for my dataset, as I’m planning to participate in a competition soon. I need to enhance my model by adjusting the parameters properly to achieve the best possible performance.
Thank you in advance for your support.
On Sun, Apr 20, 2025 at 1:51 PM phatima khanjar @.***> wrote:
Hello,
I hope this message finds you well.
image.png (view on web) https://github.com/user-attachments/assets/be6db84b-fe0d-4356-ba77-9b4426c253ee
I fine-tuned YOLOv11s on my custom dataset, which is relatively small (1,156 images split into 75% training, 15% validation, and 10% test). The dataset consists of 41 classes, with each class containing between 200 and 300 images. I experimented with three different sets of hyperparameters: the default values, those optimized using Ray Tune, and others obtained through a Genetic Algorithm. In all cases, I observed oscillations in the validation dfl and box losses, which may indicate signs of overfitting. I would appreciate any suggestions or insights on how to address this issue, particularly given the small size of the dataset, and how to improve model generalization.
best regards,
— Reply to this email directly, view it on GitHub https://github.com/orgs/ultralytics/discussions/9536#discussioncomment-12889695, or unsubscribe https://github.com/notifications/unsubscribe-auth/BPQ7ZLAQ2G7ZL434FN3WFYD22N345AVCNFSM6AAAAABFVXPSL2VHI2DSMVQWIX3LMV43URDJONRXK43TNFXW4Q3PNVWWK3TUHMYTEOBYHE3DSNI . You are receiving this because you were mentioned.Message ID: @.*** com>
- Glenn JocherUltralytics(수정됨)
@yyagmurkyaa for traffic sign detection and classification with YOLO26s, I recommend focusing on these specific augmentation and training parameters:
from ultralytics import YOLO

model = YOLO("yolo26s.pt")
model.train(
    data="your_traffic_signs.yaml",
    epochs=100,
    patience=25,
    batch=16,
    imgsz=640,  # Consider 800+ for small traffic signs
    hsv_h=0.015,  # Color augmentation helps with varying lighting conditions
    hsv_s=0.7,
    hsv_v=0.4,
    scale=0.5,  # Scale augmentation critical for varying distances
    translate=0.1,  # Helps with signs at different positions
    mosaic=1.0,  # Excellent for object detection tasks
    mixup=0.1,  # Light mixup can help with generalization
    perspective=0.0005,  # Slight perspective change for different viewing angles
    weight_decay=0.0005,  # Regularization to reduce overfitting
    optimizer="AdamW",
    lr0=0.001,
    lrf=0.01,
    cos_lr=True  # Cosine learning rate scheduler
)
For traffic sign detection specifically:
- Increase image size to better detect small signs
- Focus on color-preserving augmentations as colors are critical for traffic signs
- Use perspective transformations to simulate different viewing angles
- Enable strong scale/translate augmentations to handle varying distances
Consider running
model.tune()with these parameters as starting points to find the optimal configuration for your competition. You might also need to address class imbalance if some signs appear less frequently in your dataset. You're very welcome! I wasn't expecting such a quick response either. I'm excited to hear that you'll be training with these parameters and look forward to seeing the results as soon as possible. Thank you again for your support!
- Glenn JocherUltralytics(수정됨)
@Fatima-khanjar for a small dataset (1,156 images) with 41 classes, oscillations in validation losses often indicate overfitting. Here are specific recommendations to improve generalization:
-
Strengthen regularization:
- Increase
weight_decayto 0.001-0.003 - Add dropout with
dropout=0.1to reduce co-adaptation
- Increase
-
Enhance data augmentation:
- Maximize augmentations:
mosaic=1.0,mixup=0.2,copy_paste=0.1 - Use strong geometric transforms:
translate=0.2,scale=0.5
- Maximize augmentations:
-
Training modifications:
- Reduce model complexity by using YOLO26n instead of YOLO26s
- Implement gradual unfreezing (
freezelayers at first) - Enable
cos_lr=Truefor smoother learning rate decay
-
Consider transfer learning modifications:
- Start with a model pre-trained on a domain similar to yours
- Use fewer epochs with higher
patiencefor early stopping
With 41 classes and limited samples per class, these techniques should help stabilize training and improve generalization. You might also benefit from training ensembles of multiple models if computational resources allow. For more details, refer to our Model Training Tips.
-
Hello,
Thank you for your advice! Your instructions have improved my model’s performance compared to before. I have now achieved the following metrics:
Mean Precision: 0.794 Mean Recall: 0.99 Mean F1 Score: 0.881 mAP@0.5: 0.938 mAP@0.5-0.95: 0.827
After analyzing these results, it seems that the model is over-predicting. Do you have any suggestions on how I can better balance precision and recall?
best regards,
Hello,
I hope this message finds you well.
I fine-tuned YOLOv11s on my custom dataset, which is relatively small (1,156 images split into 75% training, 15% validation, and 10% test). The dataset consists of 41 classes, with each class containing between 200 and 300 images. I experimented with three different sets of hyperparameters: the default values, those optimized using Ray Tune, and others obtained through a Genetic Algorithm. In all cases, I observed oscillations in the validation dfl and box losses, which may indicate signs of overfitting. I would appreciate any suggestions or insights on how to address this issue, particularly given the small size of the dataset, and how to improve model generalization.
best regards,
Hello, I am training a model using YOLOv11, and the dataset consists of traffic signs. There are 22 classes, and each class has 400 labeled images. I’m not sure what parameters I should use for training. What parameters should I set to prevent overfitting, and what are the correct values? Could you help me with this?
- Glenn JocherUltralytics(수정됨)
@yyagmurkyaa your dataset of 22 classes with 400 images per class should provide a good foundation for traffic sign detection. To prevent overfitting with YOLO26, I'd recommend:
- Start with hyperparameter tuning using the
model.tune()method to find optimal values:
from ultralytics import YOLO model = YOLO("yolo26n.pt") # Start with a smaller model for faster tuning model.tune( data="your_traffic_signs.yaml", epochs=30, iterations=100, weight_decay=0.0005, # Try higher values like 0.001-0.005 to increase regularization patience=15, # Early stopping val=True )-
Key hyperparameters to prevent overfitting:
- Increase
weight_decay(0.001-0.005) - Enable strong data augmentation (
hsv_h,hsv_s,translate,scale,fliplr,mosaic) - Use early stopping with reasonable
patience - Consider reducing model capacity (use n or s model variants)
- Increase
-
Monitor validation metrics to detect overfitting (when training accuracy continues improving but validation metrics plateau or decline)
The automated tuning process should help identify the optimal parameter values for your specific dataset. For more details, check out our Hyperparameter Tuning Guide.
- Start with hyperparameter tuning using the
Thank you for your feedback. I trained my dataset using YOLOv11s. Although I didn’t experience severe overfitting with the current parameters, I couldn’t achieve optimal performance either. Some traffic signs were misclassified or not detected at all.
While searching for the best hyperparameters, I realized that I hadn't applied data augmentation—except for the flip parameter. I have an example parameter file, and I plan to include all relevant augmentation options except for flipping.
I would really appreciate your help in finding the most suitable parameters for my dataset, as I’m planning to participate in a competition soon. I need to enhance my model by adjusting the parameters properly to achieve the best possible performance.
Thank you in advance for your support.