Explore Ultralytics YOLOv8
Overview#
YOLOv8 was released by Ultralytics on January 10, 2023, offering improved accuracy and speed over previous YOLO versions. Building upon those versions, YOLOv8 introduced new features and optimizations that made it a strong choice for object detection and other vision tasks across a wide range of applications. For new projects, Ultralytics recommends YOLO26.
Watch: Ultralytics YOLOv8 Model Overview
Explore and run YOLOv8 models directly on Ultralytics Platform.
Key Features of YOLOv8#
- Advanced Backbone and Neck Architectures: YOLOv8 employs state-of-the-art backbone and neck architectures, resulting in improved feature extraction and object detection performance.
- Anchor-free Split Ultralytics Head: YOLOv8 adopts an anchor-free split Ultralytics head, which contributes to better accuracy and a more efficient detection process compared to anchor-based approaches.
- Optimized Accuracy-Speed Tradeoff: With a focus on maintaining an optimal balance between accuracy and speed, YOLOv8 is suitable for real-time object detection tasks in diverse application areas.
- Variety of Pretrained Models: YOLOv8 offers a range of pretrained models to cater to various tasks and performance requirements, making it easier to find the right model for your specific use case.
Supported Tasks and Modes#
The YOLOv8 series offers a diverse range of models, each specialized for specific tasks in computer vision. These models are designed to cater to various requirements, from object detection to more complex tasks like instance segmentation, classification, pose/keypoints detection, and oriented object detection.
Each variant of the YOLOv8 series is optimized for its respective task. All variants support the Training, Validation, Inference, and Export modes, covering every stage from development to deployment.
| Model | Filenames | Task | Training | Validation | Inference | Export |
|---|---|---|---|---|---|---|
| YOLOv8 | yolov8n.pt yolov8s.pt yolov8m.pt yolov8l.pt yolov8x.pt | Detection | ✅ | ✅ | ✅ | ✅ |
| YOLOv8-seg | yolov8n-seg.pt yolov8s-seg.pt yolov8m-seg.pt yolov8l-seg.pt yolov8x-seg.pt | Instance Segmentation | ✅ | ✅ | ✅ | ✅ |
| YOLOv8-cls | yolov8n-cls.pt yolov8s-cls.pt yolov8m-cls.pt yolov8l-cls.pt yolov8x-cls.pt | Classification | ✅ | ✅ | ✅ | ✅ |
| YOLOv8-pose | yolov8n-pose.pt yolov8s-pose.pt yolov8m-pose.pt yolov8l-pose.pt yolov8x-pose.pt yolov8x-pose-p6.pt | Pose/Keypoints | ✅ | ✅ | ✅ | ✅ |
| YOLOv8-obb | yolov8n-obb.pt yolov8s-obb.pt yolov8m-obb.pt yolov8l-obb.pt yolov8x-obb.pt | Oriented Detection | ✅ | ✅ | ✅ | ✅ |
This table summarizes the YOLOv8 model variants, the task each one performs, and their support for the Training, Validation, Inference, and Export modes.
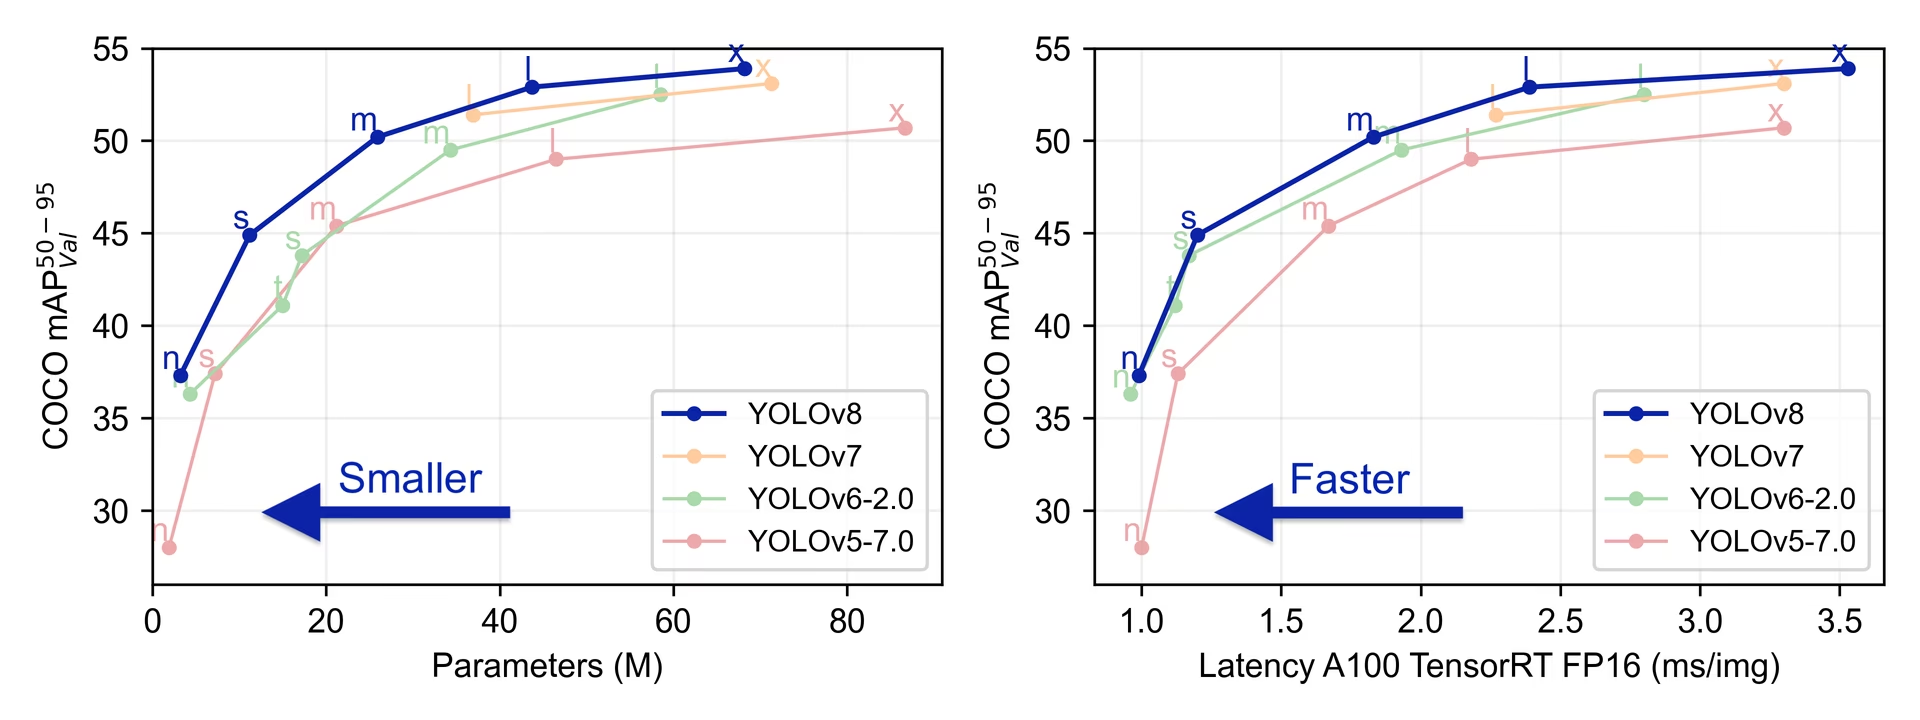
Performance Metrics#
See Detection Docs for usage examples with these models trained on COCO, which include 80 pretrained classes.
YOLOv8 Usage Examples#
This example provides simple YOLOv8 training and inference examples.
Note the below example is for YOLOv8 Detect models for object detection. For additional supported tasks see the Segment, Classify, Pose, and OBB docs.
PyTorch pretrained *.pt models as well as configuration *.yaml files can be passed to the YOLO() class to create a model instance in Python:
from ultralytics import YOLO

# Load a COCO-pretrained YOLOv8n model
model = YOLO("yolov8n.pt")

# Display model information (optional)
model.info()

# Train the model on the COCO8 example dataset for 100 epochs
results = model.train(data="coco8.yaml", epochs=100, imgsz=640)

# Run inference with the YOLOv8n model on the 'bus.jpg' image
results = model("path/to/bus.jpg")
Citations and Acknowledgments#
Ultralytics has not published a formal research paper for YOLOv8 due to the rapidly evolving nature of the models. We focus on advancing the technology and making it easier to use, rather than producing static documentation. For the most up-to-date information on YOLO architecture, features, and usage, please refer to our GitHub repository and documentation.
If you use the YOLOv8 model or any other software from this repository in your work, please cite it using the following format:
@software{yolov8_ultralytics,
  author = {Glenn Jocher and Ayush Chaurasia and Jing Qiu},
  title = {Ultralytics YOLOv8},
  version = {8.0.0},
  year = {2023},
  url = {https://github.com/ultralytics/ultralytics},
  orcid = {0000-0001-5950-6979, 0000-0002-7603-6750, 0000-0003-3783-7069},
  license = {AGPL-3.0}
}
YOLOv8 models are provided under AGPL-3.0 and Enterprise licenses.
FAQ#
YOLOv8 is designed to improve real-time object detection performance. Unlike earlier versions, YOLOv8 incorporates an anchor-free split Ultralytics head and state-of-the-art backbone and neck architectures, and offers an optimized accuracy-speed tradeoff for diverse applications.
YOLOv8 supports a wide range of computer vision tasks, including object detection, instance segmentation, classification, pose/keypoints detection, and oriented object detection. Each model variant is optimized for its specific task and supports the Training, Validation, Inference, and Export modes.
YOLOv8 models achieved state-of-the-art performance on several benchmark datasets at release. For instance, the YOLOv8n model achieves a mean Average Precision (mAP) of 37.3 on the COCO dataset and a speed of 0.99 ms on A100 TensorRT. Detailed performance metrics for each model variant across different tasks and datasets can be found in the Performance Metrics section.
You can train a YOLOv8 model with either Python or the CLI. Below are examples for training a COCO-pretrained YOLOv8n model on the COCO8 dataset for 100 epochs:
Examplefrom ultralytics import YOLO # Load a COCO-pretrained YOLOv8n model model = YOLO("yolov8n.pt") # Train the model on the COCO8 example dataset for 100 epochs results = model.train(data="coco8.yaml", epochs=100, imgsz=640)For further details, visit the Training documentation.
Yes, YOLOv8 models can be benchmarked for speed and accuracy across export formats such as PyTorch, ONNX, and TensorRT. Below are example commands for benchmarking using Python and CLI:
Examplefrom ultralytics.utils.benchmarks import benchmark # Benchmark on GPU benchmark(model="yolov8n.pt", data="coco8.yaml", imgsz=640, device=0)For additional information, check the Performance Metrics section.


Comments356
Ask a question, share your results, or help someone else.
Yscream(edited)
hey there! can you help me to handle error which i get every time when run train increasing batch and imgsz options, please? first of all, i have a powerful enough computer. RTX 3090 24gb, Ryzen 9 7950X3D 16-Core, 128gb RAM if i run train with following options
results = model.train(data=f'{database_foldername}data.yaml', cfg=cfg_filename, epochs=epochs, imgsz=640, batch=8, device=0)it works quit good, and it uses about 3-4gb GPU_MEM, but i want to change imgsz to 1280 to increase accuracy of model and when i run train with this changed option i always got different errors, like:RuntimeError: cuDNN error: CUDNN_STATUS_EXECUTION_FAILEDRuntimeError: CUDA error: device-side assert triggered Compile withTORCH_USE_CUDA_DSAto enable device-side assertions.RuntimeError: CUDA error: an illegal memory access was encountered Compile withTORCH_USE_CUDA_DSAto enable device-side assertions.RuntimeError: Pin memory thread exited unexpectedly terminate called without an active exceptionand as i wrote earlier it throw different every time. i tride run with CUDA_LAUNCH_BLOCKING=1, but nothing changed
help!!! i want to use all the power of my graphics card
2Any solutions please thank you
 Paula DerrengerUltralytics
@Yscream it sounds like you're encountering memory-related issues when increasing the image size during training. Given your powerful hardware, this is likely due to the increased memory demands of larger images. Here are a few suggestions to help mitigate these errors:
-
Reduce Batch Size: Try lowering the batch size when increasing the image size. For example, if you're using
imgsz=1280, you might need to reduce the batch size to 2 or even 1 to fit within the GPU memory limits. -
Mixed Precision Training: Enable mixed precision training by setting
amp=Truein your training arguments. This can help reduce memory usage and potentially improve training speed. -
Check for Software Updates: Ensure you are using the latest versions of PyTorch, CUDA, and cuDNN. Sometimes, updating these can resolve compatibility and performance issues.
-
Debugging: Use
CUDA_LAUNCH_BLOCKING=1to get more detailed error messages, which can help pinpoint the exact cause of the issue.
If the problem persists, please try these steps and let us know if you encounter any specific errors. This will help us provide more targeted assistance.
-
rohith-aiunika
Hi YOLO Team, I have a v8 segmentation model, i need to convert my pt file to TFlite, is it possible?
1xuan2261
"# Improved YOLOv8 with BiFormer, Fusion Blocks, MS-Block, DConv, ECA, Ghost Module, and Focal Loss
Parameters
nc: 9 # number of classes scales:
[depth, width, max_channels]
n: [0.33, 0.25, 1024]
s: [0.33, 0.50, 1024]
m: [0.67, 0.75, 768]
l: [1.00, 1.00, 512]
x: [1.00, 1.25, 512]Backbone (ensure specific feature sizes: 160×160×128, 80×80×256, 40×40×512, 20×20×512)
backbone:
[from, repeats, module, args]
- [-1, 1, GhostModule, [64, 3, 2]] # 0-P1/2 -> output 320×320×64, using Ghost Module to reduce computation
- [-1, 1, Conv, [128, 3, 2, Mish]] # 1-P2/4 -> output 160×160×128, using Mish activation
- [-1, 3, C2f_DM, [128, True]] # output 160×160×128
- [-1, 1, MS-Block, [128, 3, [3, 5, 7], True]] # MS-Block with residual connections for multi-scale feature extraction
- [-1, 1, Conv, [256, 3, 2, Mish]] # 3-P3/8 -> output 80×80×256, using Mish activation
- [-1, 6, C2f_DM, [256, True]] # output 80×80×256
- [-1, 1, MS-Block, [256, 3, [3, 5, 7], True]] # MS-Block for P3/8 with residual connections
- [-1, 1, Conv, [512, 3, 2, Mish]] # 5-P4/16 -> output 40×40×512, using Mish activation
- [-1, 6, C2f_DM, [512, True]] # output 40×40×512
- [-1, 1, MS-Block, [512, 3, [3, 5, 7], True]] # MS-Block for P4/16 with residual connections
- [-1, 1, Conv, [1024, 3, 2, Mish]] # 7-P5/32 -> output 20×20×512, using Mish activation
- [-1, 3, C2f_DM, [1024, True]] # output 20×20×512
- [-1, 1, MS-Block, [1024, 3, [3, 5, 7], True]] # MS-Block for P5/32 with residual connections
- [-1, 1, SPPF, [1024, 5]] # Spatial Pyramid Pooling Fast -> output 20×20×512
Neck with Fusion Blocks, MS-Block, BiFormer, DConv, and ECA (replacing Concat)
neck:
[from, repeats, module, args]
-
[-1, 1, nn.Upsample, [None, 2, 'nearest']]
-
[[-1, 6], 1, Fusion_Block, [512]] # Fusion Block replacing Concat for backbone P4
-
[-1, 3, C2f_Att, [512]] # C2F-Att with Attention Mechanism
-
[-1, 1, BiFormer, [512]] # BiFormer added for enhanced spatial relationships
-
[-1, 1, DConv, [512, 3]] # Adding Dynamic Convolution
-
[-1, 1, ECA, [512]] # Adding Efficient Channel Attention
-
[-1, 1, MS-Block, [512, 3, [3, 5, 7], True]] # MS-Block for multi-scale feature extraction in Neck
-
[-1, 1, nn.Upsample, [None, 2, 'nearest']]
-
[[-1, 4], 1, Fusion_Block, [256]] # Fusion Block replacing Concat for backbone P3
-
[-1, 3, C2f_Att, [256]] # P3/8-small
-
[-1, 1, BiFormer, [256]] # BiFormer added for P3
-
[-1, 1, DConv, [256, 3]] # Adding Dynamic Convolution for P3
-
[-1, 1, ECA, [256]] # Adding Efficient Channel Attention for P3
-
[-1, 1, MS-Block, [256, 3, [3, 5, 7], True]] # MS-Block for P3 in Neck
-
[-1, 1, Conv, [256, 3, 2, Mish]]
-
[[-1, 12], 1, Fusion_Block, [512]] # Fusion Block replacing Concat for head P4
-
[-1, 3, C2f_Att, [512]] # P4/16-medium
-
[-1, 1, BiFormer, [512]] # BiFormer added for P4
-
[-1, 1, DConv, [512, 3]] # Adding Dynamic Convolution for P4
-
[-1, 1, ECA, [512]] # Adding Efficient Channel Attention for P4
-
[-1, 1, MS-Block, [512, 3, [3, 5, 7], True]] # MS-Block for P4 in Neck
-
[-1, 1, Conv, [512, 3, 2, Mish]]
-
[[-1, 9], 1, Fusion_Block, [1024]] # Fusion Block replacing Concat for head P5
-
[-1, 3, C2f_Att, [1024]] # P5/32-large
-
[-1, 1, BiFormer, [1024]] # BiFormer added for P5
-
[-1, 1, DConv, [1024, 3]] # Adding Dynamic Convolution for P5
-
[-1, 1, ECA, [1024]] # Adding Efficient Channel Attention for P5
-
[-1, 1, MS-Block, [1024, 3, [3, 5, 7], True]] # MS-Block for P5 in Neck
Adding a fourth detecting head for improved detection at different scales
- [-1, 1, Conv, [128, 3, 2, Mish]]
- [[-1, 3], 1, Fusion_Block, [128]] # new Fusion Block for smaller objects
- [-1, 3, C2f_Att, [128]] # P6/64-smaller objects
- [-1, 1, BiFormer, [128]] # BiFormer added for P6
- [-1, 1, DConv, [128, 3]] # Adding Dynamic Convolution for P6
- [-1, 1, ECA, [128]] # Adding Efficient Channel Attention for P6
- [-1, 1, MS-Block, [128, 3, [3, 5, 7], True]] # MS-Block for P6 in Neck
Head
head:
- [[17, 21, 25, 29], 1, Detect, [nc]] # Detect(P3, P4, P5, P6)
Loss Function
loss: name: FocalLoss # Using Focal Loss for better handling of small object detection" If I change the new structure like this, then I can add code for new modules, blocks: GhostModule, C2f_DM, MS-Block, BiFormer, .... to which files?
1 Glenn JocherUltralytics
@xuan2261 to integrate new modules like GhostModule and BiFormer, you'll need to modify the model architecture files in the Ultralytics repository. Specifically, look into the
modelsdirectory where the architecture is defined, and add your custom modules there. Ensure you also update any relevant configuration files to reflect these changes.
Wenlong914
有没有人能为我解答一下,训练数据集过程中的权重文件也能用吗?为什么训练过程中的权重文件比训练结束后的大?
1- Paula DerrengerUltralytics
您好!在训练过程中保存的权重文件通常会比训练完成后的权重文件大,这是因为它们可能包含额外的信息,比如优化器状态和用于继续训练的其他元数据。完成训练后,通常只会保存用于推断的模型参数,不包含训练期间需要的额外信息。
对于在训练过程中的权重文件,您完全可以使用它们来继续训练或进行预测,这在处理意外中断的训练时特别有用。如果您想验证模型的性能,或者希望进行一些测试,加载这些权重然后运行验证或推理是非常合适的。
希望这能帮助您!如果有更多问题,欢迎随时提问。🙂
1
haolele123
作者您好,我想训练yolov8m-p2的版本,我在想能否使用yolov8的模型权重作为预训练权重,且我发现似乎没有yolov8-p2的m的版本这个怎末决解呢
1- Paula DerrengerUltralytics(edited)
您好!😊 感谢您对 YOLOv8 模型的兴趣!
yolov8m-p2没有单独的预训练权重,但可以直接使用 P2 配置文件训练:yolov8-p2.yaml支持n/s/m/l/x各个规模,指定yolov8m-p2.yaml即可构建 m 规模的 P2 模型。同时可以用yolov8m.pt作为预训练权重,形状匹配的层会被加载,P2 新增的层则随机初始化:yolo train model=yolov8m-p2.yaml pretrained=yolov8m.pt data=your_dataset.yaml epochs=100 imgsz=640如果直接使用
model=yolov8m.pt,训练的是标准 YOLOv8m,没有 P2 检测头。如需新的项目,也建议考虑 YOLO26。希望这有所帮助!如果还有其他问题,欢迎随时提问。祝您训练顺利!🚀
chaobao
作者你好,请问海滩或者足球场,怎么才能提高对人的识别率?
- Glenn JocherUltralytics
可以,提升这类场景下
person识别率最有效的方法通常是用海滩/球场相似数据做微调,增大imgsz(如960或1280)提升远处小目标召回,适当降低conf,并优先尝试更强的模型如 Ultralytics YOLO26;如果你愿意,也欢迎把几张样例图和当前训练配置发到 Ultralytics Discussions,这样团队更容易帮你定位具体瓶颈。
yaoyuan20000111-web
感谢yolov8让我可以研究生毕业
siddannamd
I came to know that YOLOv8 is capable of tracking objects. I am currently working on a robotics model that includes object detection and object tracking. Can YOLOv8 perform both detection and tracking simultaneously? Also, you didn’t mention the benchmark for object tracking compared to other models.
- Glenn JocherUltralytics
Yes—YOLOv8 can do detection and tracking in the same run via
trackmode (it detects each frame, then assigns persistent IDs with a tracker); see the Multi-Object Tracking (Track mode) docs (works with YOLOv8 Detect/Seg/Pose models listed on the YOLOv8 page).yolo track model=yolov8n.pt source=path/to/video.mp4 tracker="bytetrack.yaml"We don’t publish a single “tracking benchmark vs other models” on the YOLOv8 model page because results vary a lot with tracker choice (
botsort.yamlvsbytetrack.yaml), input FPS/resolution, and the evaluation set; if you share your target objects + a short sample video (or which MOT-style benchmark you’re using) here in the discussion, we can suggest a solid baseline config to compare fairly.
AniruddhaAi
I am trying to use yolov8m.pt's backbone for feature extractor. Why does it force download the coco dataset? Is there a way I could just load the weights rather downloading the data? I need to extract the features from custom dataset
- Glenn JocherUltralytics
Loading
yolov8m.ptshould only download the weights; the COCO download is triggered when you runtrain()/val()(or anything that uses a COCOdata=...YAML, including defaults). For feature extraction on your own images, use embeddings directly (no dataset download) viaModel.embed()on your custom image folder/file:from ultralytics import YOLO model = YOLO("yolov8m.pt") # weights only embeddings = model.embed(source="path/to/images") # your custom data
liuna471658955
Hi,dears, i'm new of YoLoV8, can you help see is there any thing can be improved of my below code?
from PIL import Image from ultralytics import YOLO import glob import os import numpy as np from tqdm import tqdm import torch from concurrent.futures import ThreadPoolExecutor
class Predict def init(self, batch_size=8, imgsz=640, conf_thres=0.25, iou_thres=0.45, half=True, device=cuda0)
    初始化优化后的推理类
    param batch_size 批量推理大小(根据GPU显存调整)
    param imgsz 推理图片尺寸(建议为32的倍数)
    param conf_thres 置信度阈值(过滤低置信度预测)
    param iou_thres NMS的IOU阈值(控制重复框)
    param half 是否使用半精度推理(FP16,提速且不损失精度)
    param device 推理设备(cudacpumps)

    self.model_path = homejovyanworkstudentmodelsyolo_train4weightsbest.pt
    self.device = torch.device(device if torch.cuda.is_available() else cpu)
    self.model = YOLO(self.model_path).to(self.device)

    # 核心推理参数
    self.batch_size = batch_size
    self.imgsz = imgsz
    self.conf_thres = conf_thres
    self.iou_thres = iou_thres
    self.half = half and torch.cuda.is_available()  # 仅GPU支持半精度

    # 预热模型(首次推理加速)
    self._warmup_model()

def _warmup_model(self)
    模型预热:首次推理避免初始化耗时
    dummy_img = torch.randn(1, 3, self.imgsz, self.imgsz).to(self.device)
    if self.half
        dummy_img = dummy_img.half()
    self.model.predict(dummy_img, verbose=False, conf=self.conf_thres, iou=self.iou_thres, half=self.half)

def _load_image(self, img_path)
    单张图片加载(封装为线程池调用)
    try
        with Image.open(img_path) as img
            img = img.convert(RGB)
            return img_path, img, None
    except Exception as e
        return img_path, None, str(e)

def _batch_load_images(self, image_paths)
    批量加载图片(多线程提速)
    images = []
    valid_paths = []
    error_logs = []

    # 多线程加载图片(CPU密集型任务提速)
    with ThreadPoolExecutor(max_workers=4) as executor
        results = list(tqdm(executor.map(self._load_image, image_paths), total=len(image_paths), desc=Loading images))

    for path, img, err in results
        if err
            error_logs.append(fSkipping {path} {err})
            continue
        valid_paths.append(path)
        images.append(img)

    # 打印加载错误
    if error_logs
        for err in error_logs[5]  # 只打印前5个错误
            print(err)
    return valid_paths, images

def detect(self, image_dir)

    优化后的推理主函数
    param image_dir 图片目录
    param use_tta 是否启用TTA(测试时增强,提升准确率,小幅增加耗时)
    return 推理结果列表

    # 1. 获取所有图片路径
    exts = [.jpg, .jpeg, .png, .JPG, .JPEG, .PNG]
    image_paths = []
    for ext in exts
        image_paths.extend(glob.glob(os.path.join(image_dir, ext)))
    if not image_paths
        print(No images found in directory!)
        return []

    # 2. 批量加载图片(多线程)
    valid_paths, images = self._batch_load_images(image_paths)
    if not valid_paths
        return []

    # 3. 分批次推理
    all_results = []
    num_batches = (len(valid_paths) + self.batch_size - 1)  self.batch_size

    for batch_idx in tqdm(range(num_batches), desc=Inferencing batches)
        # 切分批次
        start = batch_idx  self.batch_size
        end = min((batch_idx + 1)  self.batch_size, len(valid_paths))
        batch_paths = valid_paths[startend]
        batch_imgs = images[startend]

        # 4. 执行推理(核心优化)
        try
            results = self.model.predict(
                source=batch_imgs,
                imgsz=self.imgsz,          # 统一推理尺寸
                conf=self.conf_thres,      # 置信度过滤
                iou=self.iou_thres,        # NMS阈值
                half=self.half,            # 半精度推理
                device=self.device,        # 指定设备
                verbose=False,             # 关闭日志
                batch=self.batch_size,     # 批量大小
              #  tta=use_tta,               # 测试时增强(可选)
                max_det=100,               # 单图最大检测数
                vid_stride=1,              # 视频步长(图片无效)
                retina_masks=False         # 掩码细化(无掩码时关闭)
            )
        except Exception as e
            print(fBatch {batch_idx} inference failed {e})
            continue

        # 5. 解析结果(减少CPUGPU数据拷贝)
        for idx, result in enumerate(results)
            img_path = batch_paths[idx]
            image_name = os.path.basename(img_path)
            detections = []

            if result.boxes is not None and len(result.boxes)  0
                # 批量转换数据(避免逐框循环拷贝)
                cls = result.boxes.cls.cpu().numpy().astype(int).tolist()
                boxes = result.boxes.xyxy.cpu().numpy().tolist()
                scores = result.boxes.conf.cpu().numpy().astype(float).tolist()

                # 生成检测结果
                for c, b, s in zip(cls, boxes, scores)
                    detections.append({
                        cls int(c),
                        box [float(x) for x in b],
                     score round(float(s), 3)  # 保留3位小数,减少存储
                    })

            all_results.append({
                image_name image_name,
                detections detections,
                image_path img_path
            })

    return all_results
使用示例
if name == main # 初始化优化后的推理器(根据GPU显存调整参数) pre = Predict( batch_size=16, # 批量大小(1080Ti建议8-16,A100建议32-64) imgsz=640, # 推理尺寸(训练时用640则保持一致) conf_thres=0.3, # 提高置信度阈值,过滤假阳性 iou_thres=0.4, # 降低IOU阈值,减少重复框 half=True, # 启用半精度推理 device=cuda0 # 指定GPU )
# 执行推理(use_tta=True 提升准确率,耗时增加~30%) results = pre.detect(image_dir=homejovyanworkstudenttest) # 打印结果 for idx, result in enumerate(results[3]) # 只打印前3个 print(fImage {result['image_name']}) print(fDetections {len(result['detections'])} objects) for det in result[detections] print(f - Class {det['cls']}, Box {det['box']}, Score {det['score']}) print(- 50) print(fTotal processed images {len(results)})- Glenn JocherUltralytics
Nice work putting this together; you can simplify it a lot by letting YOLO handle most of what you’re doing manually.
A few concrete suggestions:
- Use the built‑in directory + batch inference instead of your own loader and batching. YOLO already scans a folder, loads images in parallel and batches them:
from ultralytics import YOLO

model = YOLO("best.pt")

results = model.predict(
    source="path/to/images_dir",  # folder with images
    imgsz=640,
    conf=0.3,
    iou=0.4,
    device="cuda:0",             # or "cpu"
    batch=16,                    # batched inference
    half=True,                   # FP16 on GPU
    verbose=False
)
This gives you essentially the same effect as your
Predict.detect()without the customThreadPoolExecutor, manual slicing, or warmup.-
Don’t call
.to(self.device)on theYOLOobject; instead, just passdevice="cuda:0"(or"cpu") topredict()as above. That’s the supported pattern in the Python API. -
If you want to keep a small wrapper class, keep it thin and delegate everything to
model.predict():
class Predictor:
    def __init__(self, weights, device="cuda:0", imgsz=640, conf=0.3, iou=0.4, batch=16, half=True):
        self.model = YOLO(weights)
        self.device = device
        self.imgsz = imgsz
        self.conf = conf
        self.iou = iou
        self.batch = batch
        self.half = half and "cuda" in str(device)

    def __call__(self, image_dir):
        return self.model.predict(
            source=image_dir,
            imgsz=self.imgsz,
            conf=self.conf,
            iou=self.iou,
            device=self.device,
            batch=self.batch,
            half=self.half,
            verbose=False,
        )
If you share what problem you’re trying to optimize (speed, memory, or result format), I can suggest more targeted tweaks; in the meantime, the built‑in batch directory inference in the Predict mode docs will usually be both faster and simpler than a custom pipeline.