AWS 深度学习实例上的 Ultralytics YOLOv5 🚀:您的完整指南
建立高性能的深度学习环境似乎令人生畏,尤其是对于新手而言。但是不用担心!🛠️ 本指南提供了在 AWS 深度学习实例上启动并运行 Ultralytics YOLOv5 的分步演练。通过利用 Amazon Web Services (AWS) 的强大功能,即使是 机器学习 (ML) 新手也可以快速且经济高效地开始。AWS 平台的 可扩展性 使其成为实验和生产部署的理想选择。
YOLOv5 的其他快速入门选项包括我们的 Google Colab Notebook, Kaggle 环境


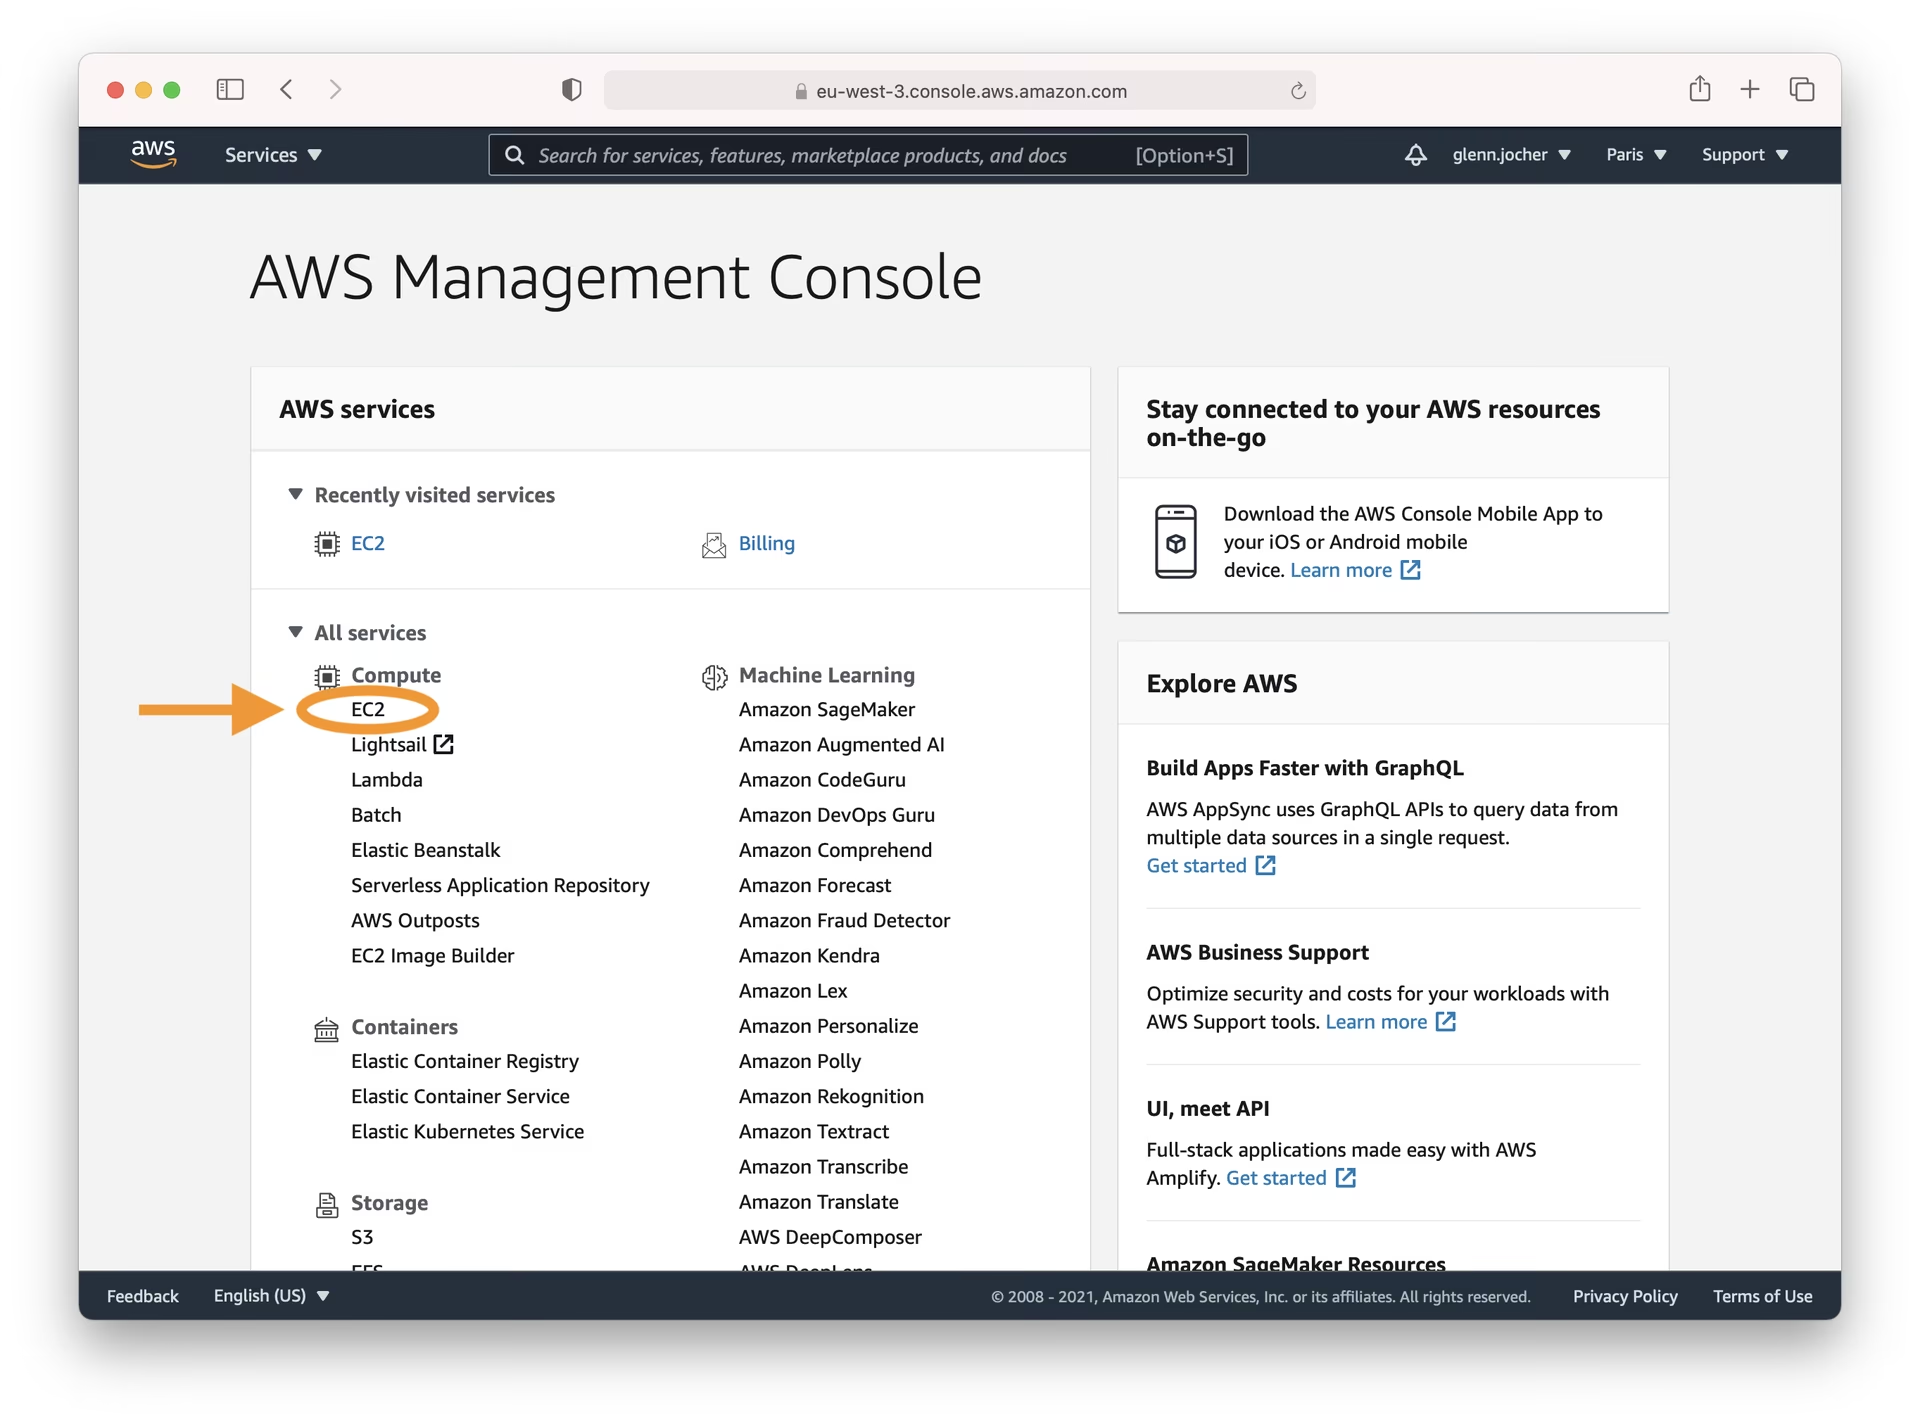
步骤 1:AWS 控制台登录
首先创建账户或登录到 AWS 管理控制台。登录后,导航到 EC2 服务控制面板,您可以在其中管理您的虚拟服务器(实例)。
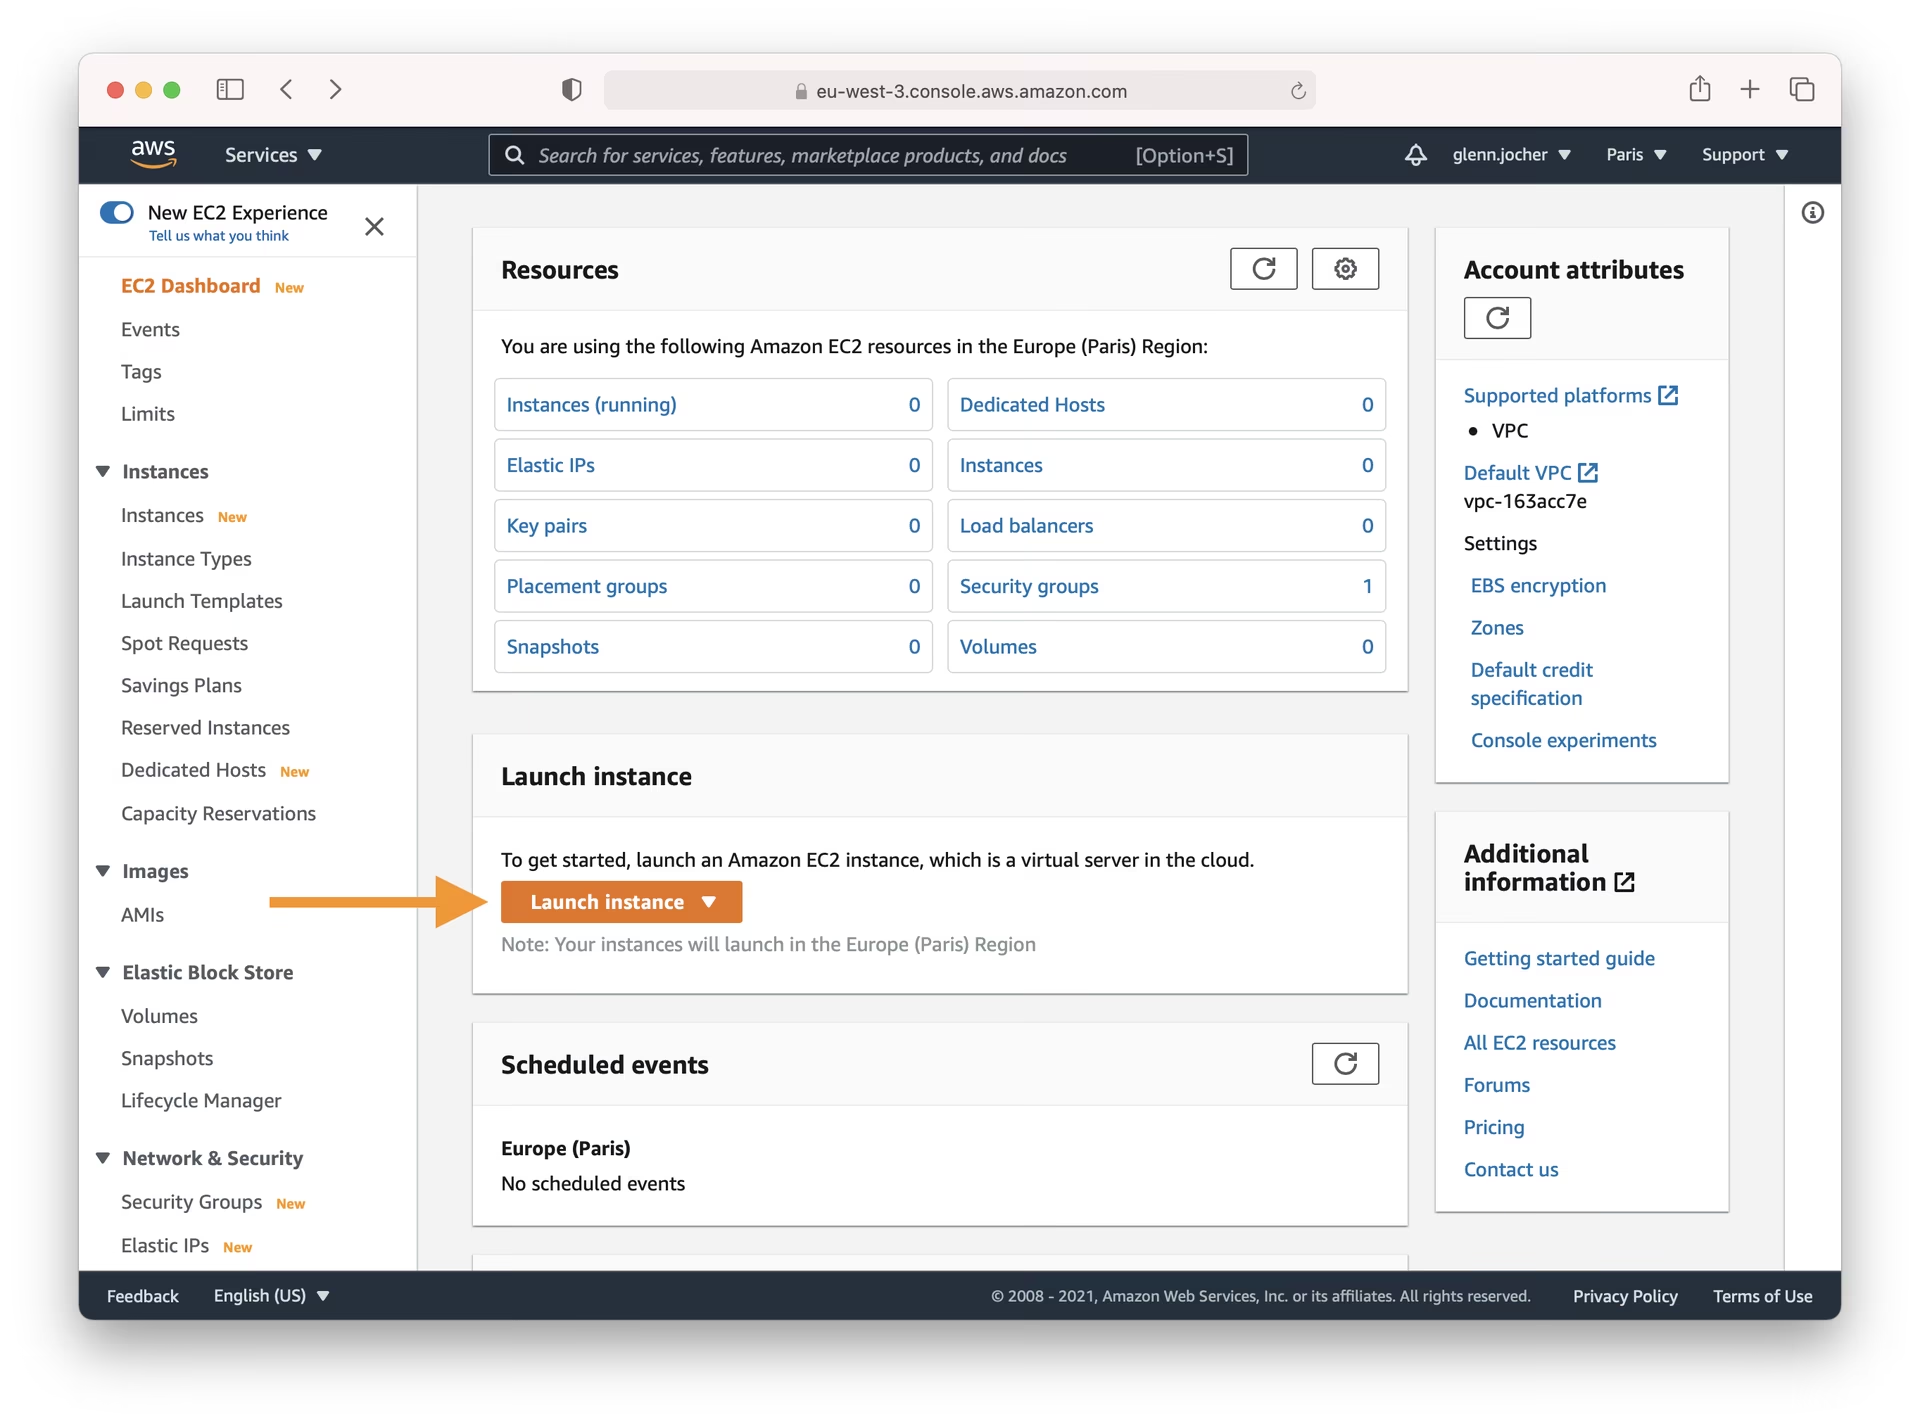
步骤 2:启动您的实例
在 EC2 仪表板中,单击 Launch Instance 按钮。 这将启动创建新的虚拟服务器的过程,该服务器可以根据您的需求进行定制。
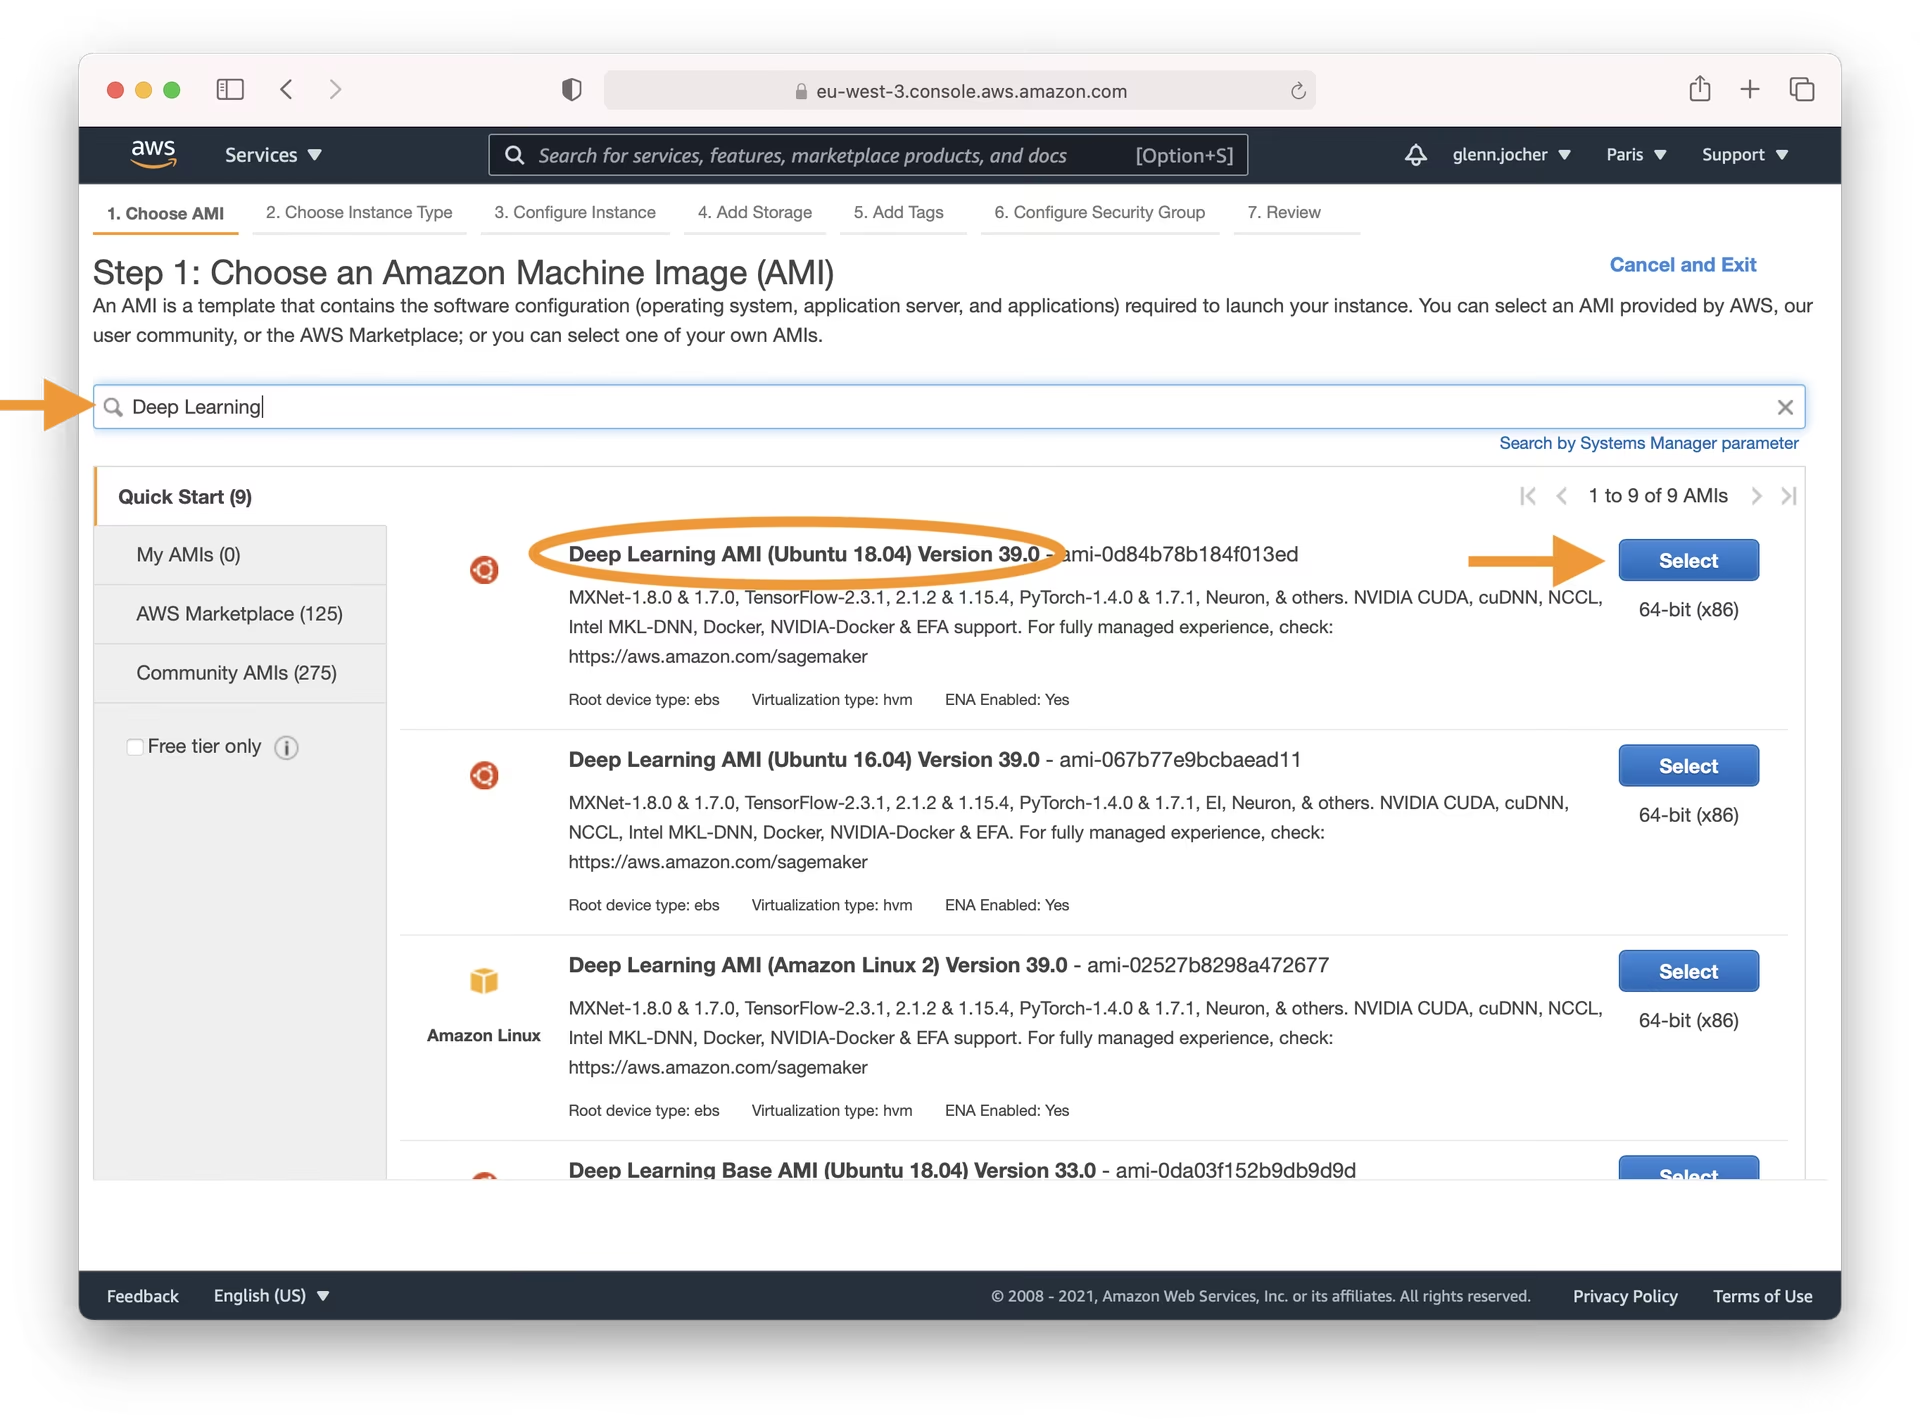
选择合适的 Amazon Machine Image (AMI)
选择正确的 AMI 至关重要。 这决定了您的实例的操作系统和预安装的软件。 在搜索栏中,键入“深度学习”,然后选择最新的基于 Ubuntu 的深度学习 AMI(除非您对其他操作系统有特定要求)。 亚马逊的深度学习 AMI 预先配置了流行的 深度学习框架(如 YOLOv5 使用的 PyTorch)和必要的 GPU 驱动程序,从而大大简化了设置过程。
选择实例类型
对于诸如训练深度学习模型等高要求的任务,强烈建议选择 GPU 加速的实例类型。与 CPU 相比,GPU 可以显著减少模型训练所需的时间。在选择实例大小时,请确保其内存容量(RAM)足以满足您的模型和数据集的需求。
注意: 模型和数据集的大小是关键因素。如果您的 ML 任务需要的内存超过所选实例提供的内存,您需要选择更大的实例类型,以避免性能问题或错误。
浏览 EC2 实例类型页面上可用的 GPU 实例类型,尤其是在 加速计算 类别下。
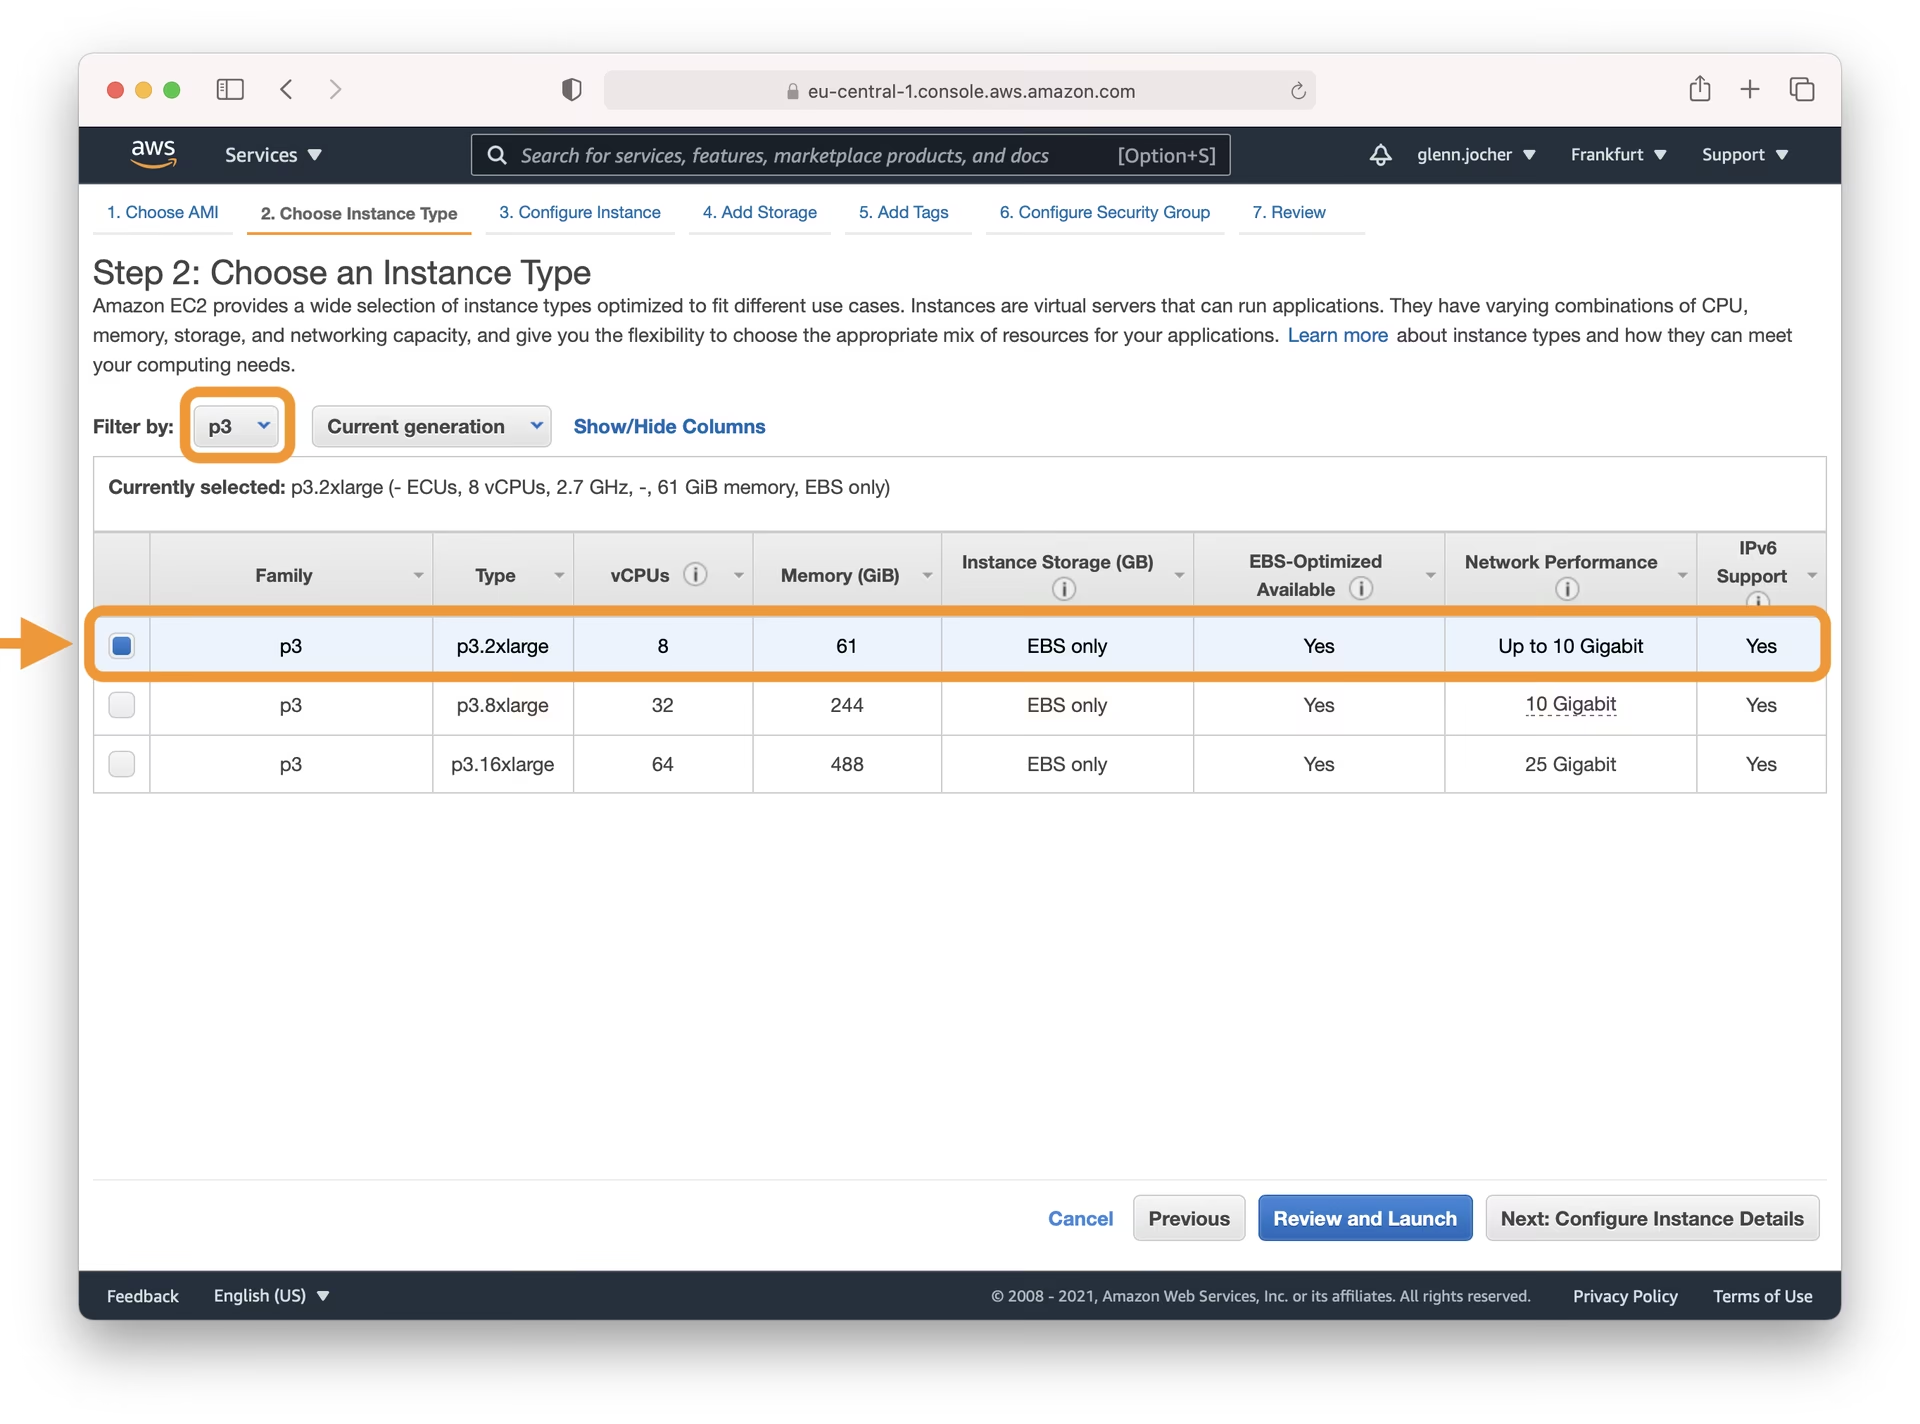
有关监控和优化 GPU 使用情况的详细信息,请参阅 AWS 关于 GPU 监控和优化 的指南。使用 按需定价 比较成本,并通过 竞价型实例定价 探索潜在的节省。
配置您的实例
考虑使用 Amazon EC2 Spot Instances 以获得更具成本效益的方法。Spot Instances 允许您竞标未使用的 EC2 容量,通常比按需价格有很大的折扣。对于需要持久性的任务(即使 Spot Instance 中断也要保存数据),请选择持久性请求。这可确保您的存储卷保持不变。
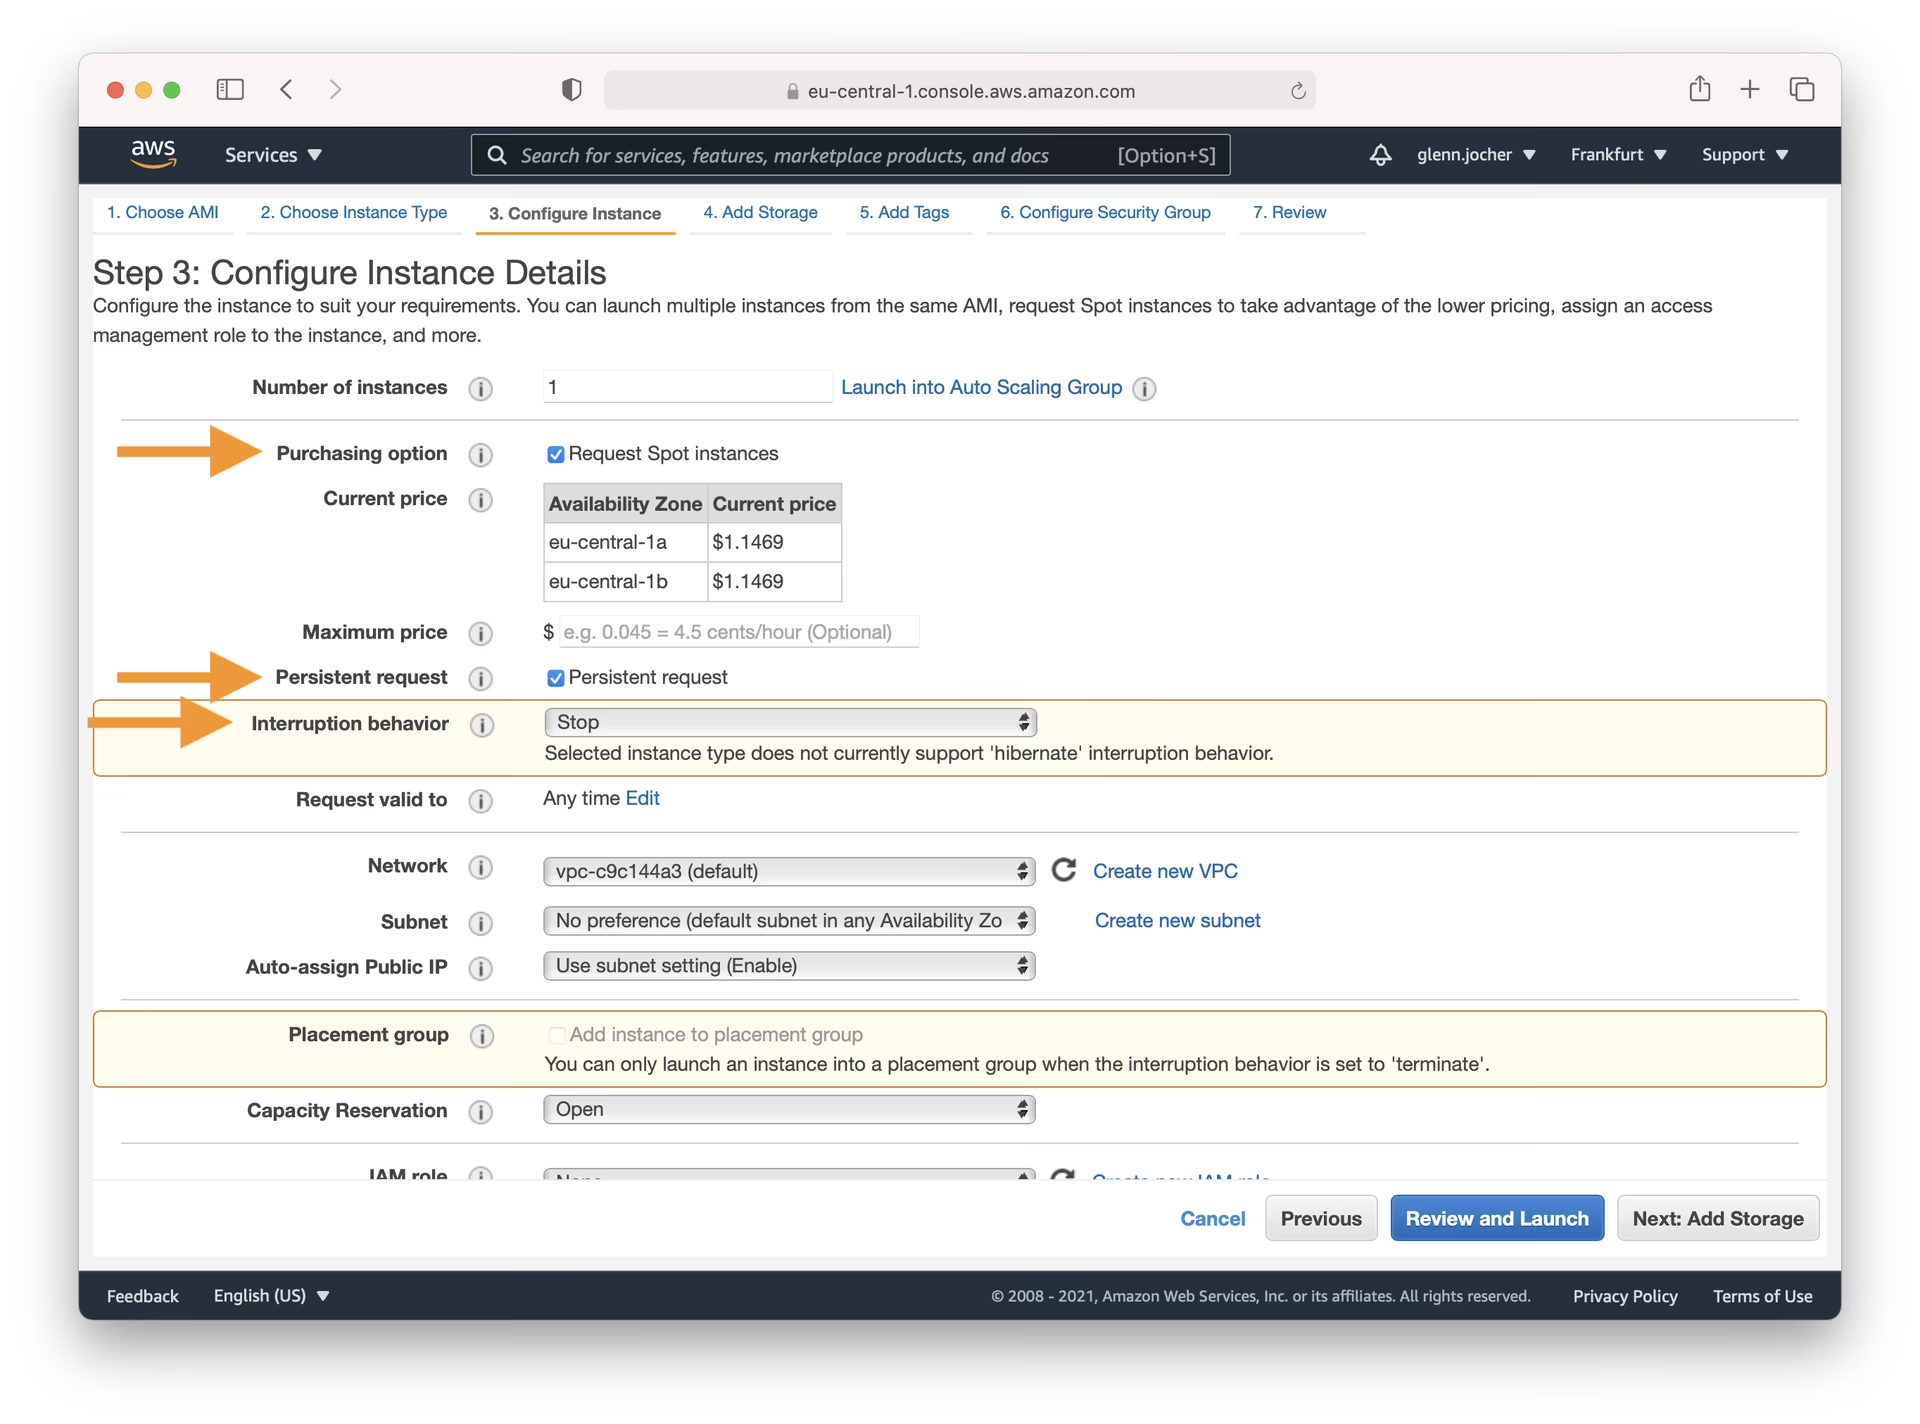
继续执行实例启动向导的步骤 4-7,以配置存储、添加标签、设置安全组(确保从您的 IP 打开 SSH 端口 22),并在单击 启动 之前查看您的设置。您还需要创建或选择现有的密钥对以进行安全的 SSH 访问。
步骤 3:连接到您的实例
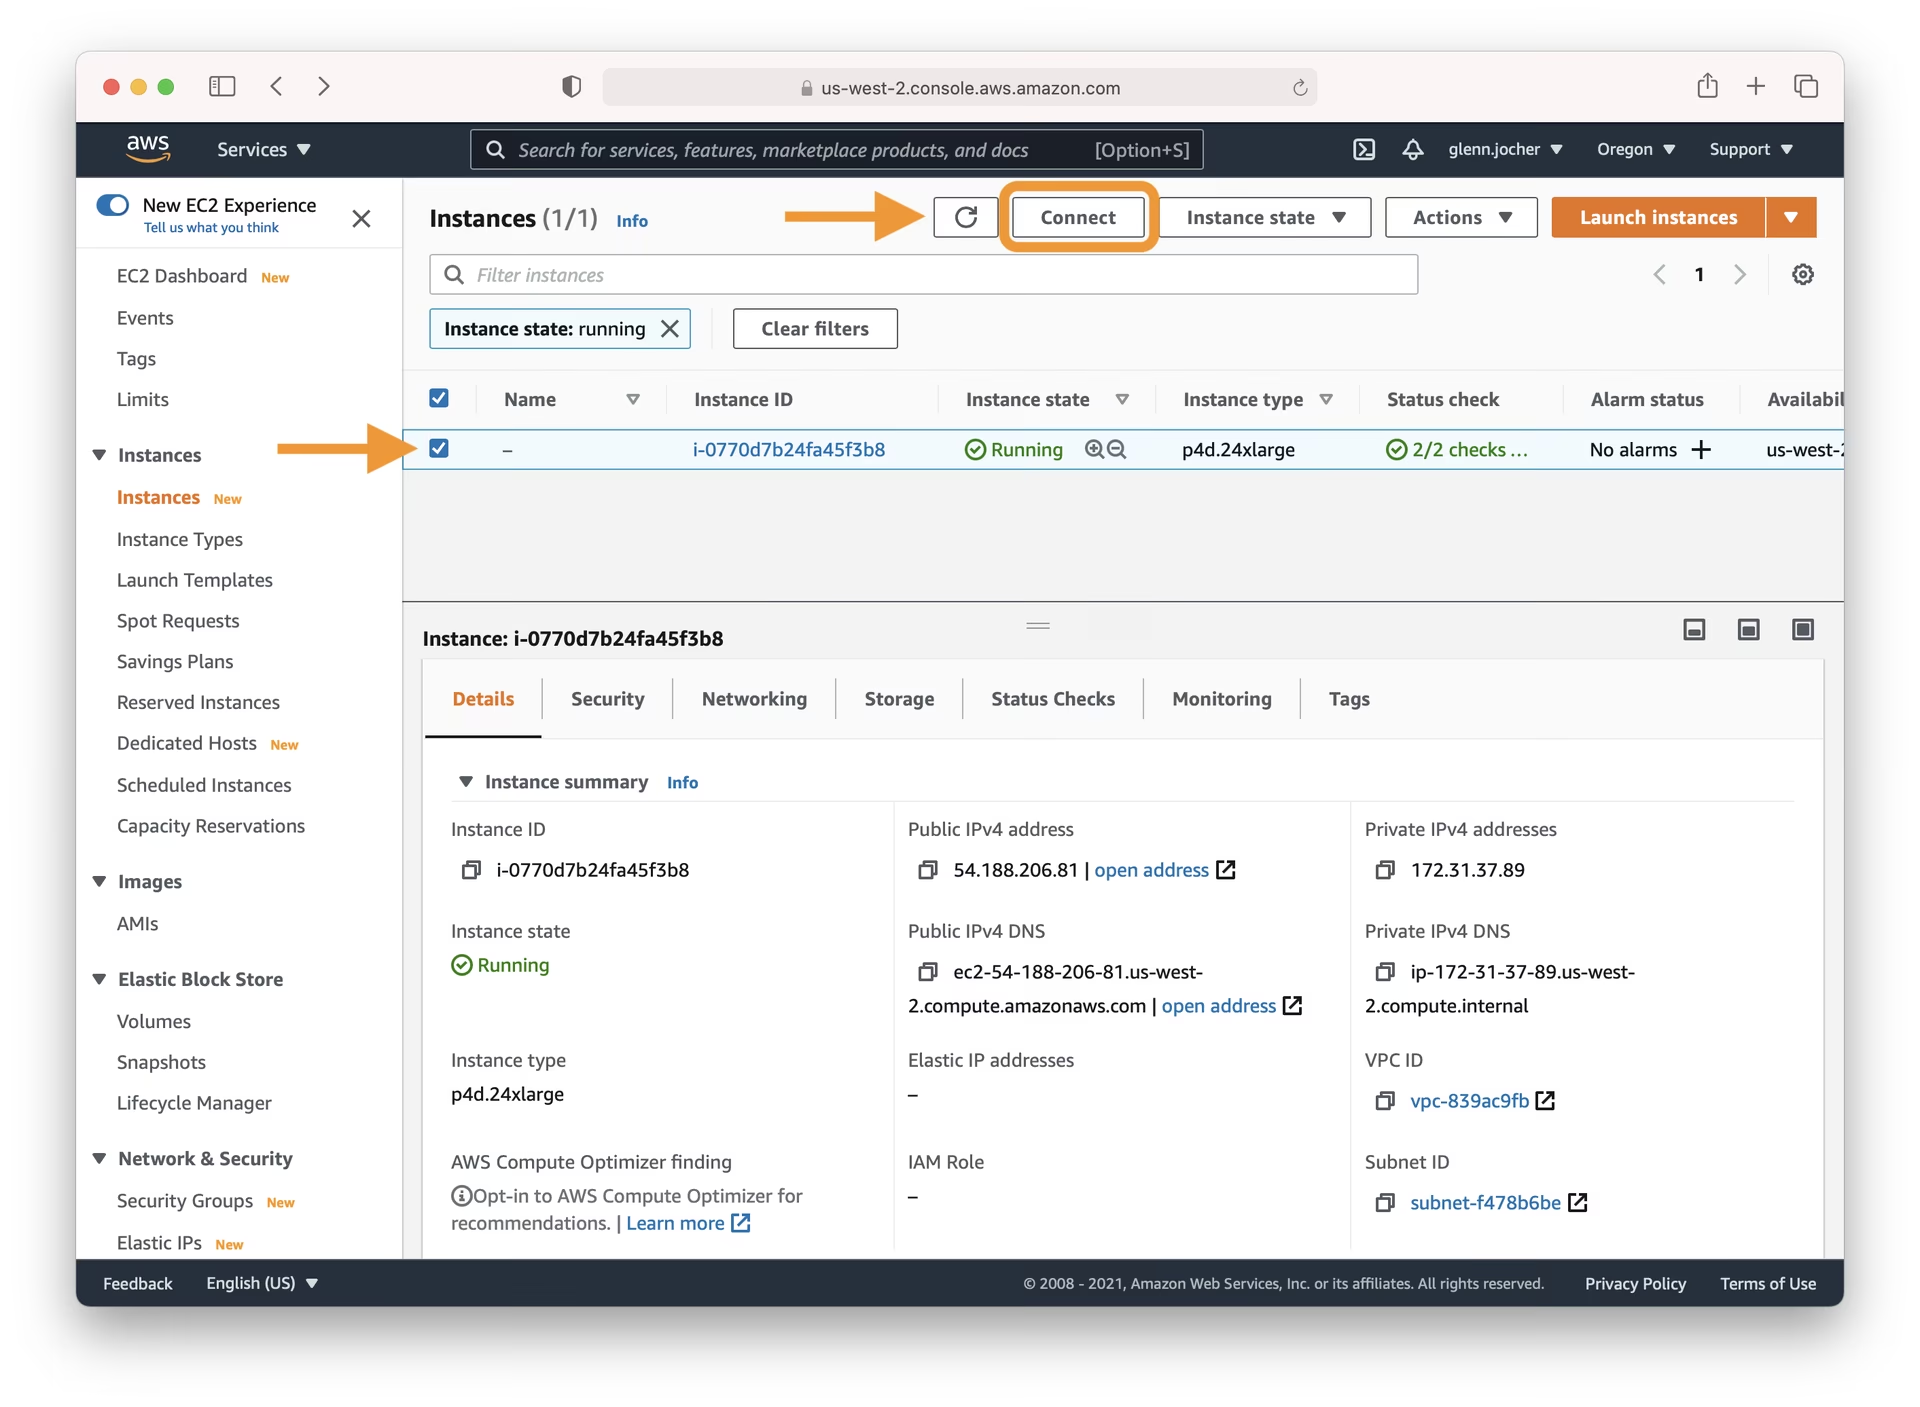
一旦您的实例状态显示为“running”,请从 EC2 仪表板中选择它。点击 连接 用于查看连接选项的按钮。 在您的本地终端(如 macOS/Linux 上的 Terminal 或 Windows 上的 PuTTY/WSL)中使用提供的 SSH 命令示例来建立安全连接。 您将需要私钥文件(.pem)您在启动期间创建或选择的。
步骤 4:运行 Ultralytics YOLOv5
现在您已通过 SSH 连接,您可以设置并运行 YOLOv5。首先,从以下位置克隆官方 YOLOv5 存储库 GitHub 并导航到该目录。然后,使用以下命令安装所需的依赖项 pip。建议使用 Python 3.8 环境或更高版本。必需的模型和数据集将会从最新的 YOLOv5 自动下载。 发布 当你运行诸如训练或检测之类的命令时。
# Clone the YOLOv5 repository
git clone https://github.com/ultralytics/yolov5
cd yolov5

# Install required packages
pip install -r requirements.txt
环境准备就绪后,您可以开始使用 YOLOv5 执行各种任务:
# Train a YOLOv5 model on a custom dataset (e.g., coco128.yaml)
python train.py --data coco128.yaml --weights yolov5s.pt --img 640

# Validate the performance (Precision, Recall, mAP) of a trained model (e.g., yolov5s.pt)
python val.py --weights yolov5s.pt --data coco128.yaml --img 640

# Run inference (object detection) on images or videos using a trained model
python detect.py --weights yolov5s.pt --source path/to/your/images_or_videos/ --img 640

# Export the trained model to various formats like ONNX, CoreML, TFLite for deployment
# See https://docs.ultralytics.com/modes/export/ for more details
python export.py --weights yolov5s.pt --include onnx coreml tflite --img 640
有关训练、验证、预测(推理)和导出的详细指南,请参阅 Ultralytics 文档。
可选的额外步骤:增加交换内存
如果您正在处理非常大的数据集,或者在训练期间遇到内存限制,增加实例上的交换内存有时会有所帮助。交换空间允许系统使用磁盘空间作为虚拟 RAM。
# Allocate a 64GB swap file (adjust size as needed)
sudo fallocate -l 64G /swapfile

# Set correct permissions
sudo chmod 600 /swapfile

# Set up the file as a Linux swap area
sudo mkswap /swapfile

# Enable the swap file
sudo swapon /swapfile

# Verify the swap memory is active
free -h
恭喜!🎉 您已成功设置 AWS 深度学习实例,安装了 Ultralytics YOLOv5,并准备执行目标检测任务。无论您是使用预训练模型进行实验,还是在自己的数据上进行训练,这个强大的设置都为您的计算机视觉项目提供了可扩展的基础。如果您遇到任何问题,请查阅详尽的AWS 文档以及 Ultralytics 社区的有用资源,例如常见问题。祝您检测愉快!