Link to this sectionYOLOv5 快速入门 🚀#
开启你的实时 object detection 之旅,与 Ultralytics YOLOv5 一起探索动态世界!本指南旨在为旨在掌握 YOLOv5 的 AI 爱好者和专业人士提供一个全面的起点。从初始设置到高级 training techniques,我们都为你准备好了。读完本指南,你将掌握如何利用最先进的 deep learning 方法将 YOLOv5 自信地应用到你的项目中。让我们点火引擎,翱翔在 YOLOv5 的世界吧!
Link to this section安装#
通过克隆 YOLOv5 repository 并配置环境来为起飞做准备。这将确保所有必要的 requirements 都已安装。请检查你是否准备好了 Python>=3.8.0 和 PyTorch>=1.8。这些基础工具对于高效运行 YOLOv5 至关重要。
git clone https://github.com/ultralytics/yolov5 # clone repository
cd yolov5
pip install -r requirements.txt # install dependencies
Link to this section使用 PyTorch Hub 进行推理#
Experience the simplicity of YOLOv5 PyTorch Hub inference, where models are seamlessly downloaded from the latest YOLOv5 release. This method leverages the power of PyTorch for easy model loading and execution, making it straightforward to get predictions.
import torch

# Model loading
model = torch.hub.load("ultralytics/yolov5", "yolov5s")  # Can be 'yolov5n' - 'yolov5x6', or 'custom'

# Inference on images
img = "https://ultralytics.com/images/zidane.jpg"  # Can be a file, Path, PIL, OpenCV, numpy, or list of images

# Run inference
results = model(img)

# Display results
results.print()  # Other options: .show(), .save(), .crop(), .pandas(), etc. Explore these in the Predict mode documentation.
Link to this section使用 detect.py 进行推理#
Harness detect.py for versatile inference on various sources. It automatically fetches models from the latest YOLOv5 release and saves results with ease. This script is ideal for command-line usage and integrating YOLOv5 into larger systems, supporting inputs like images, videos, directories, webcams, and even live streams.
python detect.py --weights yolov5s.pt --source 0                              # webcam
python detect.py --weights yolov5s.pt --source image.jpg                      # image
python detect.py --weights yolov5s.pt --source video.mp4                      # video
python detect.py --weights yolov5s.pt --source screen                         # screenshot
python detect.py --weights yolov5s.pt --source path/                          # directory
python detect.py --weights yolov5s.pt --source list.txt                       # list of images
python detect.py --weights yolov5s.pt --source list.streams                   # list of streams
python detect.py --weights yolov5s.pt --source 'path/*.jpg'                   # glob pattern
python detect.py --weights yolov5s.pt --source 'https://youtu.be/LNwODJXcvt4' # YouTube video
python detect.py --weights yolov5s.pt --source 'rtsp://example.com/media.mp4' # RTSP, RTMP, HTTP stream
Link to this section训练#
Replicate the YOLOv5 COCO dataset benchmarks by following the training instructions below. The necessary models and datasets (like coco128.yaml or the full coco.yaml) are pulled directly from the latest YOLOv5 release. Training YOLOv5n/s/m/l/x on a V100 GPU should typically take 1/2/4/6/8 days respectively (note that Multi-GPU training setups work faster). Maximize performance by using the highest possible --batch-size or use --batch-size -1 for the YOLOv5 AutoBatch feature, which automatically finds the optimal batch size. The following batch sizes are ideal for V100-16GB GPUs. Refer to our configuration guide for details on model configuration files (*.yaml).
# Train YOLOv5n on COCO128 for 3 epochs
python train.py --data coco128.yaml --epochs 3 --weights yolov5n.pt --batch-size 128

# Train YOLOv5s on COCO for 300 epochs
python train.py --data coco.yaml --epochs 300 --weights '' --cfg yolov5s.yaml --batch-size 64

# Train YOLOv5m on COCO for 300 epochs
python train.py --data coco.yaml --epochs 300 --weights '' --cfg yolov5m.yaml --batch-size 40

# Train YOLOv5l on COCO for 300 epochs
python train.py --data coco.yaml --epochs 300 --weights '' --cfg yolov5l.yaml --batch-size 24

# Train YOLOv5x on COCO for 300 epochs
python train.py --data coco.yaml --epochs 300 --weights '' --cfg yolov5x.yaml --batch-size 16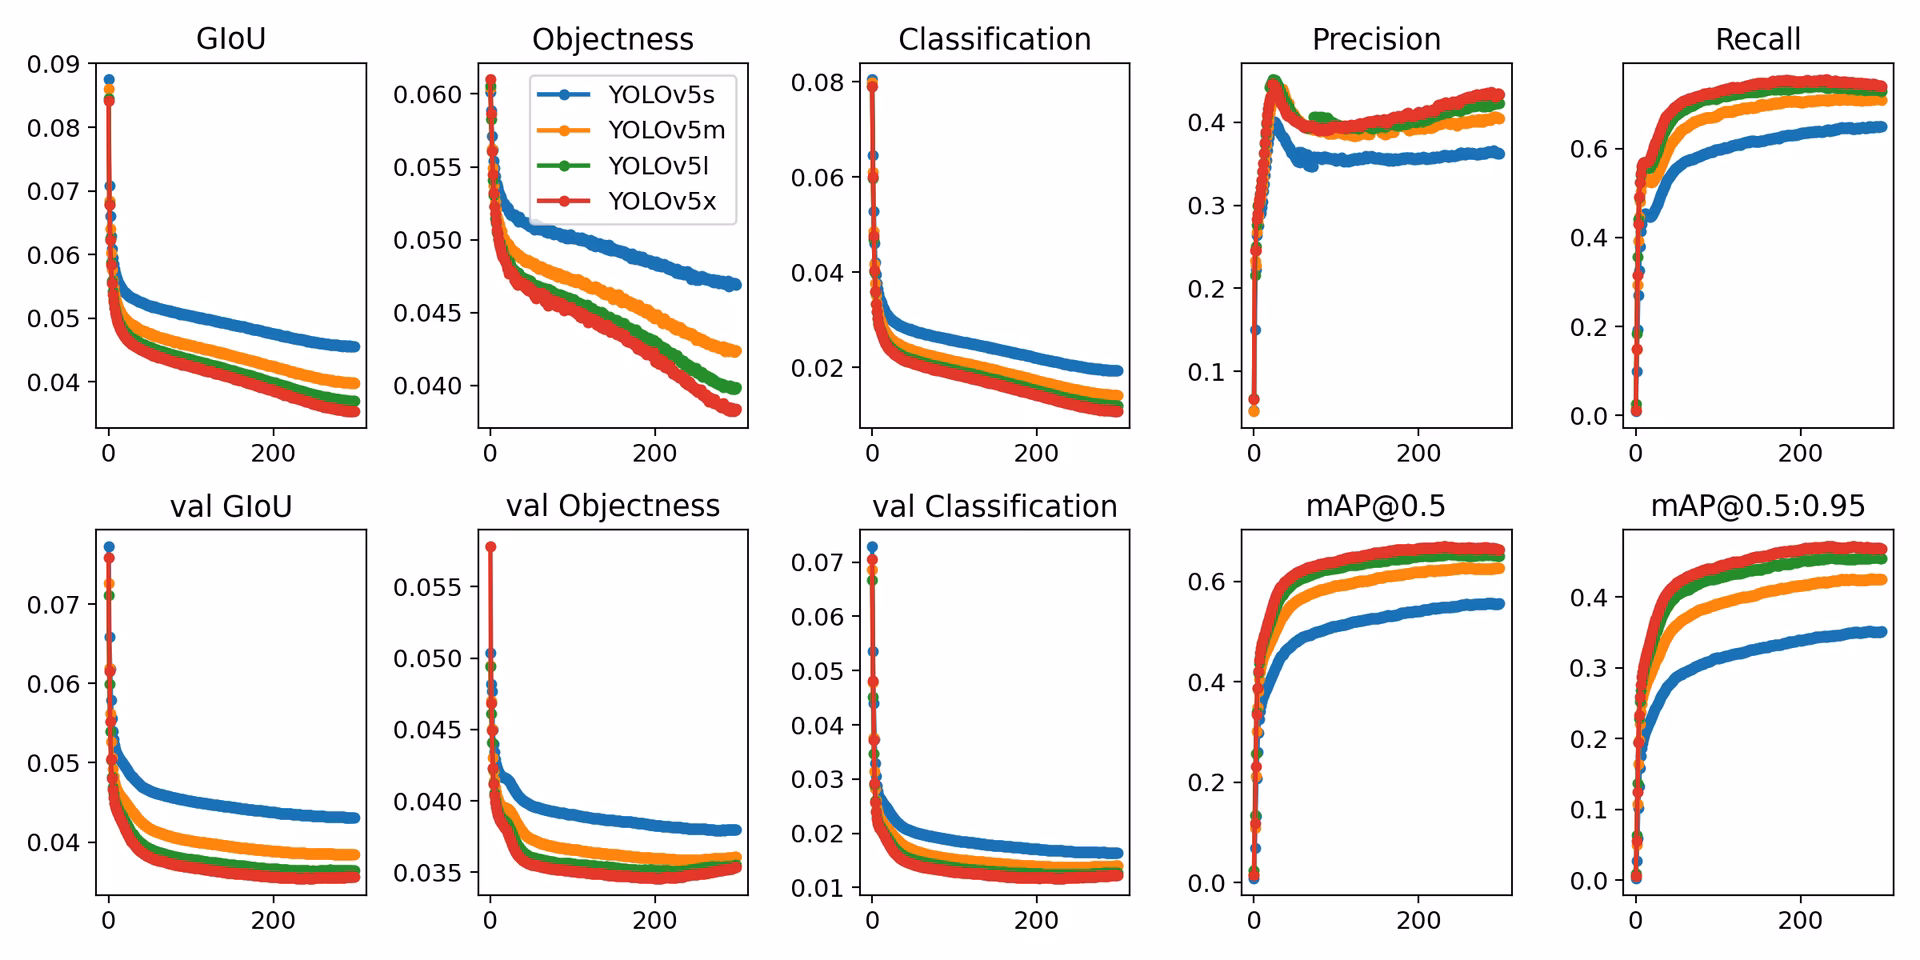
最后,YOLOv5 不仅是用于目标检测的最先进工具,也是 machine learning 强大能力的见证,它通过视觉理解改变了我们与世界互动的方式。当你深入本指南并开始将 YOLOv5 应用于你的项目时,请记住你正处于技术革命的最前沿,有能力在 computer vision 领域取得非凡成就。如果你需要更多见解或来自其他远见者的支持,欢迎访问我们的 GitHub repository,这里汇聚了充满活力的开发者和研究人员社区。探索更多资源,如 Ultralytics Platform 进行无代码数据集管理和模型训练,或查看我们的 Solutions 页面获取实际应用案例和灵感。保持探索,持续创新,享受 YOLOv5 带来的奇迹吧。祝你检测愉快! 🌠🔍