Neural Magic의 DeepSparse를 사용하여 YOLOv5 배포
소프트웨어 기반 AI에 오신 것을 환영합니다.
이 가이드에서는 Neural Magic의 DeepSparse를 사용하여 YOLOv5를 배포하는 방법을 설명합니다.
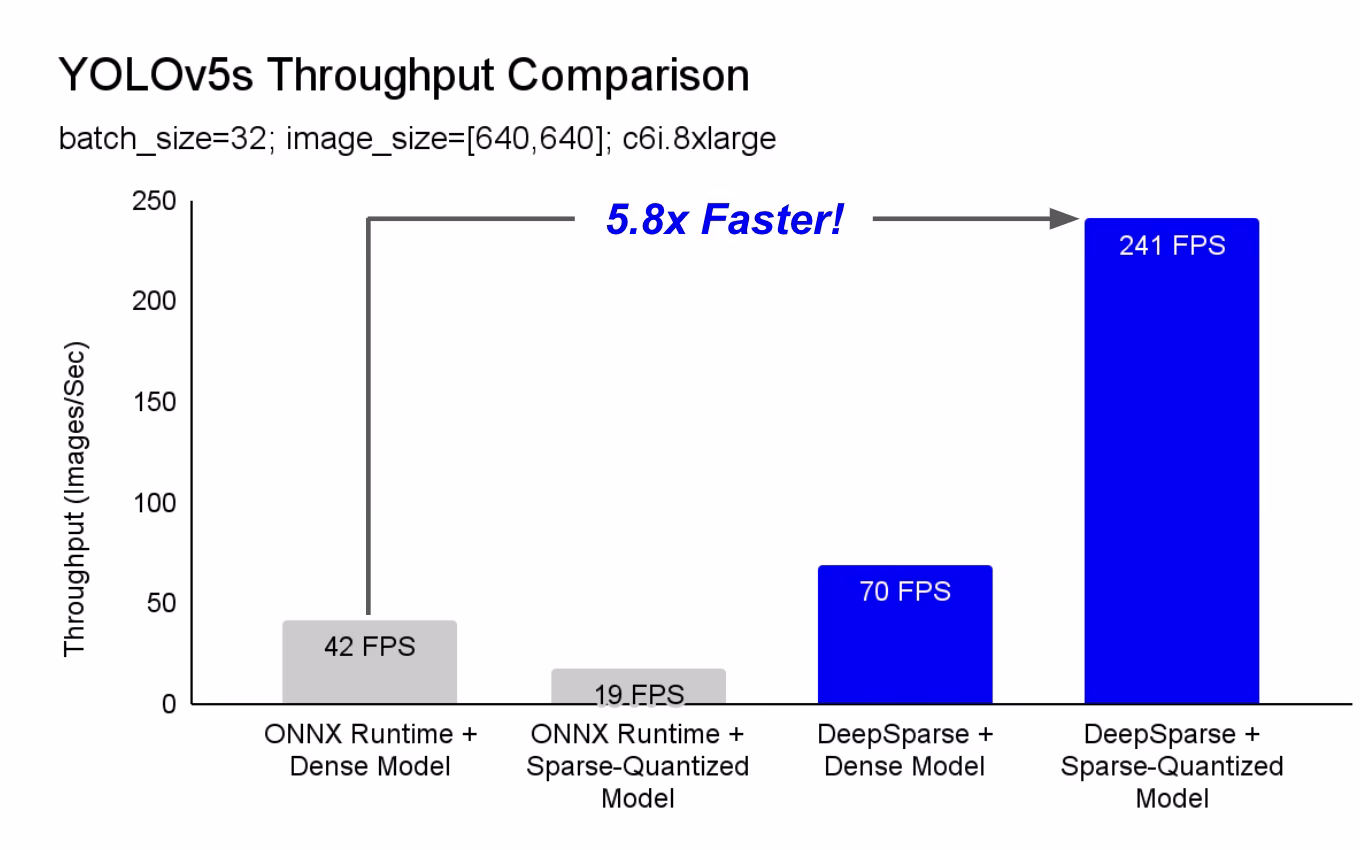
DeepSparse는 CPU에서 뛰어난 성능을 제공하는 추론 런타임입니다. 예를 들어 ONNX Runtime 기준선과 비교했을 때 DeepSparse는 동일한 시스템에서 실행되는 YOLOv5s에 대해 5.8배의 속도 향상을 제공합니다!
처음으로 귀사의 딥 러닝 워크로드는 하드웨어 가속기의 복잡성과 비용 없이 생산의 성능 요구 사항을 충족할 수 있습니다. 간단히 말해서 DeepSparse는 GPU의 성능과 소프트웨어의 단순성을 제공합니다.
- 유연한 배포: Intel에서 AMD, ARM에 이르기까지 모든 하드웨어 공급업체를 통해 클라우드, 데이터 센터 및 엣지에서 일관되게 실행됩니다.
- 무한한 확장성: 수직적으로 수백 개의 코어로 확장하거나, 표준 Kubernetes로 확장하거나, 서버리스로 완전히 추상화할 수 있습니다.
- 간편한 통합: 모델을 애플리케이션에 통합하고 프로덕션 환경에서 모니터링할 수 있는 깔끔한 API를 제공합니다.
DeepSparse는 어떻게 GPU 수준의 성능을 달성하나요?
DeepSparse는 모델 희소성을 활용하여 성능 향상을 이룹니다.
가지치기 및 양자화를 통한 희소화는 널리 연구된 기술로, 높은 정확도를 유지하면서 네트워크 실행에 필요한 크기와 계산량을 획기적으로 줄일 수 있습니다. DeepSparse는 희소성을 인식하므로 0으로 설정된 매개변수를 건너뛰어 순방향 패스의 계산량을 줄입니다. 희소 계산이 이제 메모리 바운드되므로 DeepSparse는 네트워크를 깊이별로 실행하여 문제를 캐시에 맞는 텐서 열, 즉 수직 계산 스트라이프로 분할합니다.
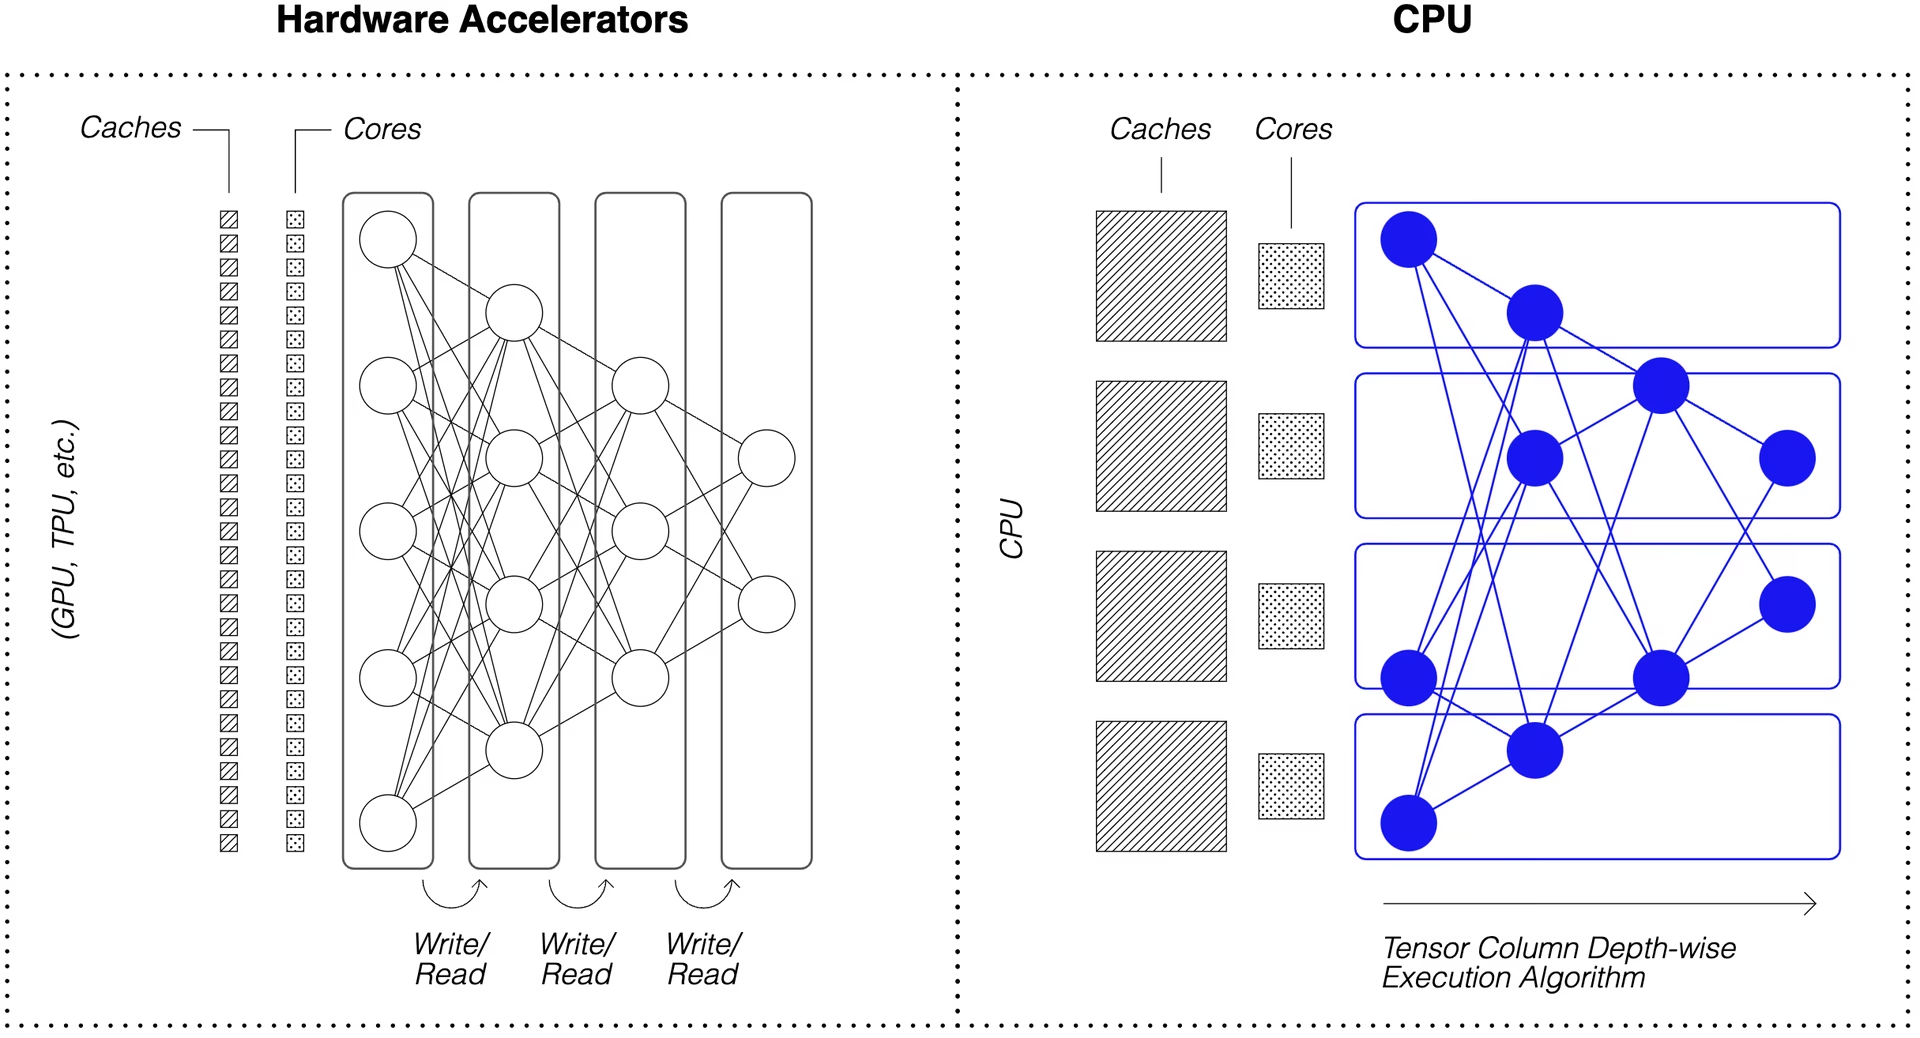
압축된 계산을 사용하는 희소 네트워크는 캐시에서 깊이별로 실행되므로 DeepSparse는 CPU에서 GPU 수준의 성능을 제공할 수 있습니다!
내 데이터로 학습된 YOLOv5의 희소 버전을 어떻게 만듭니까?
Neural Magic의 오픈 소스 모델 리포지토리인 SparseZoo에는 각 YOLOv5 모델의 사전 스파스화된 체크포인트가 포함되어 있습니다. Ultralytics와 통합된 SparseML을 사용하면 단일 CLI 명령으로 스파스 체크포인트를 데이터에 미세 조정할 수 있습니다.
자세한 내용은 Neural Magic의 YOLOv5 문서를 참조하십시오.
DeepSparse 사용법
DeepSparse를 사용하여 YOLOv5s의 희소 버전을 벤치마킹하고 배포하는 예제를 살펴보겠습니다.
DeepSparse 설치
DeepSparse를 설치하려면 다음을 실행하십시오. python 가상 환경을 사용하는 것이 좋습니다.
pip install "deepsparse[server,yolo,onnxruntime]"
ONNX 파일 수집
DeepSparse는 ONNX 형식의 모델을 다음 중 하나로 전달하여 허용합니다.
- SparseZoo에서 ONNX 파일을 식별하는 SparseZoo 스텁
- 파일 시스템에서 ONNX 모델의 로컬 경로
아래 예제에서는 다음 SparseZoo 스텁으로 식별되는 표준 밀집 및 가지치기-양자화된 YOLOv5s 체크포인트를 사용합니다.
zoo:cv/detection/yolov5-s/pytorch/ultralytics/coco/base-none
zoo:cv/detection/yolov5-s/pytorch/ultralytics/coco/pruned65_quant-none
모델 배포
DeepSparse는 모델을 애플리케이션에 통합하기 위한 편리한 API를 제공합니다.
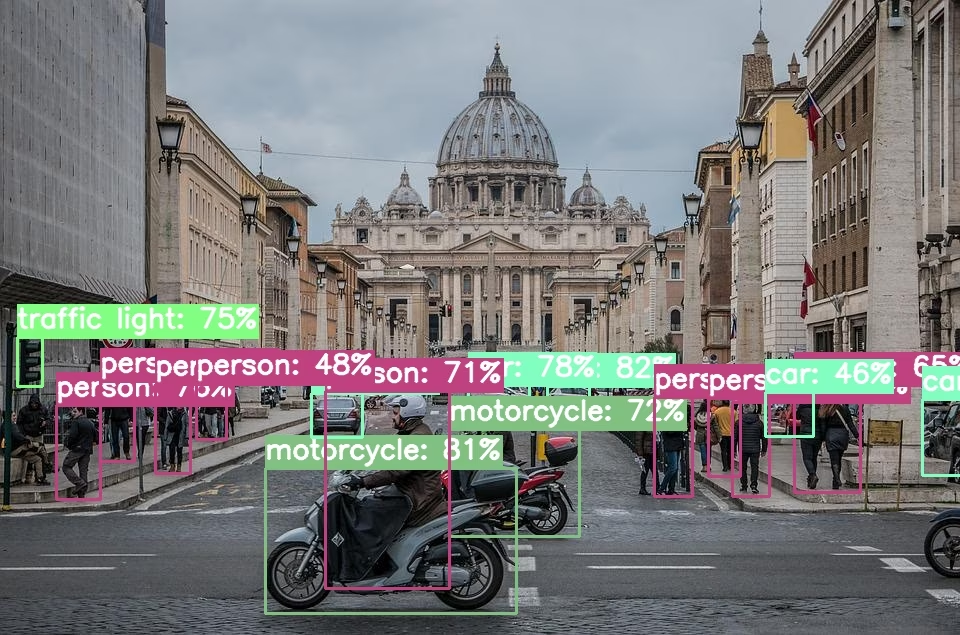
아래 배포 예제를 사용해 보려면 샘플 이미지를 가져와서 다음으로 저장하십시오. basilica.jpg 다음을 포함합니다.
wget -O basilica.jpg https://raw.githubusercontent.com/neuralmagic/deepsparse/main/src/deepsparse/yolo/sample_images/basilica.jpg
Python API
Pipelines 런타임 전후 처리를 래핑하여 DeepSparse를 애플리케이션에 추가하기 위한 깔끔한 인터페이스를 제공합니다. DeepSparse-Ultralytics 통합에는 즉시 사용 가능한 기능이 포함되어 있습니다. Pipeline raw 이미지를 허용하고 경계 상자를 출력합니다.
파일 만들기 Pipeline 추론을 실행합니다:
from deepsparse import Pipeline

# list of images in local filesystem
images = ["basilica.jpg"]

# create Pipeline
model_stub = "zoo:cv/detection/yolov5-s/pytorch/ultralytics/coco/pruned65_quant-none"
yolo_pipeline = Pipeline.create(
    task="yolo",
    model_path=model_stub,
)

# run inference on images, receive bounding boxes + classes
pipeline_outputs = yolo_pipeline(images=images, iou_thres=0.6, conf_thres=0.001)
print(pipeline_outputs)
클라우드에서 실행 중인 경우, OpenCV가 찾을 수 없다는 오류가 발생할 수 있습니다. libGL.so.1. 누락된 라이브러리를 설치할 수 있습니다:
apt-get install libgl1
또는 GUI 종속성을 완전히 피하는 헤드리스 Ultralytics 패키지를 사용할 수 있습니다:
pip install ultralytics-opencv-headless
HTTP 서버
DeepSparse 서버는 널리 사용되는 FastAPI 웹 프레임워크 및 Uvicorn 웹 서버를 기반으로 실행됩니다. 단일 CLI 명령으로 DeepSparse를 사용하여 모델 서비스 엔드포인트를 쉽게 설정할 수 있습니다. 서버는 YOLOv5를 사용한 객체 감지를 포함하여 DeepSparse의 모든 파이프라인을 지원하므로 원시 이미지를 엔드포인트로 보내고 경계 상자를 받을 수 있습니다.
가지치기 및 양자화된 YOLOv5s로 서버를 시작합니다.
deepsparse.server \
  --task yolo \
  --model_path zoo:cv/detection/yolov5-s/pytorch/ultralytics/coco/pruned65_quant-none
python을 사용한 요청 예시 requests 패키지:
import json

import requests

# list of images for inference (local files on client side)
path = ["basilica.jpg"]
files = [("request", open(img, "rb")) for img in path]

# send request over HTTP to /predict/from_files endpoint
url = "http://0.0.0.0:5543/predict/from_files"
resp = requests.post(url=url, files=files)

# response is returned in JSON
annotations = json.loads(resp.text)  # dictionary of annotation results
bounding_boxes = annotations["boxes"]
labels = annotations["labels"]
Annotate CLI
annotate 명령을 사용하여 엔진이 어노테이션이 추가된 사진을 디스크에 저장하도록 할 수도 있습니다. 다음을 시도해 보세요. --source 0 실시간 웹캠 피드를 주석 처리하려면!
deepsparse.object_detection.annotate --model_filepath zoo:cv/detection/yolov5-s/pytorch/ultralytics/coco/pruned65_quant-none --source basilica.jpg
위 명령을 실행하면 다음이 생성됩니다. annotation-results 폴더 안에 주석이 달린 이미지를 저장합니다.
성능 벤치마킹
DeepSparse의 벤치마킹 스크립트를 사용하여 YOLOv5s에 대한 DeepSparse의 처리량을 ONNX Runtime의 처리량과 비교할 것입니다.
벤치마크는 AWS에서 실행되었습니다. c6i.8xlarge 인스턴스(16 코어).
배치 32 성능 비교
ONNX Runtime 기준선
배치 32에서 ONNX Runtime은 표준 밀집 YOLOv5s로 초당 42개의 이미지를 달성합니다.
deepsparse.benchmark zoo:cv/detection/yolov5-s/pytorch/ultralytics/coco/base-none -s sync -b 32 -nstreams 1 -e onnxruntime

# Original Model Path: zoo:cv/detection/yolov5-s/pytorch/ultralytics/coco/base-none
# Batch Size: 32
# Scenario: sync
# Throughput (items/sec): 41.9025
DeepSparse 고밀도 성능
DeepSparse는 최적화된 스파스 모델에서 최고의 성능을 제공하지만 표준 dense YOLOv5s에서도 잘 작동합니다.
배치 32에서 DeepSparse는 표준 밀집 YOLOv5s로 초당 70개의 이미지를 달성하여 ORT보다 1.7배 더 높은 성능 향상을 제공합니다!
deepsparse.benchmark zoo:cv/detection/yolov5-s/pytorch/ultralytics/coco/base-none -s sync -b 32 -nstreams 1

# Original Model Path: zoo:cv/detection/yolov5-s/pytorch/ultralytics/coco/base-none
# Batch Size: 32
# Scenario: sync
# Throughput (items/sec): 69.5546
DeepSparse 희소 성능
스파시티를 모델에 적용할 때 DeepSparse의 성능 향상은 ONNX 대비 더욱 두드러집니다.
배치 32에서 DeepSparse는 가지치기 및 양자화된 YOLOv5s로 초당 241개의 이미지를 달성하여 ORT보다 5.8배 더 높은 성능 향상을 제공합니다!
deepsparse.benchmark zoo:cv/detection/yolov5-s/pytorch/ultralytics/coco/pruned65_quant-none -s sync -b 32 -nstreams 1

# Original Model Path: zoo:cv/detection/yolov5-s/pytorch/ultralytics/coco/pruned65_quant-none
# Batch Size: 32
# Scenario: sync
# Throughput (items/sec): 241.2452
배치 1 성능 비교
DeepSparse는 또한 지연 시간에 민감한 배치 1 시나리오에서 ONNX Runtime보다 빠른 속도를 얻을 수 있습니다.
ONNX Runtime 기준선
배치 1에서 ONNX Runtime은 표준 밀집 YOLOv5s로 초당 48개의 이미지를 달성합니다.
deepsparse.benchmark zoo:cv/detection/yolov5-s/pytorch/ultralytics/coco/base-none -s sync -b 1 -nstreams 1 -e onnxruntime

# Original Model Path: zoo:cv/detection/yolov5-s/pytorch/ultralytics/coco/base-none
# Batch Size: 1
# Scenario: sync
# Throughput (items/sec): 48.0921
DeepSparse 희소 성능
배치 1에서 DeepSparse는 가지치기 및 양자화된 YOLOv5s로 초당 135개의 항목을 달성하여 ONNX Runtime보다 2.8배 더 높은 성능을 제공합니다!
deepsparse.benchmark zoo:cv/detection/yolov5-s/pytorch/ultralytics/coco/pruned65_quant-none -s sync -b 1 -nstreams 1

# Original Model Path: zoo:cv/detection/yolov5-s/pytorch/ultralytics/coco/pruned65_quant-none
# Batch Size: 1
# Scenario: sync
# Throughput (items/sec): 134.9468
이후 c6i.8xlarge 인스턴스에 VNNI 명령어가 있는 경우, 가중치가 4개 블록으로 정리되면 DeepSparse의 처리량을 더욱 늘릴 수 있습니다.
배치 1에서 DeepSparse는 4블록 가지치기 및 양자화된 YOLOv5s로 초당 180개의 항목을 달성하여 ONNX Runtime보다 3.7배 더 높은 성능을 제공합니다!
deepsparse.benchmark zoo:cv/detection/yolov5-s/pytorch/ultralytics/coco/pruned35_quant-none-vnni -s sync -b 1 -nstreams 1

# Original Model Path: zoo:cv/detection/yolov5-s/pytorch/ultralytics/coco/pruned35_quant-none-vnni
# Batch Size: 1
# Scenario: sync
# Throughput (items/sec): 179.7375
DeepSparse 시작하기
연구 또는 테스트? DeepSparse Community는 연구 및 테스트에 무료로 사용할 수 있습니다. 설명서를 참조하여 시작하십시오.
DeepSparse를 사용하여 YOLOv5를 배포하는 방법에 대한 자세한 내용은 Neural Magic의 DeepSparse 문서 및 DeepSparse 통합에 대한 Ultralytics 블로그 게시물을 확인하십시오.


