使用Neural Magic的DeepSparse部署YOLOv5
欢迎体验软件驱动的 AI。
本指南介绍了如何使用 Neural Magic 的 DeepSparse 部署 YOLOv5。
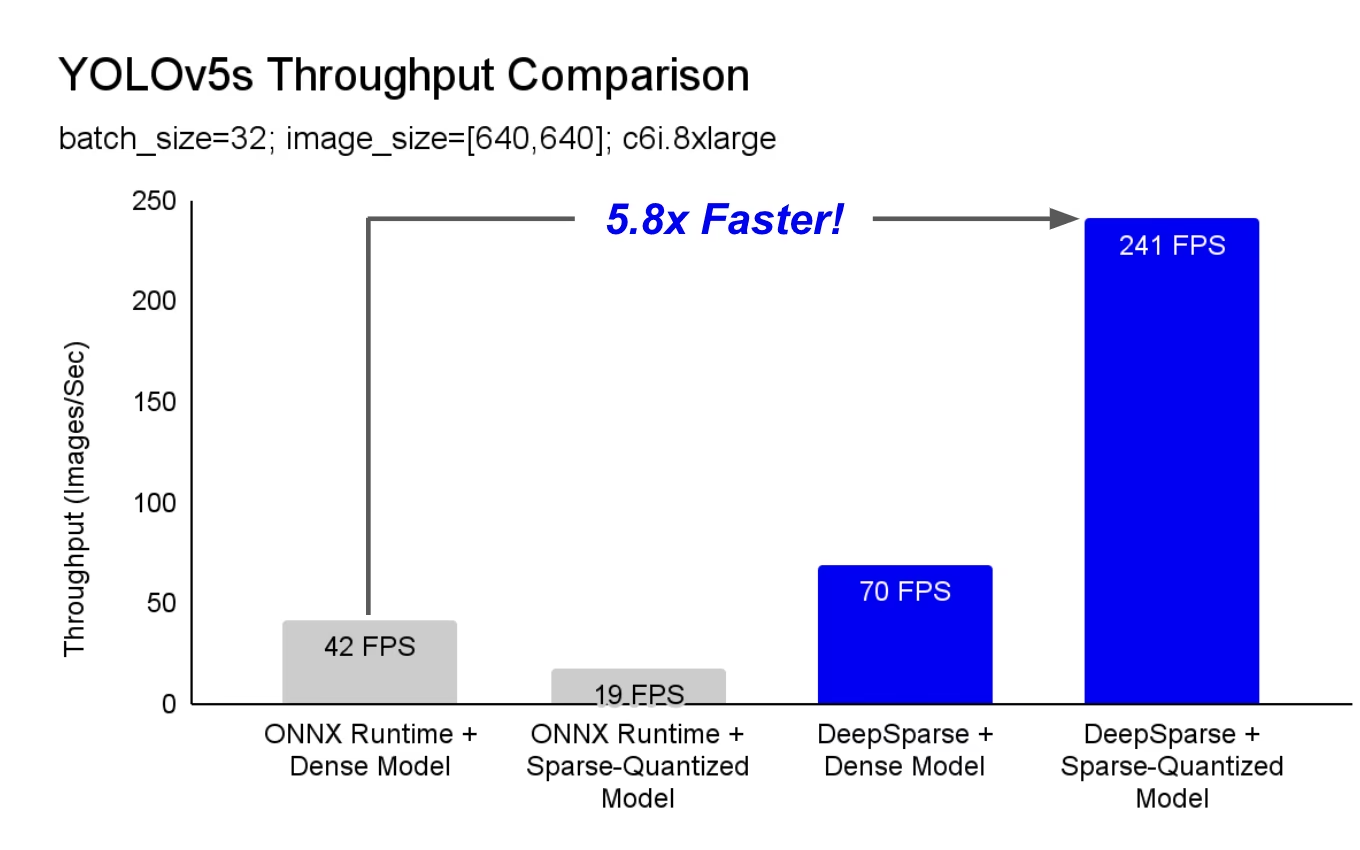
DeepSparse 是一个在 CPU 上具有卓越性能的推理运行时。例如,与 ONNX Runtime 基线相比,DeepSparse 在同一台机器上运行 YOLOv5s 时,速度提高了 5.8 倍!

您的 深度学习 工作负载首次可以在满足生产性能需求的同时,避免硬件加速器的复杂性和成本。简而言之,DeepSparse 为您提供 GPU 的性能和软件的简易性:
- 灵活部署: 在云、数据中心和边缘上,通过从 Intel 到 AMD 再到 ARM 的任何硬件提供商保持一致运行
- 无限可扩展性: 纵向扩展到数百个内核,使用标准 Kubernetes,或使用 Serverless 完全抽象
- 易于集成:用于将模型集成到应用程序中并在生产环境中对其进行监控的简洁 API
DeepSparse 如何实现 GPU 级别的性能?
DeepSparse 利用模型稀疏性来提高其性能速度。
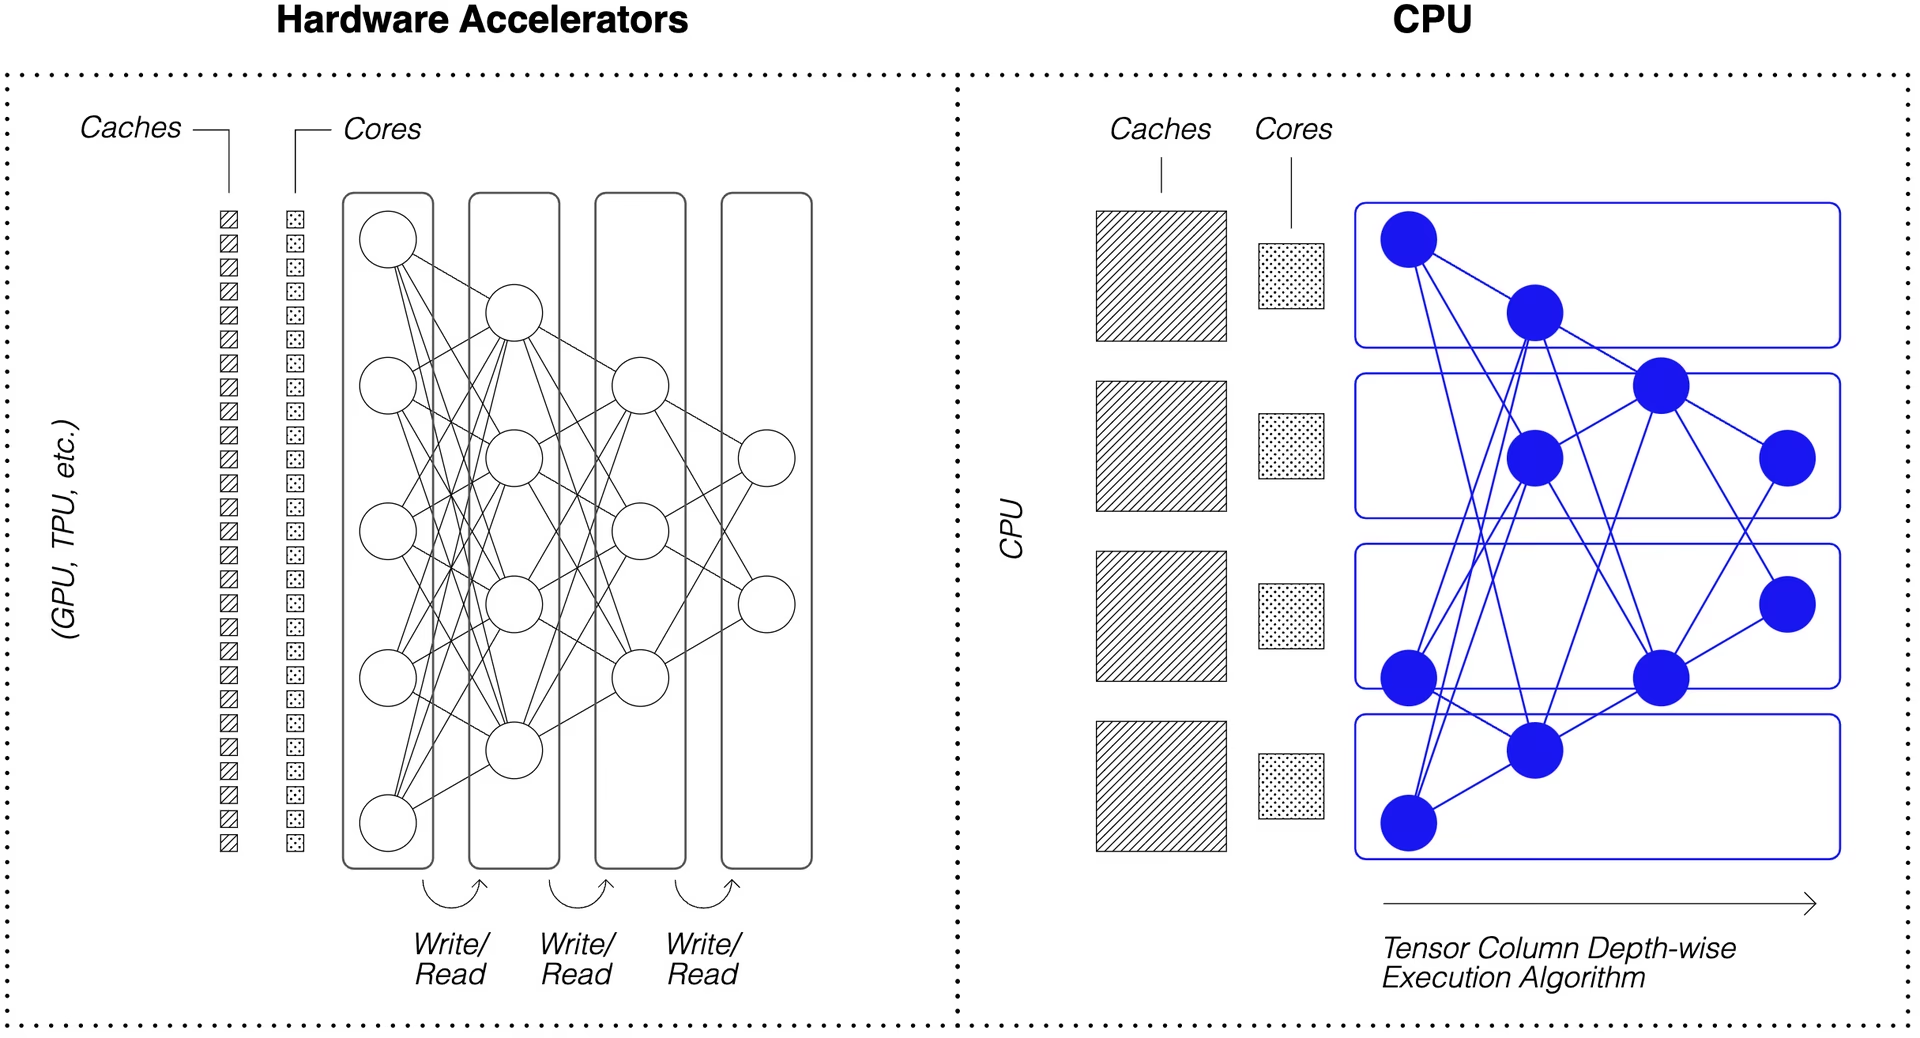
通过剪枝和量化实现的稀疏化是一种被广泛研究的技术,可以在保持高准确性的同时,大幅减少执行网络所需的大小和计算量。DeepSparse 具有稀疏感知能力,这意味着它可以跳过归零的参数,从而减少前向传递中的计算量。由于稀疏计算现在受内存限制,DeepSparse 以深度方式执行网络,将问题分解为 Tensor Columns,即适合缓存在计算中的垂直条纹。

具有压缩计算的稀疏网络,在缓存中以深度方式执行,使 DeepSparse 能够在 CPU 上提供 GPU 级别的性能!
如何创建基于我的数据训练的 YOLOv5 稀疏版本?
Neural Magic 的开源模型存储库 SparseZoo 包含每个 YOLOv5 模型的预稀疏化检查点。使用与 Ultralytics 集成的 SparseML,您可以使用单个 CLI 命令将稀疏检查点微调到您的数据上。
查看 Neural Magic 的 YOLOv5 文档以获取更多详细信息。
DeepSparse 用法
我们将通过一个示例来演示如何使用 DeepSparse 对 YOLOv5s 的稀疏版本进行基准测试和部署。
安装 DeepSparse
运行以下命令来安装 DeepSparse。我们建议您使用带有 Python 的虚拟环境。
pip install "deepsparse[server,yolo,onnxruntime]"
收集 ONNX 文件
DeepSparse 接受 ONNX 格式的模型,可以通过以下方式传递:
- SparseZoo 存根,用于标识 SparseZoo 中的 ONNX 文件
- 文件系统中 ONNX 模型的本地路径
以下示例使用标准的密集和剪枝量化 YOLOv5s 检查点,由以下 SparseZoo 存根标识:
zoo:cv/detection/yolov5-s/pytorch/ultralytics/coco/base-none
zoo:cv/detection/yolov5-s/pytorch/ultralytics/coco/pruned65_quant-none
部署模型
DeepSparse 提供了方便的 API,用于将您的模型集成到应用程序中。
要尝试以下部署示例,请提取示例图像并将其另存为 basilica.jpg 包括以下内容:
wget -O basilica.jpg https://raw.githubusercontent.com/neuralmagic/deepsparse/main/src/deepsparse/yolo/sample_images/basilica.jpg
Python API
Pipelines 围绕运行时封装预处理和输出后处理,为向应用程序添加 DeepSparse 提供了一个清晰的接口。DeepSparse-Ultralytics 集成包括一个开箱即用的 Pipeline 接受原始图像并输出边界框。
创建一个 Pipeline 并运行推理:
from deepsparse import Pipeline

# list of images in local filesystem
images = ["basilica.jpg"]

# create Pipeline
model_stub = "zoo:cv/detection/yolov5-s/pytorch/ultralytics/coco/pruned65_quant-none"
yolo_pipeline = Pipeline.create(
    task="yolo",
    model_path=model_stub,
)

# run inference on images, receive bounding boxes + classes
pipeline_outputs = yolo_pipeline(images=images, iou_thres=0.6, conf_thres=0.001)
print(pipeline_outputs)
如果您在云端运行,可能会遇到OpenCV无法找到 libGL.so.1的错误。您可以安装缺失的库:
apt-get install libgl1
或者使用无头Ultralytics包,它完全避免了GUI依赖:
pip install ultralytics-opencv-headless
HTTP 服务器
DeepSparse Server 运行在流行的 FastAPI Web 框架和 Uvicorn Web 服务器之上。只需一个 CLI 命令,您就可以使用 DeepSparse 轻松设置模型服务端点。该服务器支持来自 DeepSparse 的任何 Pipeline,包括使用 YOLOv5 的 目标检测,使您可以将原始图像发送到端点并接收边界框。
使用修剪量化的 YOLOv5s 启动服务器:
deepsparse.server \
  --task yolo \
  --model_path zoo:cv/detection/yolov5-s/pytorch/ultralytics/coco/pruned65_quant-none
使用 python 的示例请求 requests 软件包的更多详细信息:
import json

import requests

# list of images for inference (local files on client side)
path = ["basilica.jpg"]
files = [("request", open(img, "rb")) for img in path]

# send request over HTTP to /predict/from_files endpoint
url = "http://0.0.0.0:5543/predict/from_files"
resp = requests.post(url=url, files=files)

# response is returned in JSON
annotations = json.loads(resp.text)  # dictionary of annotation results
bounding_boxes = annotations["boxes"]
labels = annotations["labels"]
标注 CLI
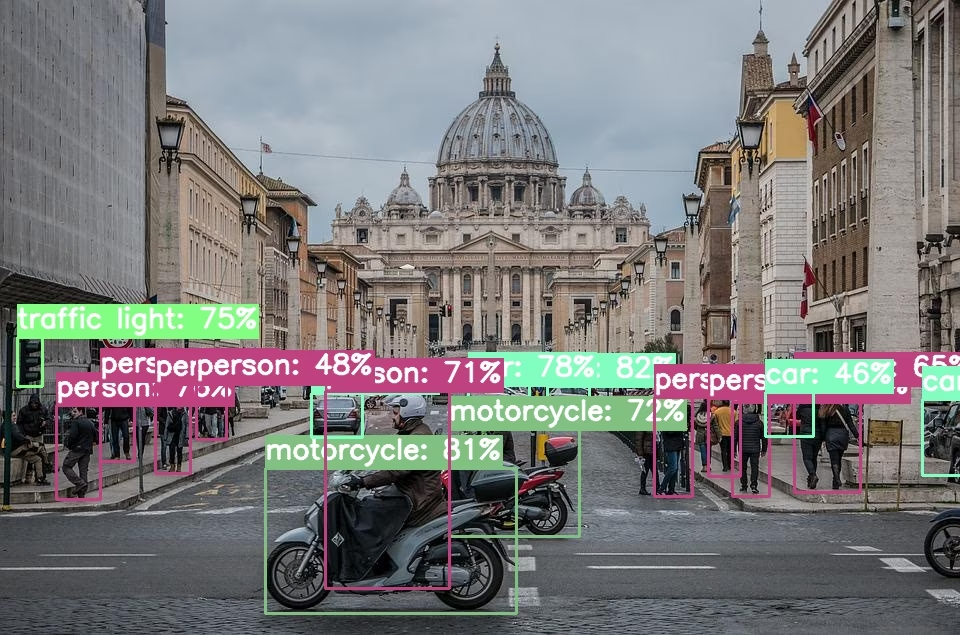
您还可以使用 annotate 命令,让引擎将带注释的照片保存到磁盘。尝试一下: --source 0 来注释您的实时网络摄像头Feed!
deepsparse.object_detection.annotate --model_filepath zoo:cv/detection/yolov5-s/pytorch/ultralytics/coco/pruned65_quant-none --source basilica.jpg
运行上述命令将创建一个 annotation-results 文件夹中,并将标注的图像保存在其中。

性能基准测试
我们将使用 DeepSparse 的基准测试脚本,比较 DeepSparse 与 ONNX Runtime 在 YOLOv5s 上的吞吐量。
这些基准测试是在 AWS 上运行的。 c6i.8xlarge 实例(16 核)。
批次 32 性能比较
ONNX Runtime 基准
在 batch 32 时,ONNX Runtime 使用标准的密集 YOLOv5s 实现了 42 images/秒:
deepsparse.benchmark zoo:cv/detection/yolov5-s/pytorch/ultralytics/coco/base-none -s sync -b 32 -nstreams 1 -e onnxruntime

# Original Model Path: zoo:cv/detection/yolov5-s/pytorch/ultralytics/coco/base-none
# Batch Size: 32
# Scenario: sync
# Throughput (items/sec): 41.9025
DeepSparse 密集性能
虽然 DeepSparse 在优化后的稀疏模型上表现最佳,但它在标准的密集 YOLOv5s 模型上也能很好地运行。
在 batch 32 时,DeepSparse 使用标准的密集 YOLOv5s 实现了 70 images/秒,性能比 ORT 提升了 1.7 倍!
deepsparse.benchmark zoo:cv/detection/yolov5-s/pytorch/ultralytics/coco/base-none -s sync -b 32 -nstreams 1

# Original Model Path: zoo:cv/detection/yolov5-s/pytorch/ultralytics/coco/base-none
# Batch Size: 32
# Scenario: sync
# Throughput (items/sec): 69.5546
DeepSparse 稀疏性能
当稀疏性应用于模型时,DeepSparse相对于ONNX Runtime的性能提升更加显著。
在 batch 32 时,DeepSparse 使用经过剪枝量化的 YOLOv5s 实现了 241 images/秒,性能比 ORT 提升了 5.8 倍!
deepsparse.benchmark zoo:cv/detection/yolov5-s/pytorch/ultralytics/coco/pruned65_quant-none -s sync -b 32 -nstreams 1

# Original Model Path: zoo:cv/detection/yolov5-s/pytorch/ultralytics/coco/pruned65_quant-none
# Batch Size: 32
# Scenario: sync
# Throughput (items/sec): 241.2452
批次 1 性能比较
对于延迟敏感的 batch 1 场景,DeepSparse 也能够获得比 ONNX Runtime 更快的速度。
ONNX Runtime 基准
在 batch 1 时,ONNX Runtime 使用标准的密集 YOLOv5s 实现了 48 images/秒。
deepsparse.benchmark zoo:cv/detection/yolov5-s/pytorch/ultralytics/coco/base-none -s sync -b 1 -nstreams 1 -e onnxruntime

# Original Model Path: zoo:cv/detection/yolov5-s/pytorch/ultralytics/coco/base-none
# Batch Size: 1
# Scenario: sync
# Throughput (items/sec): 48.0921
DeepSparse 稀疏性能
在 batch 1 时,DeepSparse 使用经过剪枝量化的 YOLOv5s 实现了 135 items/秒,性能比 ONNX Runtime 提升了 2.8 倍!
deepsparse.benchmark zoo:cv/detection/yolov5-s/pytorch/ultralytics/coco/pruned65_quant-none -s sync -b 1 -nstreams 1

# Original Model Path: zoo:cv/detection/yolov5-s/pytorch/ultralytics/coco/pruned65_quant-none
# Batch Size: 1
# Scenario: sync
# Throughput (items/sec): 134.9468
由于 c6i.8xlarge 实例具有 VNNI 指令,如果权重以 4 个块为单位进行修剪,则 DeepSparse 的吞吐量可以进一步提高。
在 batch 1 时,DeepSparse 使用 4-block 经过剪枝量化的 YOLOv5s 实现了 180 items/秒,性能比 ONNX Runtime 提升了 3.7 倍!
deepsparse.benchmark zoo:cv/detection/yolov5-s/pytorch/ultralytics/coco/pruned35_quant-none-vnni -s sync -b 1 -nstreams 1

# Original Model Path: zoo:cv/detection/yolov5-s/pytorch/ultralytics/coco/pruned35_quant-none-vnni
# Batch Size: 1
# Scenario: sync
# Throughput (items/sec): 179.7375
开始使用 DeepSparse
研究或测试? DeepSparse Community 免费提供研究和测试。通过他们的文档开始使用。
有关使用 DeepSparse 部署 YOLOv5 的更多信息,请查看 Neural Magic 的 DeepSparse 文档 和 Ultralytics 关于 DeepSparse 集成的博客文章。