Schnellstartanleitung: NVIDIA Jetson mit Ultralytics YOLO26
Diese Anleitung führt dich durch die Bereitstellung von Ultralytics YOLO26 auf NVIDIA Jetson-Geräten und enthält Leistungsbenchmarks, die zeigen, was YOLO26 auf diesen kompakten, energieeffizienten Geräten leisten kann.
Wir haben diese Anleitung mit dem neuesten NVIDIA Jetson AGX Thor Developer Kit aktualisiert. Es bietet bis zu 2070 FP4 TFLOPS KI-Rechenleistung und 128 GB Speicher bei einer konfigurierbaren Leistungsaufnahme zwischen 40 W und 130 W. Damit liefert es mehr als die 7,5-fache KI-Rechenleistung des NVIDIA Jetson AGX Orin und eine 3,5-mal höhere Energieeffizienz bei der Ausführung der beliebtesten KI-Modelle.
Sieh dir an: Erreiche schnellere Inferenz mit Ultralytics YOLO26 auf NVIDIA-Jetson-Geräten 🚀
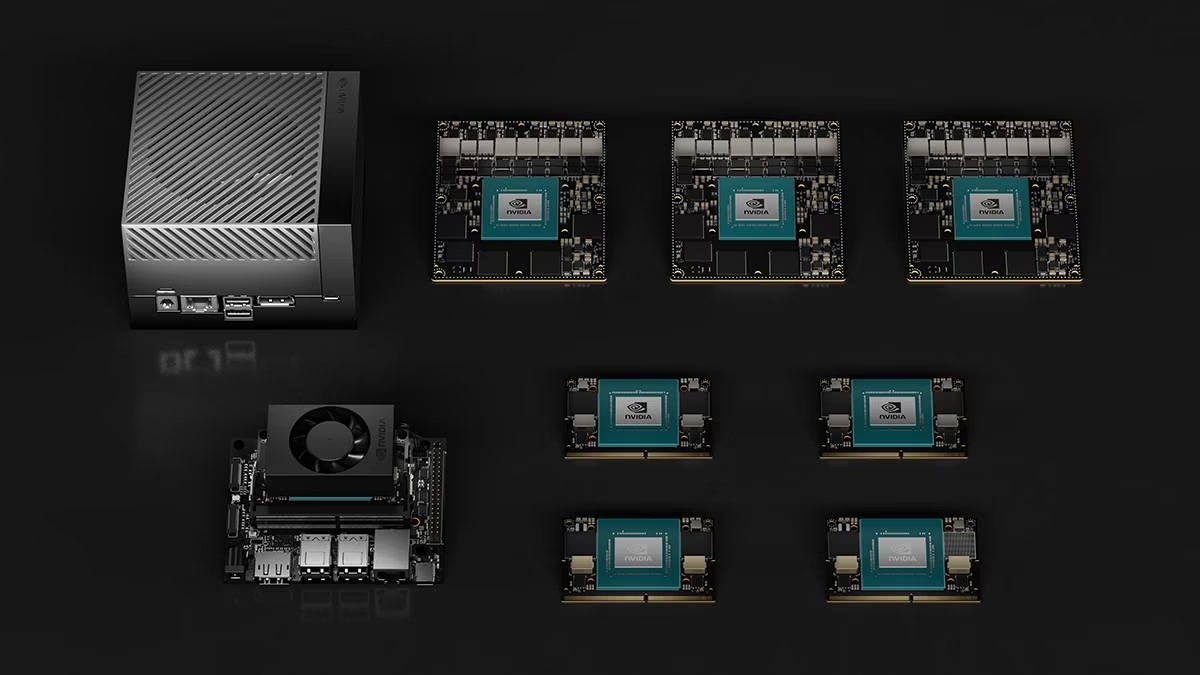
Diese Anleitung wurde mit dem NVIDIA Jetson AGX Thor Developer Kit (Jetson T5000) und dem NVIDIA Jetson AGX Orin Developer Kit (64GB) mit der aktuellen stabilen Version JetPack 7.2 getestet. Getestet wurde außerdem mit dem NVIDIA Jetson Orin Nano Super Developer Kit mit der JetPack-Version JP6.1, dem Seeed Studio reComputer J4012, das auf NVIDIA Jetson Orin NX 16GB basiert und mit der JetPack-Version JP6.0 beziehungsweise JP5.1.3 läuft, sowie dem Seeed Studio reComputer J1020 v2, das auf NVIDIA Jetson Nano 4GB basiert und mit der JetPack-Version JP4.6.1 läuft. Die Anleitung sollte mit der gesamten NVIDIA Jetson-Hardwarefamilie funktionieren, einschließlich der neuesten und älteren Geräte.
Was ist NVIDIA Jetson?#
NVIDIA Jetson ist eine Reihe von Platinen für eingebettete Computersysteme, die dafür entwickelt wurden, beschleunigte Rechenleistung für AI (künstliche Intelligenz) auf Edge-Geräten bereitzustellen. Diese kompakten und leistungsstarken Geräte basieren auf der GPU-Architektur von NVIDIA und können komplexe AI-Algorithmen und Deep Learning-Modelle direkt auf dem Gerät ausführen, ohne auf Cloud-Computing-Ressourcen angewiesen zu sein. Jetson-Platinen werden häufig in der Robotik, in autonomen Fahrzeugen, in der industriellen Automatisierung und in anderen Anwendungen eingesetzt, in denen AI-Inferenz lokal mit geringer Latenz und hoher Effizienz erfolgen muss. Außerdem basieren diese Platinen auf der ARM64-Architektur und verbrauchen weniger Strom als herkömmliche Geräte für GPU-Berechnungen.
Vergleich der NVIDIA Jetson-Serie#
Der NVIDIA Jetson AGX Thor ist die neueste Generation der NVIDIA-Jetson-Familie und basiert auf der NVIDIA-Blackwell-Architektur, die deutlich höhere AI-Leistung als frühere Generationen bietet. Die folgende Tabelle vergleicht einige der Jetson-Geräte im Ökosystem.
| Jetson AGX Thor (T5000) | Jetson AGX Orin 64GB | Jetson Orin NX 16GB | Jetson Orin Nano Super | Jetson AGX Xavier | Jetson Xavier NX | Jetson Nano | |
|---|---|---|---|---|---|---|---|
| KI-Leistung | 2070 TFLOPS | 275 TOPS | 100 TOPS | 67 TOPS | 32 TOPS | 21 TOPS | 472 GFLOPS |
| GPU | NVIDIA-Blackwell-GPU mit 2560 Kernen und 96 Tensor Cores | NVIDIA-Ampere-GPU mit 2048 Kernen und 64 Tensor Cores | NVIDIA-Ampere-GPU mit 1024 Kernen und 32 Tensor Cores | NVIDIA-Ampere-GPU mit 1024 Kernen und 32 Tensor Cores | NVIDIA-Volta-GPU mit 512 Kernen und 64 Tensor Cores | NVIDIA-Volta™-GPU mit 384 Kernen und 48 Tensor Cores | NVIDIA-Maxwell™-GPU mit 128 Kernen |
| Maximale GPU-Taktfrequenz | 1.57 GHz | 1.3 GHz | 918 MHz | 1020 MHz | 1377 MHz | 1100 MHz | 921MHz |
| CPU | 64-Bit-CPU Arm® Neoverse®-V3AE mit 14 Kernen, 1 MB L2-Cache und 16 MB L3-Cache | 64-Bit-CPU NVIDIA Arm® Cortex A78AE v8.2 mit 12 Kernen, 3 MB L2-Cache und 6 MB L3-Cache | 64-Bit-CPU NVIDIA Arm® Cortex A78AE v8.2 mit 8 Kernen, 2 MB L2-Cache und 4 MB L3-Cache | 6-Kern Arm® Cortex®-A78AE v8.2 64-Bit-CPU, 1,5 MB L2 + 4 MB L3 | 8-Kern NVIDIA Carmel Arm®v8.2 64-Bit-CPU, 8 MB L2 + 4 MB L3 | 6-Kern NVIDIA Carmel Arm®v8.2 64-Bit-CPU, 6 MB L2 + 4 MB L3 | Quad-Core-Prozessor Arm® Cortex®-A57 MPCore |
| Maximale CPU-Frequenz | 2.6 GHz | 2.2 GHz | 2.0 GHz | 1.7 GHz | 2.2 GHz | 1.9 GHz | 1.43GHz |
| Speicher | 128 GB, 256 Bit LPDDR5X, 273 GB/s | 64 GB, 256 Bit LPDDR5, 204,8 GB/s | 16 GB, 128 Bit LPDDR5, 102,4 GB/s | 8 GB, 128 Bit LPDDR5, 102 GB/s | 32 GB, 256 Bit LPDDR4x, 136,5 GB/s | 8 GB, 128 Bit LPDDR4x, 59,7 GB/s | 4 GB, 64 Bit LPDDR4, 25,6 GB/s |
Was ist NVIDIA JetPack?#
Das NVIDIA JetPack SDK treibt die Jetson-Module an und bietet eine vollständige Entwicklungsumgebung zum Erstellen durchgängig beschleunigter KI-Anwendungen. JetPack umfasst Jetson Linux mit Bootloader, Linux-Kernel, Ubuntu-Desktopumgebung und eine vollständige Bibliothekssammlung zur Beschleunigung von GPU-Berechnungen, Multimedia, Grafik und Computer Vision. Außerdem enthält es Beispiele, Dokumentation und Entwicklertools für Hostcomputer und Entwicklerkit und unterstützt höherstufige SDKs wie DeepStream für die Streaming-Videoanalyse, Isaac für Robotik und Riva für dialogbasierte KI.
JetPack auf NVIDIA Jetson flashen#
Der erste Schritt nach dem Erhalt eines NVIDIA Jetson-Geräts ist, NVIDIA JetPack auf das Gerät zu flashen. Dafür gibt es mehrere Möglichkeiten.
- Lade für JetPack 7.2 auf einem offiziellen Jetson AGX Thor, AGX Orin oder Orin Nano Developer Kit die vereinheitlichte Jetson-ISO herunter, schreibe sie auf einen USB-Stick und folge der gerätespezifischen Schnellstartanleitung für AGX Thor, AGX Orin oder Orin Nano. Ab JetPack 7.2 gibt es für Orin Nano kein herunterladbares SD-Kartenabbild mehr. Die Installation über die ISO auf dem USB-Stick installiert Jetson Linux auf der microSD-Karte oder NVMe-SSD des Geräts.
- Wenn du absichtlich JetPack 6 auf einem Jetson Orin Nano Developer Kit verwendest, folge den Anweisungen von NVIDIA zu JetPack 6.x-Updates und SD-Karten.
- Wenn du ein anderes NVIDIA Developer Kit besitzt, kannst du JetPack mit dem SDK Manager auf das Gerät flashen.
- Wenn du ein Seeed Studio reComputer J4012 besitzt, kannst du JetPack auf die mitgelieferte SSD flashen. Wenn du ein Seeed Studio reComputer J1020 v2 besitzt, kannst du JetPack auf den eMMC-/SSD-Speicher flashen.
- Wenn du ein anderes Gerät eines Drittanbieters besitzt, das mit dem NVIDIA Jetson-Modul ausgestattet ist, empfehlen wir, über die Befehlszeile zu flashen.
Bei den oben genannten Methoden 1, 4 und 5 führst du nach dem Flashen des Systems und dem Starten des Geräts sudo apt update && sudo apt install nvidia-jetpack -y im Geräteterminal aus, um alle noch fehlenden JetPack-Komponenten zu installieren.
JetPack-Unterstützung nach Jetson-Gerät#
Die folgende Tabelle zeigt, welche JetPack-Versionen von den verschiedenen NVIDIA Jetson-Geräten unterstützt werden.
| JetPack 4 | JetPack 5 | JetPack 6 | JetPack 7 | |
|---|---|---|---|---|
| Jetson Nano | ✅ | ❌ | ❌ | ❌ |
| Jetson TX2 | ✅ | ❌ | ❌ | ❌ |
| Jetson Xavier NX | ✅ | ✅ | ❌ | ❌ |
| Jetson AGX Xavier | ✅ | ✅ | ❌ | ❌ |
| Jetson AGX Orin | ❌ | ✅ | ✅ | ✅ |
| Jetson Orin NX | ❌ | ✅ | ✅ | ✅ |
| Jetson Orin Nano | ❌ | ✅ | ✅ | ✅ |
| Jetson AGX Thor | ❌ | ❌ | ❌ | ✅ |
Schnellstart mit Docker#
Am schnellsten startest du mit Ultralytics YOLO26 auf NVIDIA Jetson, indem du die vorgefertigten Docker-Images für Jetson ausführst. Sieh dir die obige Tabelle an und wähle die JetPack-Version passend zu deinem Jetson-Gerät aus.
t=ultralytics/ultralytics:latest-jetson-jetpack4
sudo docker pull $t && sudo docker run -it --ipc=host --runtime=nvidia $tDas Image latest-nvidia-arm64 verwendet NVIDIA PyTorch 26.10, einschließlich CUDA 13.4 und TensorRT 11.4. NVIDIA führt JetPack 7.1 für PyTorch in der Kompatibilitätstabelle auf, aber TensorRT 11 unterstützt JetPack nicht, auch nicht auf Thor. Verwende dieses Image nur für PyTorch-Workloads auf einem unterstützten Host. Verwende für TensorRT-Exporte auf Jetson die native Installation weiter unten mit der von deiner JetPack-Version unterstützten TensorRT-10.x-Laufzeitumgebung. JetPack 7.2 auf Thor oder Orin erfordert eine separate Container-Validierung. Erstelle die Engines für die jeweilige GPU und TensorRT-Version neu.
Für Images mit JetPack 4, 5 und 6 lies weiter unter TensorRT auf NVIDIA Jetson verwenden. Das obige Image für JetPack 7.1 ist ausschließlich für PyTorch-Workloads vorgesehen.
Mit der nativen Installation beginnen#
Eine native Installation ohne Docker wird in den folgenden Schritten beschrieben.
Unter JetPack 7.2 ausführen#
Ultralytics-Paket installieren#
Installiere das Ultralytics-Paket auf dem Jetson. Exportabhängigkeiten werden beim ersten Export eines Modells automatisch installiert, daher benötigst du hier nur das Basispaket. Diese Anleitung konzentriert sich auf NVIDIA-TensorRT-Exporte, da TensorRT die beste Leistung auf Jetson-Geräten bietet.
-
Paketlisten aktualisieren, pip installieren und auf die neueste Version aktualisieren
sudo apt update sudo apt install python3-pip -y pip install -U pip -
Das pip-Paket
ultralyticsinstallierenpip install ultralytics -
Gerät neu starten
sudo reboot
PyTorch und Torchvision installieren#
Bei der oben beschriebenen Installation von ultralytics werden Torch und Torchvision installiert. Diese beiden über pip installierten Pakete sind jedoch nicht mit Geräten mit JetPack 7.2 und CUDA 13 kompatibel und müssen daher manuell installiert werden.
torch und torchvision entsprechend JP7.2 installieren
pip install torch torchvision --index-url https://download.pytorch.org/whl/cu130onnxruntime-gpu installieren#
Verwende ein ONNX-Runtime-GPU-Wheel, das zu deinen JetPack-, Python- und CUDA-Versionen passt. Aktuelle PyPI-Versionen enthalten ARM64-Wheels, diese ersetzen jedoch nicht die gerätespezifischen Pakete für jede JetPack-Version.
Lade onnxruntime-gpu 1.24.0 herunter und installiere es mit Unterstützung für Python3.12.
pip install https://github.com/ultralytics/assets/releases/download/v0.0.0/onnxruntime_gpu-1.24.0-cp312-cp312-linux_aarch64.whlUnter JetPack 6.1 ausführen#
Ultralytics-Paket installieren#
Installiere das Ultralytics-Paket auf dem Jetson. Exportabhängigkeiten werden beim ersten Export eines Modells automatisch installiert, daher benötigst du hier nur das Basispaket. Diese Anleitung konzentriert sich auf NVIDIA-TensorRT-Exporte, da TensorRT die beste Leistung auf Jetson-Geräten bietet.
-
Paketlisten aktualisieren, pip installieren und auf die neueste Version aktualisieren
sudo apt update sudo apt install python3-pip -y pip install -U pip -
Das pip-Paket
ultralyticsinstallierenpip install ultralytics -
Gerät neu starten
sudo reboot
PyTorch und Torchvision installieren#
Bei der oben beschriebenen Installation von ultralytics werden Torch und Torchvision installiert. Diese beiden über pip installierten Pakete sind jedoch nicht mit der Jetson-Plattform kompatibel, die auf der ARM64-Architektur basiert. Deshalb musst du ein vorgefertigtes PyTorch-pip-Wheel manuell installieren und Torchvision aus dem Quellcode kompilieren oder installieren.
torch 2.10.0 und torchvision 0.25.0 entsprechend JP6.1 installieren
pip install https://github.com/ultralytics/assets/releases/download/v0.0.0/torch-2.10.0-cp310-cp310-linux_aarch64.whl
pip install https://github.com/ultralytics/assets/releases/download/v0.0.0/torchvision-0.25.0-cp310-cp310-linux_aarch64.whlAuf der PyTorch-für-Jetson-Seite findest du alle verfügbaren PyTorch-Versionen für die verschiedenen JetPack-Versionen. Eine ausführlichere Liste zur Kompatibilität von PyTorch und Torchvision findest du auf der Kompatibilitätsseite für PyTorch und Torchvision.
Installiere cuDSS, um ein Abhängigkeitsproblem mit torch 2.10.0 zu beheben
wget https://developer.download.nvidia.com/compute/cudss/0.7.1/local_installers/cudss-local-tegra-repo-ubuntu2204-0.7.1_0.7.1-1_arm64.deb
sudo dpkg -i cudss-local-tegra-repo-ubuntu2204-0.7.1_0.7.1-1_arm64.deb
sudo cp /var/cudss-local-tegra-repo-ubuntu2204-0.7.1/cudss-*-keyring.gpg /usr/share/keyrings/
sudo apt-get update
sudo apt-get -y install cudss
onnxruntime-gpu installieren#
Verwende ein ONNX-Runtime-GPU-Wheel, das zu deinen JetPack-, Python- und CUDA-Versionen passt. Aktuelle PyPI-Versionen enthalten ARM64-Wheels, diese ersetzen jedoch nicht die gerätespezifischen Pakete für jede JetPack-Version.
Alle verfügbaren onnxruntime-gpu-Pakete findest du – geordnet nach JetPack-Version, Python-Version und weiteren Kompatibilitätsdetails – in der Jetson-Zoo-Kompatibilitätsmatrix für ONNX Runtime.
Für JetPack 6 mit Unterstützung für Python 3.10 kannst du onnxruntime-gpu 1.23.0 installieren:
pip install https://github.com/ultralytics/assets/releases/download/v0.0.0/onnxruntime_gpu-1.23.0-cp310-cp310-linux_aarch64.whlAlternativ kannst du für onnxruntime-gpu 1.20.0 Folgendes installieren:
pip install https://github.com/ultralytics/assets/releases/download/v0.0.0/onnxruntime_gpu-1.20.0-cp310-cp310-linux_aarch64.whlUnter JetPack 5.1.2 ausführen#
Ultralytics-Paket installieren#
Installiere das Ultralytics-Paket auf dem Jetson. Exportabhängigkeiten werden beim ersten Export eines Modells automatisch installiert, daher benötigst du hier nur das Basispaket. Diese Anleitung konzentriert sich auf NVIDIA-TensorRT-Exporte, da TensorRT die beste Leistung auf Jetson-Geräten bietet.
-
Paketlisten aktualisieren, pip installieren und auf die neueste Version aktualisieren
sudo apt update sudo apt install python3-pip -y pip install -U pip -
Das pip-Paket
ultralyticsinstallierenpip install ultralytics -
Gerät neu starten
sudo reboot
PyTorch und Torchvision installieren#
Bei der oben beschriebenen Installation von ultralytics werden Torch und Torchvision installiert. Diese beiden über pip installierten Pakete sind jedoch nicht mit der Jetson-Plattform kompatibel, die auf der ARM64-Architektur basiert. Deshalb musst du ein vorgefertigtes PyTorch-pip-Wheel manuell installieren und Torchvision aus dem Quellcode kompilieren oder installieren.
-
Derzeit installierte PyTorch- und Torchvision-Versionen deinstallieren
pip uninstall torch torchvision -
torch 2.1.0undtorchvision 0.16.2entsprechend JP5.1.2 installierenpip install https://github.com/ultralytics/assets/releases/download/v0.0.0/torch-2.1.0a0+41361538.nv23.06-cp38-cp38-linux_aarch64.whl pip install https://github.com/ultralytics/assets/releases/download/v0.0.0/torchvision-0.16.2+c6f3977-cp38-cp38-linux_aarch64.whl
Auf der PyTorch-für-Jetson-Seite findest du alle verfügbaren PyTorch-Versionen für die verschiedenen JetPack-Versionen. Eine ausführlichere Liste zur Kompatibilität von PyTorch und Torchvision findest du auf der Kompatibilitätsseite für PyTorch und Torchvision.
onnxruntime-gpu installieren#
Verwende ein ONNX-Runtime-GPU-Wheel, das zu deinen JetPack-, Python- und CUDA-Versionen passt. Aktuelle PyPI-Versionen enthalten ARM64-Wheels, diese ersetzen jedoch nicht die gerätespezifischen Pakete für jede JetPack-Version.
Alle verfügbaren onnxruntime-gpu-Pakete findest du nach JetPack-Version, Python-Version und weiteren Kompatibilitätsdetails sortiert in der Kompatibilitätsmatrix für die Jetson Zoo ONNX Runtime. Lade onnxruntime-gpu 1.17.0 herunter und installiere es mit Unterstützung für Python3.8.
wget https://nvidia.box.com/shared/static/zostg6agm00fb6t5uisw51qi6kpcuwzd.whl -O onnxruntime_gpu-1.17.0-cp38-cp38-linux_aarch64.whl
pip install onnxruntime_gpu-1.17.0-cp38-cp38-linux_aarch64.whlonnxruntime-gpu aktualisiert NumPy automatisch auf die neueste Version. Installiere NumPy 1.23.5 erneut, um das dadurch verursachte Problem zu beheben:
pip install numpy==1.23.5
TensorRT auf NVIDIA Jetson verwenden#
Von allen von Ultralytics unterstützten Modell-Exportformaten bietet TensorRT die höchste Inferenzleistung auf NVIDIA-Jetson-Geräten und ist daher unsere erste Empfehlung für Jetson-Bereitstellungen. Installiere vor dem Export die für deine JetPack-Version bereitgestellten TensorRT-Python-Bindings und überprüfe sie mit python3 -c "import tensorrt; print(tensorrt.__version__)". Verwende weiterhin die unterstützte TensorRT-10.x-Laufzeitumgebung auf JetPack 6/7; ersetze sie nicht durch TensorRT 11. Anleitungen zur Einrichtung und zur erweiterten Verwendung findest du in unserem speziellen TensorRT-Integrationsleitfaden.
Du kannst Modelle auch im Browser exportieren, ohne die Build-Umgebung lokal einzurichten. Wähle im Export-Tab für Modelle auf der Ultralytics Platform TensorRT und das gewünschte Jetson-Ziel aus. Thor-Auswahlen werden auf echter Thor-Hardware validiert. Die sechs Orin-Auswahlen erzeugen derzeit mögliche Engines, die für AGX Orin erstellt wurden. Validiere diese vor der Bereitstellung auf dem vorgesehenen Orin-Modell.
TensorRT erstellt und optimiert eine Engine auf der GPU, auf der sie gebaut wird. Stimme die GPU-Architektur und die TensorRT-/CUDA-Laufzeitumgebung auf das Zielsystem ab und überprüfe jede heruntergeladene Engine auf dem Bereitstellungsgerät. Orin-Modelle mit derselben Architektur sind nicht automatisch portierbar. Für optimale Ergebnisse sollte die INT8-Kalibrierung auf dem Zielgerät erfolgen.
Modell in TensorRT konvertieren und Inferenz ausführen#
Das YOLO26n-Modell im PyTorch-Format wird in TensorRT umgewandelt, um mit dem exportierten Modell Inferenz auszuführen.
from ultralytics import YOLO

# Ein YOLO26n-PyTorch-Modell laden
model = YOLO("yolo26n.pt")

# Modell nach TensorRT exportieren
model.export(format="engine")  # erstellt 'yolo26n.engine'

# Das exportierte TensorRT-Modell laden
trt_model = YOLO("yolo26n.engine")

# Inferenz ausführen
results = trt_model("https://ultralytics.com/images/bus.jpg")
NVIDIA Deep Learning Accelerator (DLA) verwenden#
Der NVIDIA Deep-Learning-Beschleuniger (DLA) ist eine spezielle Hardwarekomponente in NVIDIA Jetson-Geräten, die die Inferenz mit Deep Learning im Hinblick auf Energieeffizienz und Leistung optimiert. Indem DLA Aufgaben von der GPU übernimmt und diese so für rechenintensivere Prozesse freigibt, ermöglicht DLA den Modellen einen Betrieb mit geringerem Stromverbrauch und hohem Durchsatz. Das ist ideal für eingebettete Systeme und KI-Anwendungen in Echtzeit.
NVIDIA führt TensorRT 10.7 als letzte Version mit DLA-Unterstützung auf; TensorRT 11.x unterstützt DLA nicht. Verwende eine DLA-fähige TensorRT-Version, die von deiner JetPack-Version unterstützt wird. TensorRT 11 unterstützt JetPack nicht, auch nicht für reine GPU-Exporte.
Die folgenden Jetson-Geräte sind mit DLA-Hardware ausgestattet:
| Jetson-Gerät | DLA-Kerne | Maximale DLA-Frequenz |
|---|---|---|
| Jetson AGX Orin-Serie | 2 | 1.6 GHz |
| Jetson Orin NX 16GB | 2 | 614 MHz |
| Jetson Orin NX 8 GB | 1 | 614 MHz |
| Jetson AGX Xavier-Serie | 2 | 1.4 GHz |
| Jetson Xavier NX-Serie | 2 | 1.1 GHz |
from ultralytics import YOLO

# Ein YOLO26n-PyTorch-Modell laden
model = YOLO("yolo26n.pt")

# Modell mit aktiviertem DLA nach TensorRT exportieren (funktioniert nur mit FP16 oder INT8)
model.export(format="engine", device="dla:0", quantize=16)  # dla:0 oder dla:1 entspricht den DLA-Kernen

# Das exportierte TensorRT-Modell laden
trt_model = YOLO("yolo26n.engine")

# Inferenz ausführen
results = trt_model("https://ultralytics.com/images/bus.jpg")Bei DLA-Exporten werden manche Layer möglicherweise nicht von DLA unterstützt und zur Ausführung an die GPU übergeben. Dieses Ausweichen kann zusätzliche Latenz verursachen und die gesamte Inferenzleistung beeinträchtigen. DLA ist daher nicht in erster Linie dafür gedacht, die Inferenzlatenz gegenüber der Ausführung von TensorRT ausschließlich auf der GPU zu verringern. Der Hauptzweck von DLA besteht vielmehr darin, den Durchsatz zu erhöhen und die Energieeffizienz zu verbessern.
NVIDIA Jetson YOLO26-Benchmarks#
Das Ultralytics-Team hat YOLO26-Benchmarks für 11 verschiedene Modellformate durchgeführt und Geschwindigkeit sowie Genauigkeit gemessen: PyTorch, TorchScript, ONNX, OpenVINO, TensorRT, TF SavedModel, TF GraphDef, TF Lite, MNN, NCNN und ExecuTorch. Die Benchmarks wurden mit FP32-Präzision und der standardmäßigen Eingabebildgröße von 640 auf dem NVIDIA Jetson AGX Thor Developer Kit, dem NVIDIA Jetson AGX Orin Developer Kit (64 GB), dem NVIDIA Jetson Orin Nano Super Developer Kit und dem Seeed Studio reComputer J4012 mit Jetson Orin NX 16 GB durchgeführt.
Vergleichsdiagramme#
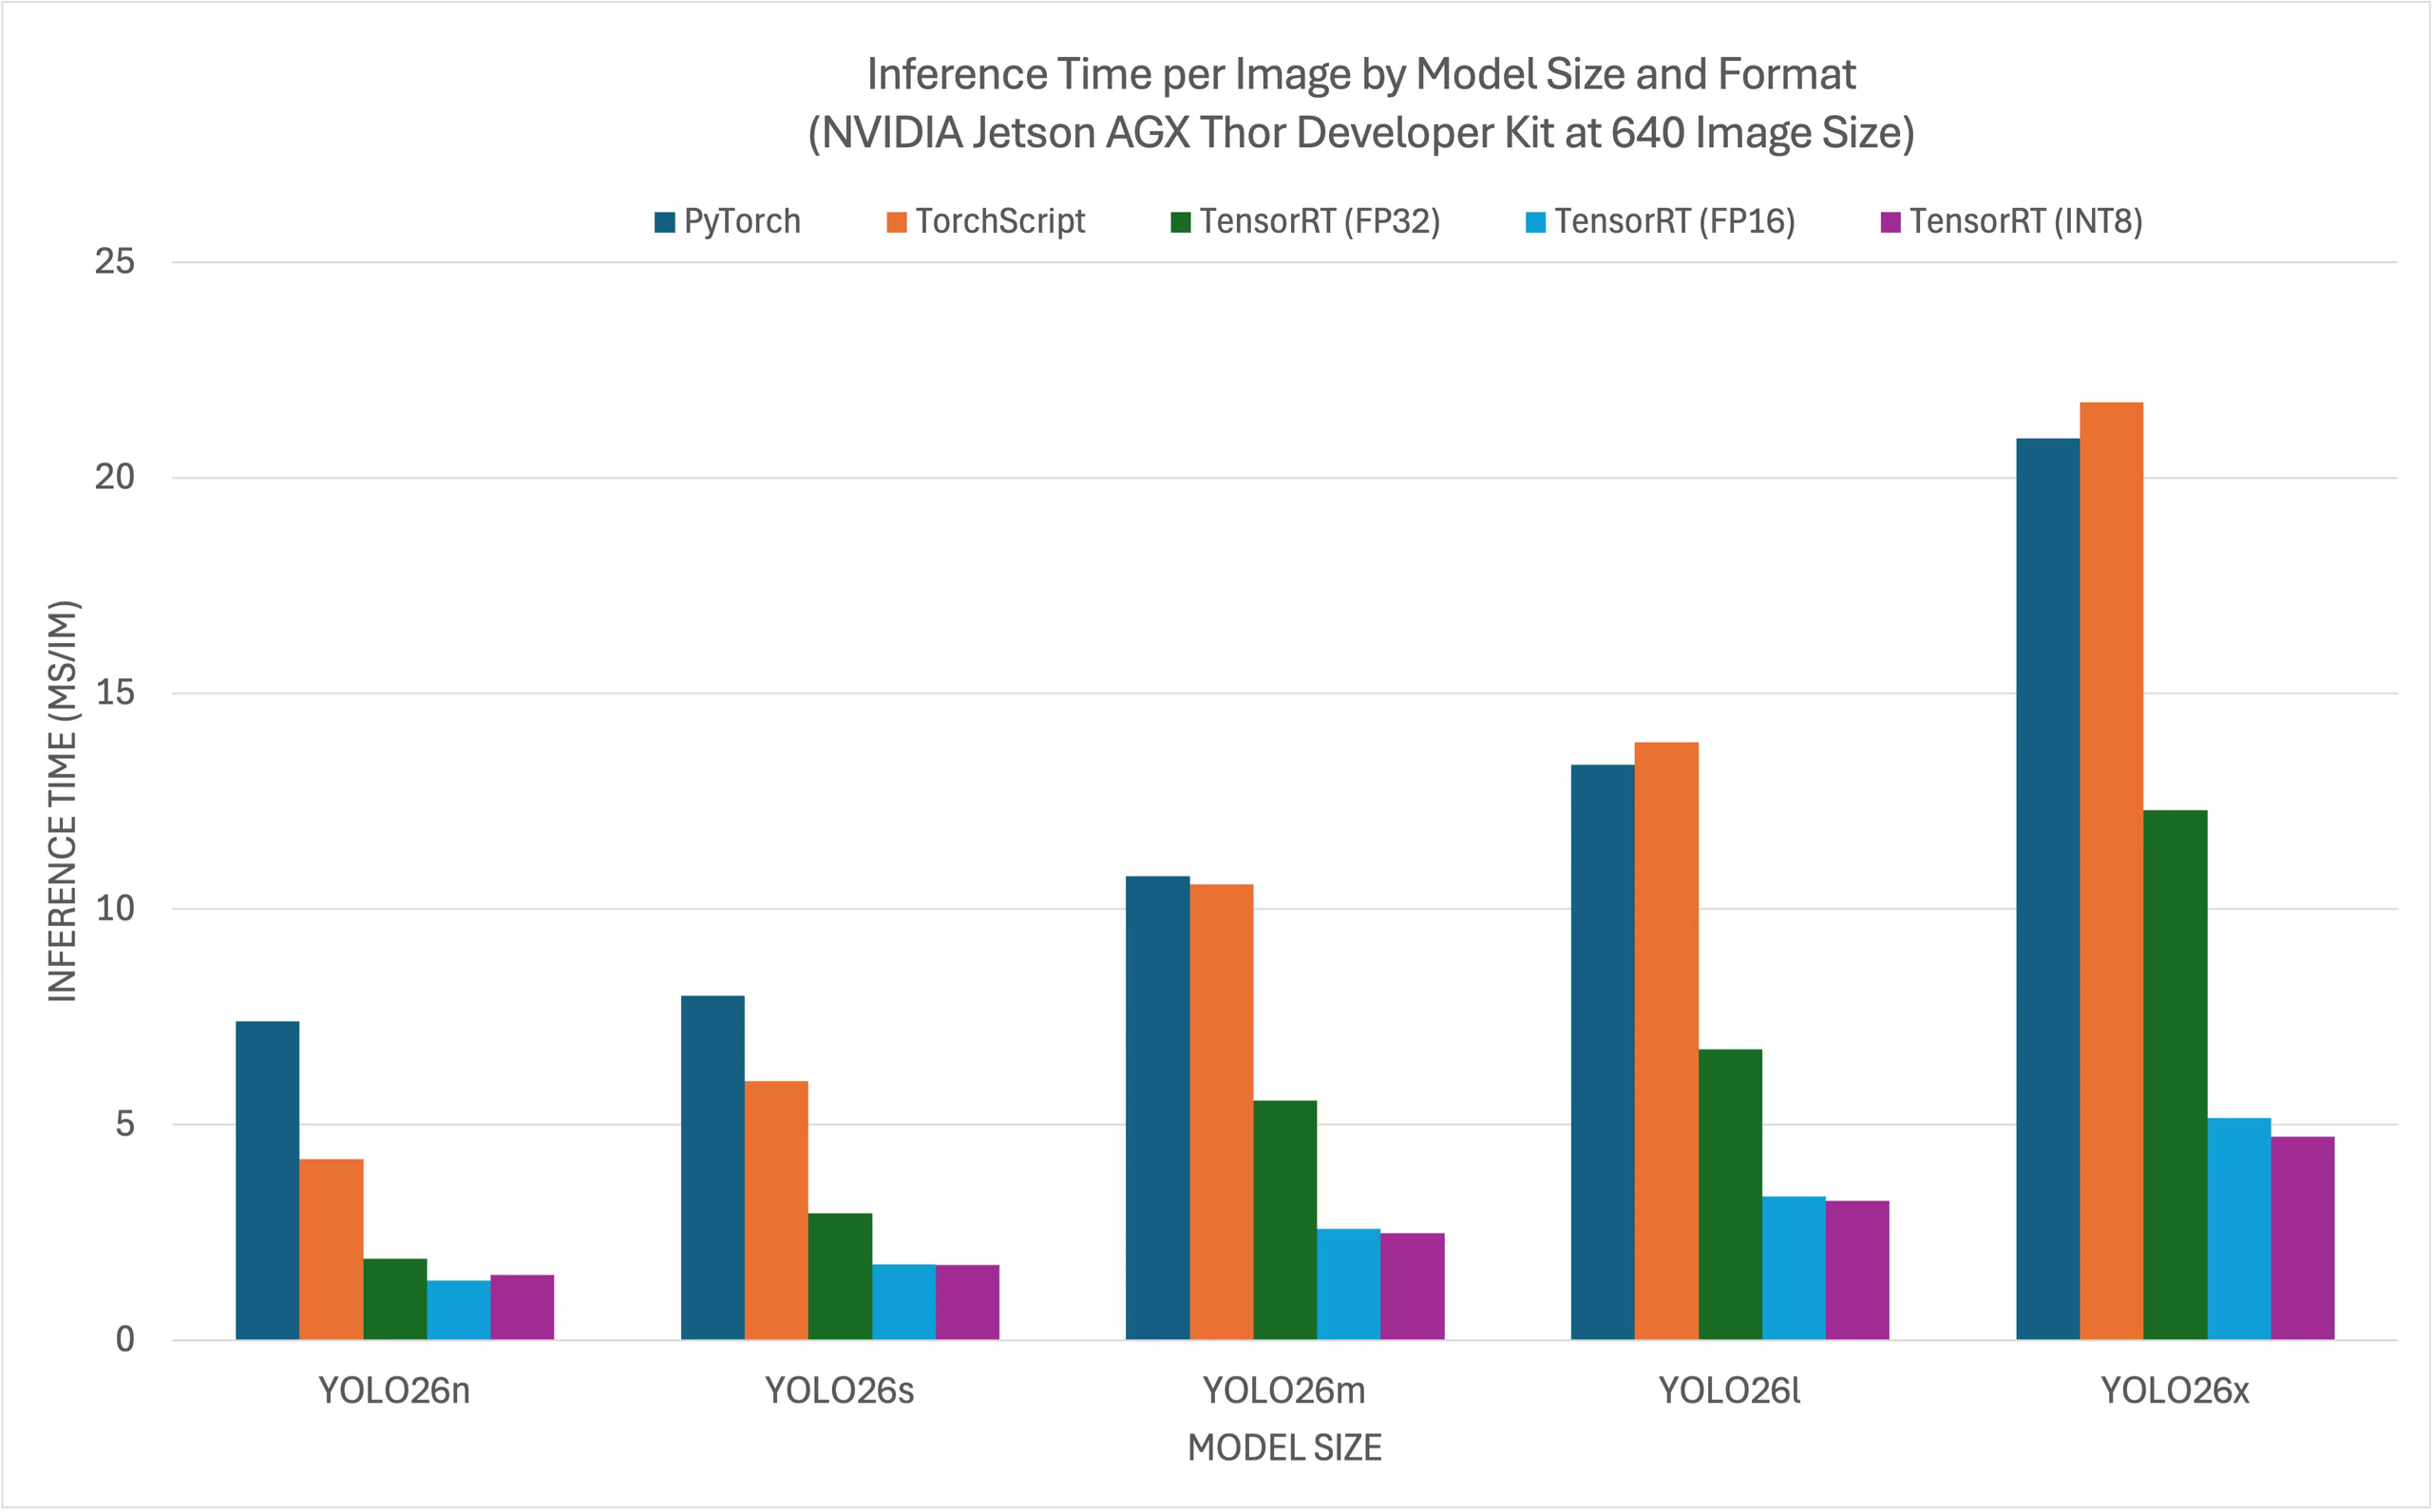
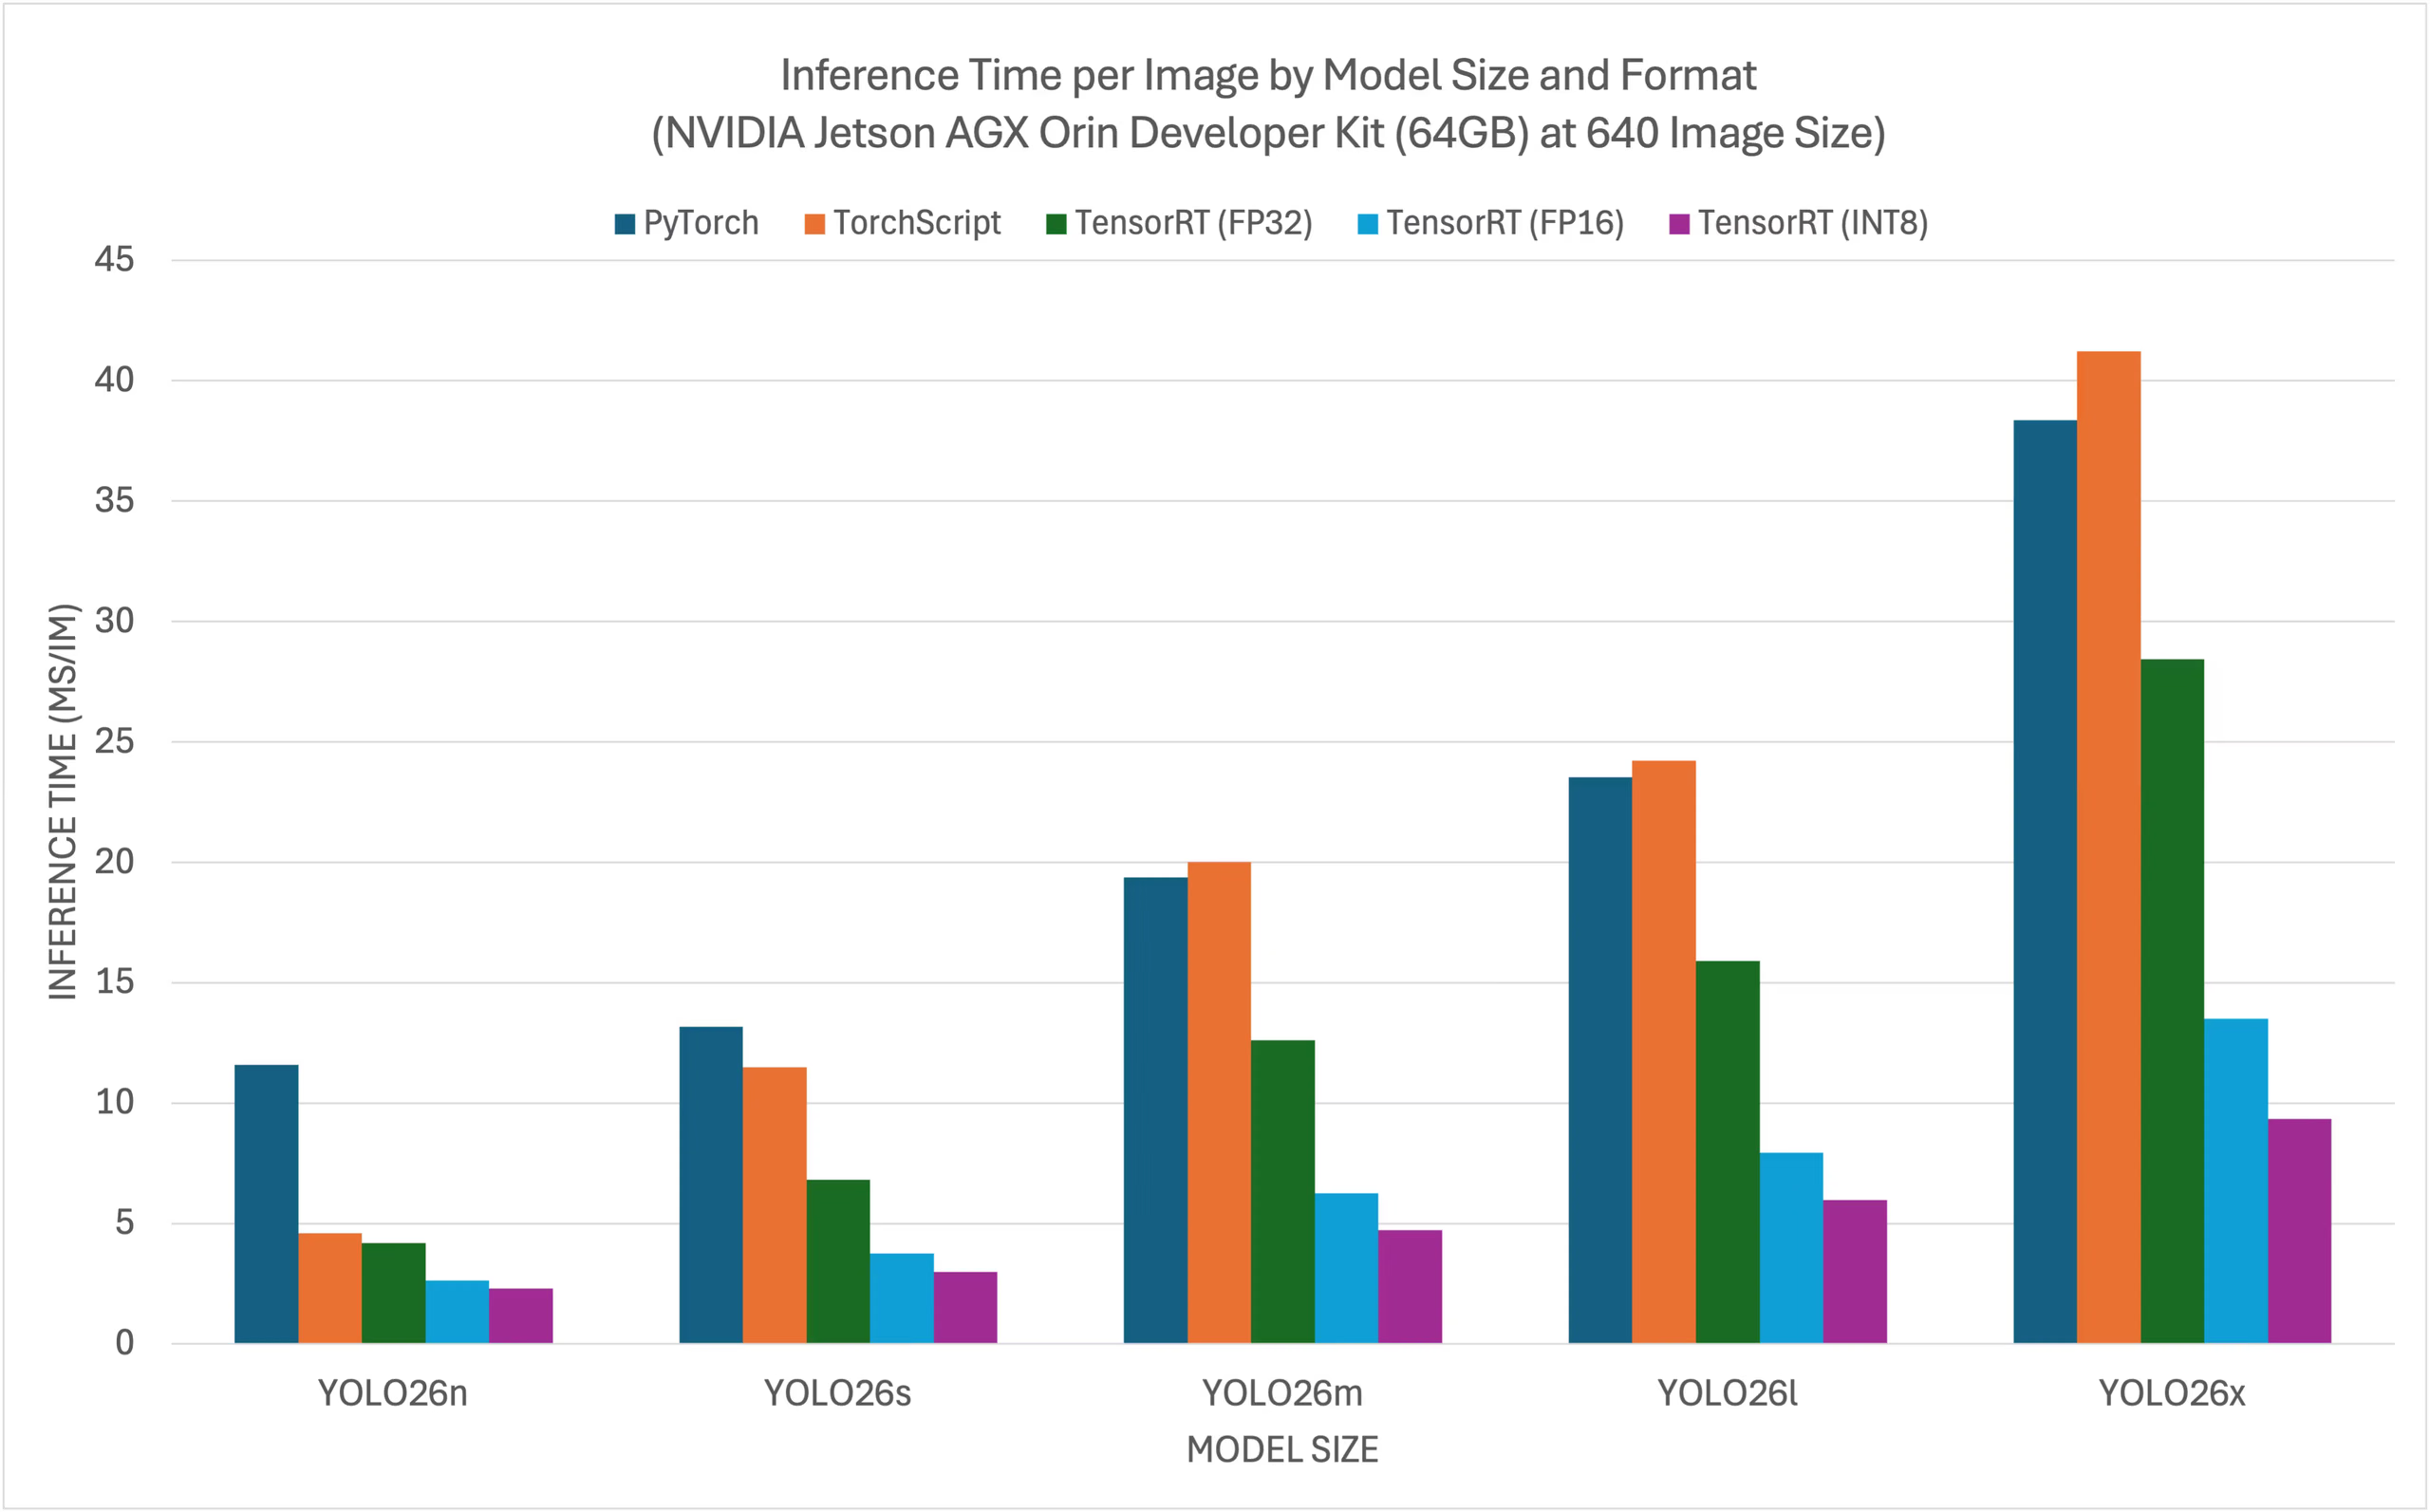
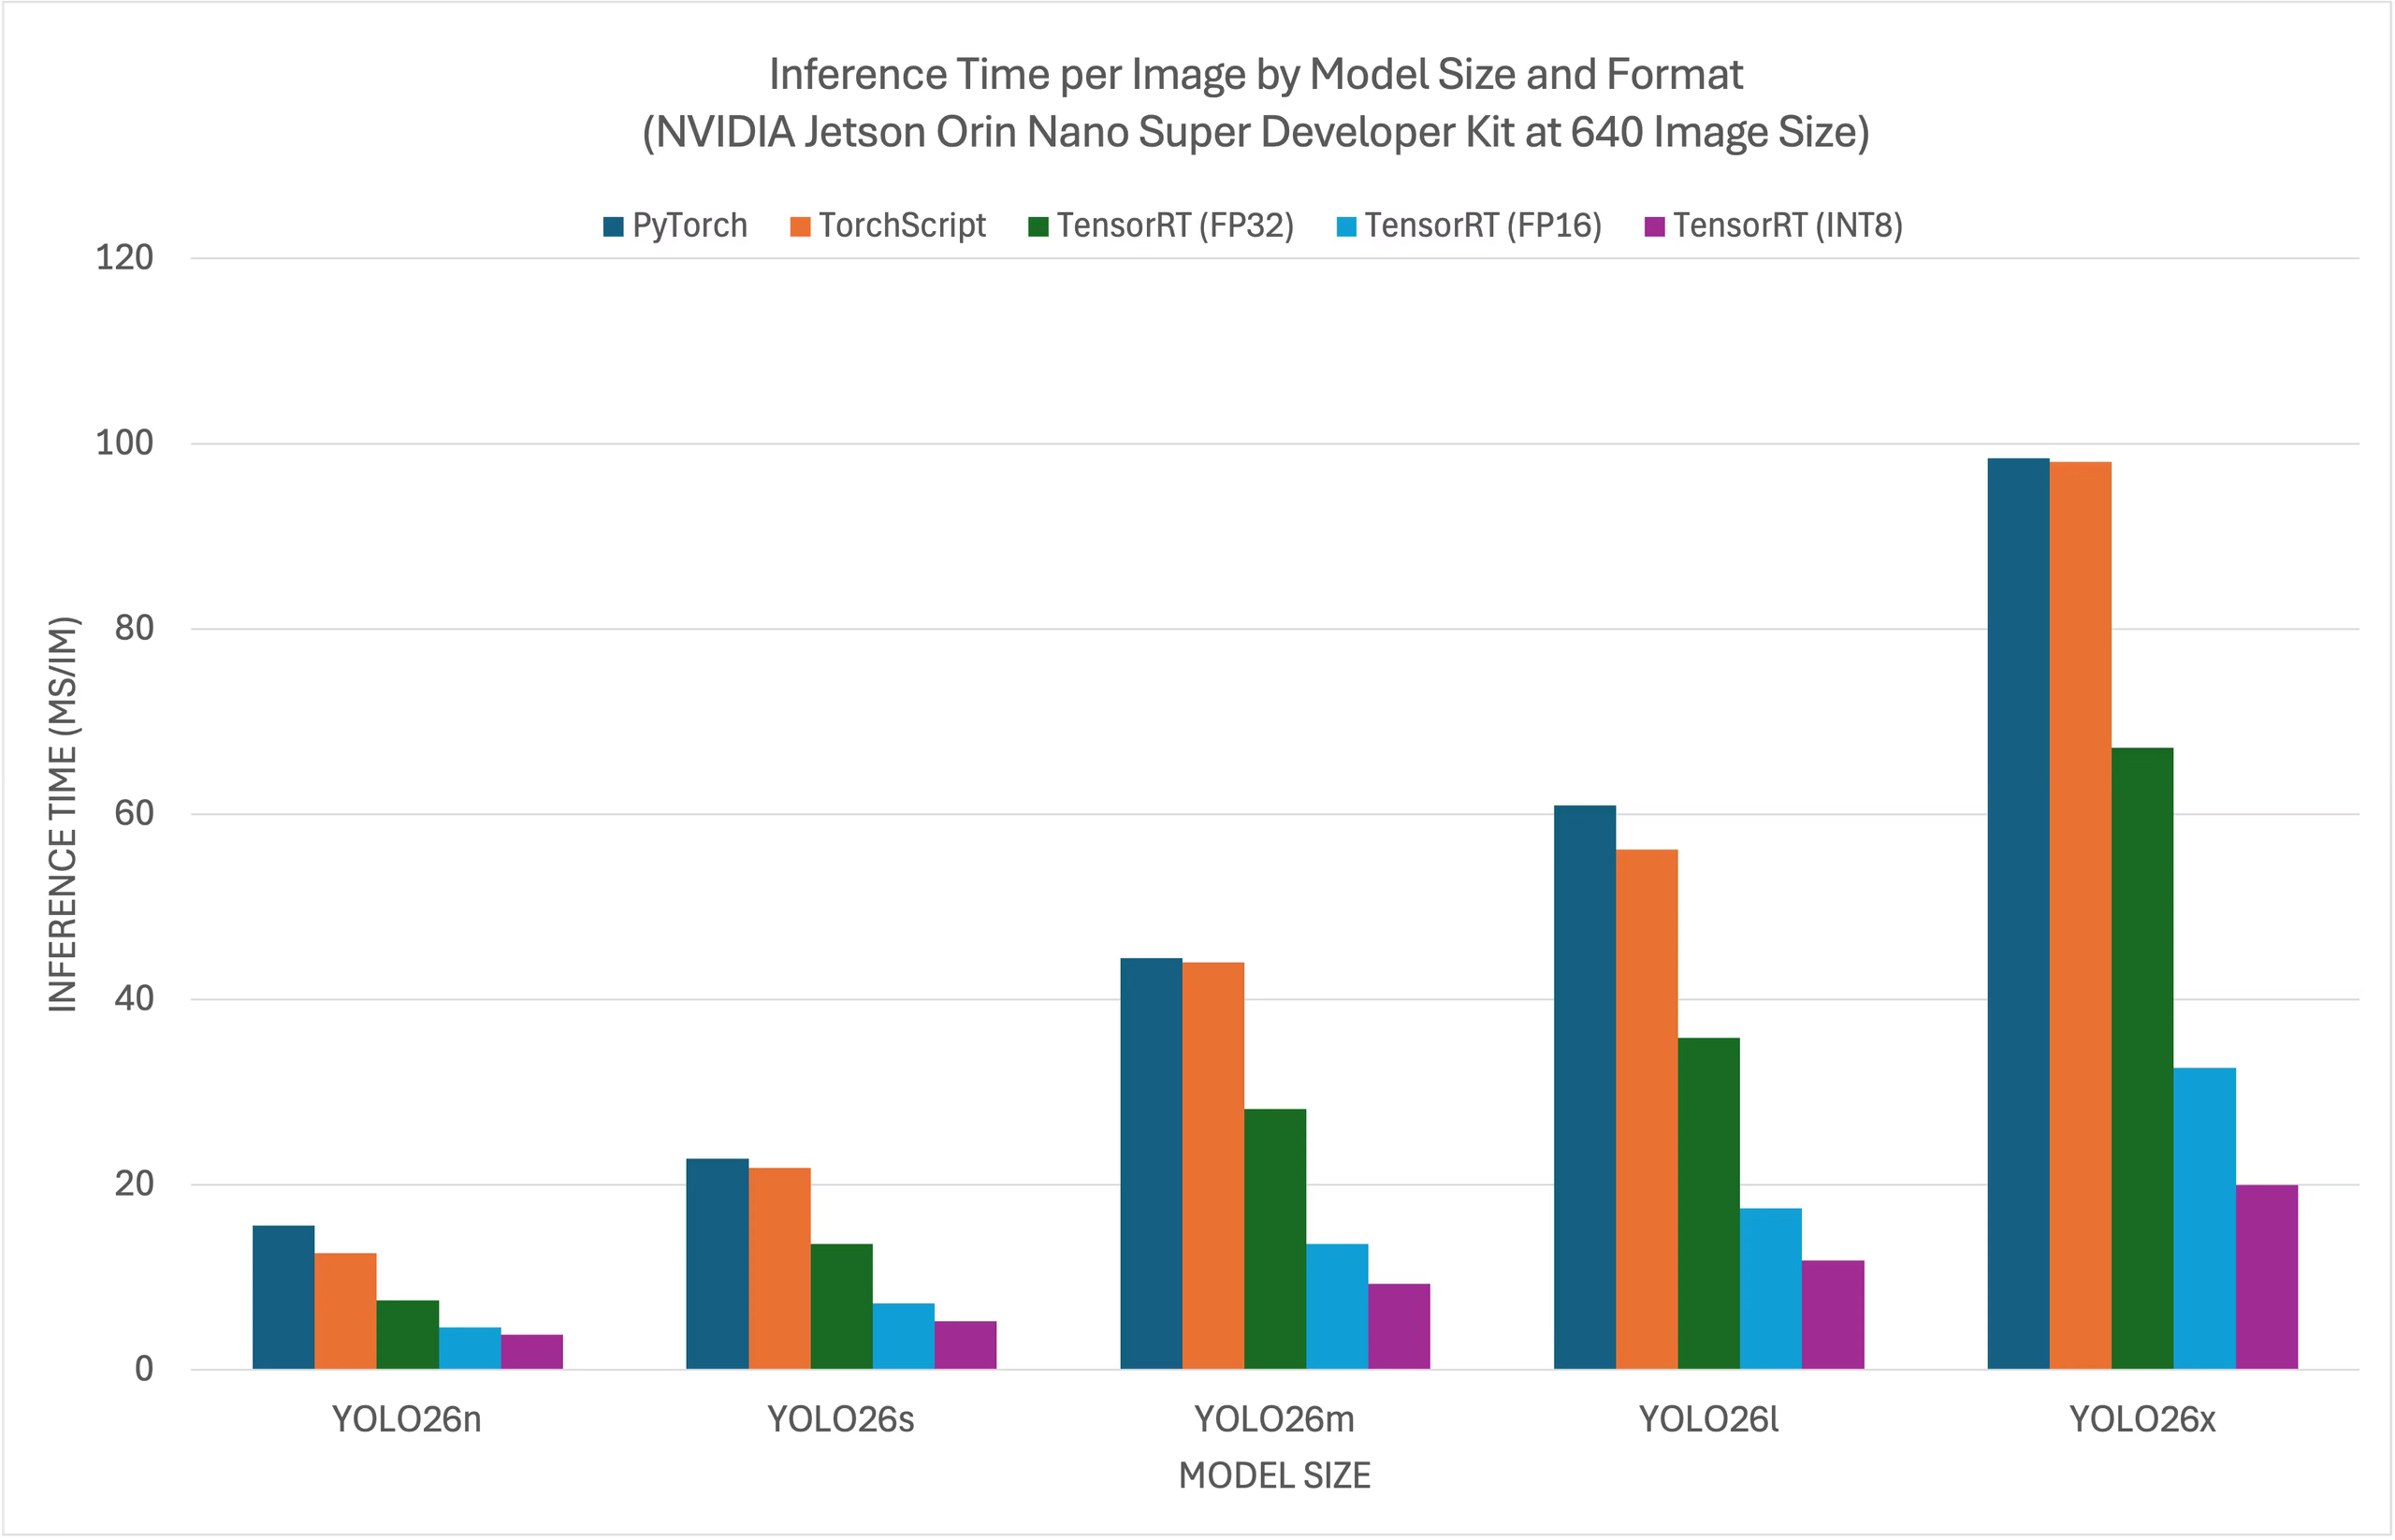
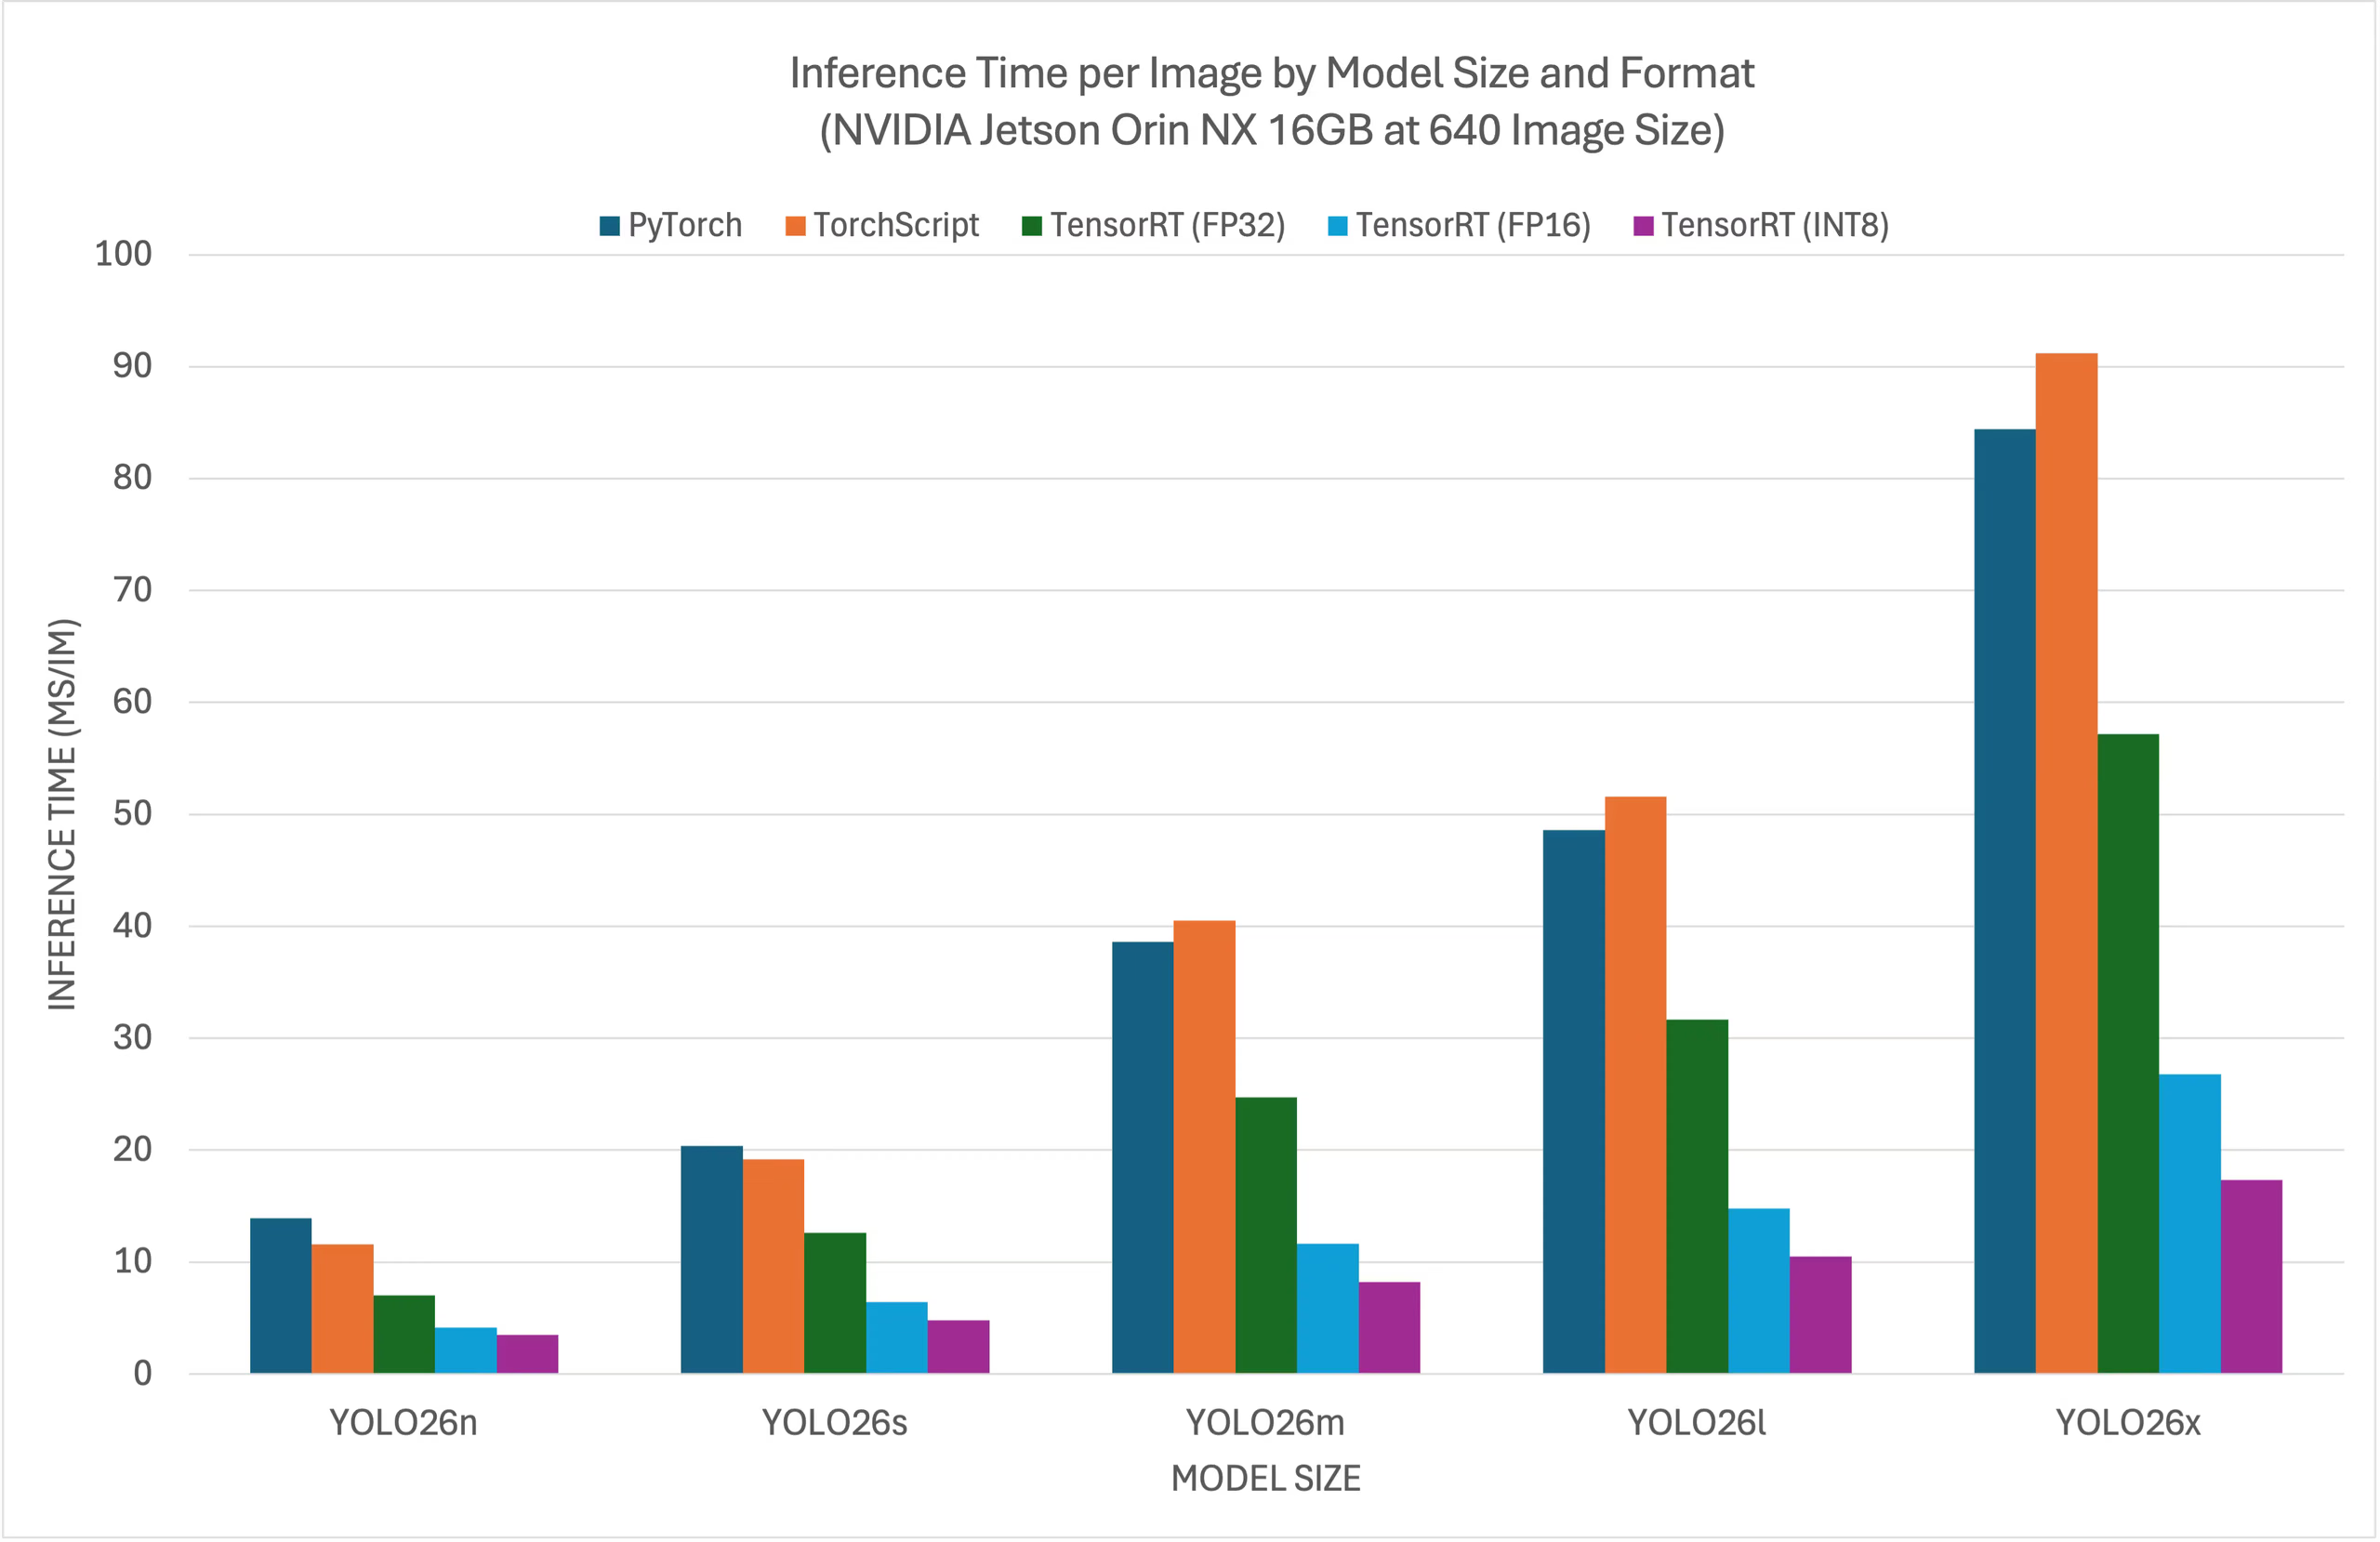
Obwohl alle Modelle nach dem Export auf NVIDIA Jetson funktionieren, enthält das folgende Vergleichsdiagramm nur PyTorch, TorchScript und TensorRT. Benchmarks für alle Exportformate findest du im Abschnitt nach diesem Diagramm.
NVIDIA Jetson AGX Thor Entwicklerkit#
NVIDIA Jetson AGX Orin Entwicklerkit (64GB)#
NVIDIA Jetson Orin Nano Super Entwicklerkit#
NVIDIA Jetson Orin NX 16GB#
Detaillierte Vergleichstabellen#
Die folgende Tabelle zeigt Benchmark-Ergebnisse für fünf verschiedene YOLO26-Modelle (YOLO26n, YOLO26s, YOLO26m, YOLO26l, YOLO26x) in 11 verschiedenen Formaten (PyTorch, TorchScript, ONNX, OpenVINO, TensorRT, TF SavedModel, TF GraphDef, TF Lite, MNN, NCNN, ExecuTorch). Für jede Kombination werden Status, Größe, die Metrik mAP50-95(B) und Inferenzzeit angegeben.
NVIDIA Jetson AGX Thor Entwicklerkit#
| Format | Status | Dateigröße (MB) | mAP50-95(B) | Inferenzzeit (ms/Bild) |
|---|---|---|---|---|
| PyTorch | ✅ | 5.3 | 0.4798 | 7.39 |
| TorchScript | ✅ | 9.8 | 0.4789 | 4.21 |
| ONNX | ✅ | 9.5 | 0.4767 | 6.58 |
| OpenVINO | ✅ | 10.1 | 0.4794 | 17.50 |
| TensorRT (FP32) | ✅ | 13.9 | 0.4791 | 1.90 |
| TensorRT (FP16) | ✅ | 7.6 | 0.4797 | 1.39 |
| TensorRT (INT8) | ✅ | 6.5 | 0.4273 | 1.52 |
| TF SavedModel | ✅ | 25.7 | 0.4764 | 47.24 |
| TF GraphDef | ✅ | 9.5 | 0.4764 | 45.98 |
| TF Lite | ✅ | 9.9 | 0.4764 | 182.04 |
| MNN | ✅ | 9.4 | 0.4784 | 21.83 |
Getestet mit Ultralytics 8.4.7
Die Inferenzzeit umfasst keine Vor- und Nachverarbeitung.
NVIDIA Jetson AGX Orin Entwicklerkit (64GB)#
| Format | Status | Dateigröße (MB) | mAP50-95(B) | Inferenzzeit (ms/Bild) |
|---|---|---|---|---|
| PyTorch | ✅ | 5.3 | 0.4790 | 11.58 |
| TorchScript | ✅ | 9.8 | 0.4770 | 4.60 |
| ONNX | ✅ | 9.5 | 0.4770 | 9.87 |
| OpenVINO | ✅ | 9.6 | 0.4820 | 28.80 |
| TensorRT (FP32) | ✅ | 11.5 | 0.4770 | 4.18 |
| TensorRT (FP16) | ✅ | 7.9 | 0.4789 | 2.62 |
| TensorRT (INT8) | ✅ | 5.4 | 0.4640 | 2.30 |
| TF SavedModel | ✅ | 24.6 | 0.4760 | 71.10 |
| TF GraphDef | ✅ | 9.5 | 0.4760 | 70.02 |
| TF Lite | ✅ | 9.9 | 0.4760 | 227.94 |
| MNN | ✅ | 9.4 | 0.4760 | 32.46 |
| NCNN | ✅ | 9.3 | 0.4810 | 29.93 |
Getestet mit Ultralytics 8.4.32
Die Inferenzzeit umfasst keine Vor- und Nachverarbeitung.
NVIDIA Jetson Orin Nano Super Entwicklerkit#
| Format | Status | Dateigröße (MB) | mAP50-95(B) | Inferenzzeit (ms/Bild) |
|---|---|---|---|---|
| PyTorch | ✅ | 5.3 | 0.4790 | 15.60 |
| TorchScript | ✅ | 9.8 | 0.4770 | 12.60 |
| ONNX | ✅ | 9.5 | 0.4760 | 15.76 |
| OpenVINO | ✅ | 9.6 | 0.4820 | 56.23 |
| TensorRT (FP32) | ✅ | 11.3 | 0.4770 | 7.53 |
| TensorRT (FP16) | ✅ | 8.1 | 0.4800 | 4.57 |
| TensorRT (INT8) | ✅ | 5.3 | 0.4490 | 3.80 |
| TF SavedModel | ✅ | 24.6 | 0.4760 | 118.33 |
| TF GraphDef | ✅ | 9.5 | 0.4760 | 116.30 |
| TF Lite | ✅ | 9.9 | 0.4760 | 286.00 |
| MNN | ✅ | 9.4 | 0.4760 | 68.77 |
| NCNN | ✅ | 9.3 | 0.4810 | 47.50 |
Getestet mit Ultralytics 8.4.33
Die Inferenzzeit umfasst keine Vor- und Nachverarbeitung.
NVIDIA Jetson Orin NX 16GB#
| Format | Status | Dateigröße (MB) | mAP50-95(B) | Inferenzzeit (ms/Bild) |
|---|---|---|---|---|
| PyTorch | ✅ | 5.3 | 0.4799 | 13.90 |
| TorchScript | ✅ | 9.8 | 0.4787 | 11.60 |
| ONNX | ✅ | 9.5 | 0.4763 | 14.18 |
| OpenVINO | ✅ | 9.6 | 0.4819 | 40.19 |
| TensorRT (FP32) | ✅ | 11.4 | 0.4770 | 7.01 |
| TensorRT (FP16) | ✅ | 8.0 | 0.4789 | 4.13 |
| TensorRT (INT8) | ✅ | 5.5 | 0.4489 | 3.49 |
| TF SavedModel | ✅ | 24.6 | 0.4764 | 92.34 |
| TF GraphDef | ✅ | 9.5 | 0.4764 | 92.06 |
| TF Lite | ✅ | 9.9 | 0.4764 | 254.43 |
| MNN | ✅ | 9.4 | 0.4760 | 48.55 |
| NCNN | ✅ | 9.3 | 0.4805 | 34.31 |
Getestet mit Ultralytics 8.4.33
Die Inferenzzeit umfasst keine Vor- und Nachverarbeitung.
Entdecke weitere Benchmark-Tests von Seeed Studio, die auf verschiedenen Versionen der NVIDIA Jetson-Hardware ausgeführt wurden.
Unsere Ergebnisse reproduzieren#
Um die obigen Ultralytics-Benchmarks für alle Export-Formate zu reproduzieren, führe diesen Code aus:
from ultralytics import YOLO

# Ein YOLO26n-PyTorch-Modell laden
model = YOLO("yolo26n.pt")

# Benchmark für Geschwindigkeit und Genauigkeit von YOLO26n auf dem COCO128-Datensatz für alle Exportformate
results = model.benchmark(data="coco128.yaml", imgsz=640)
Beachte, dass die Benchmark-Ergebnisse je nach genauer Hardware- und Softwarekonfiguration eines Systems sowie der aktuellen Auslastung des Systems zum Zeitpunkt der Benchmarks variieren können. Die zuverlässigsten Ergebnisse erhältst du mit einem Datensatz mit vielen Bildern, z. B. data='coco.yaml' (5000 Validierungsbilder).
Bewährte Vorgehensweisen für die Verwendung von NVIDIA Jetson#
Befolge diese bewährten Vorgehensweisen, um die maximale Leistung von YOLO26 auf NVIDIA Jetson zu erzielen.
-
MAX Power Mode aktivieren
Wenn du auf dem Jetson den MAX-Leistungsmodus aktivierst, werden alle CPU- und GPU-Kerne eingeschaltet.
sudo nvpmodel -m 0 -
Jetson Clocks aktivieren
Wenn du Jetson Clocks aktivierst, werden alle CPU- und GPU-Kerne mit ihrer maximalen Frequenz betrieben.
sudo jetson_clocks -
Jetson Stats-Anwendung installieren
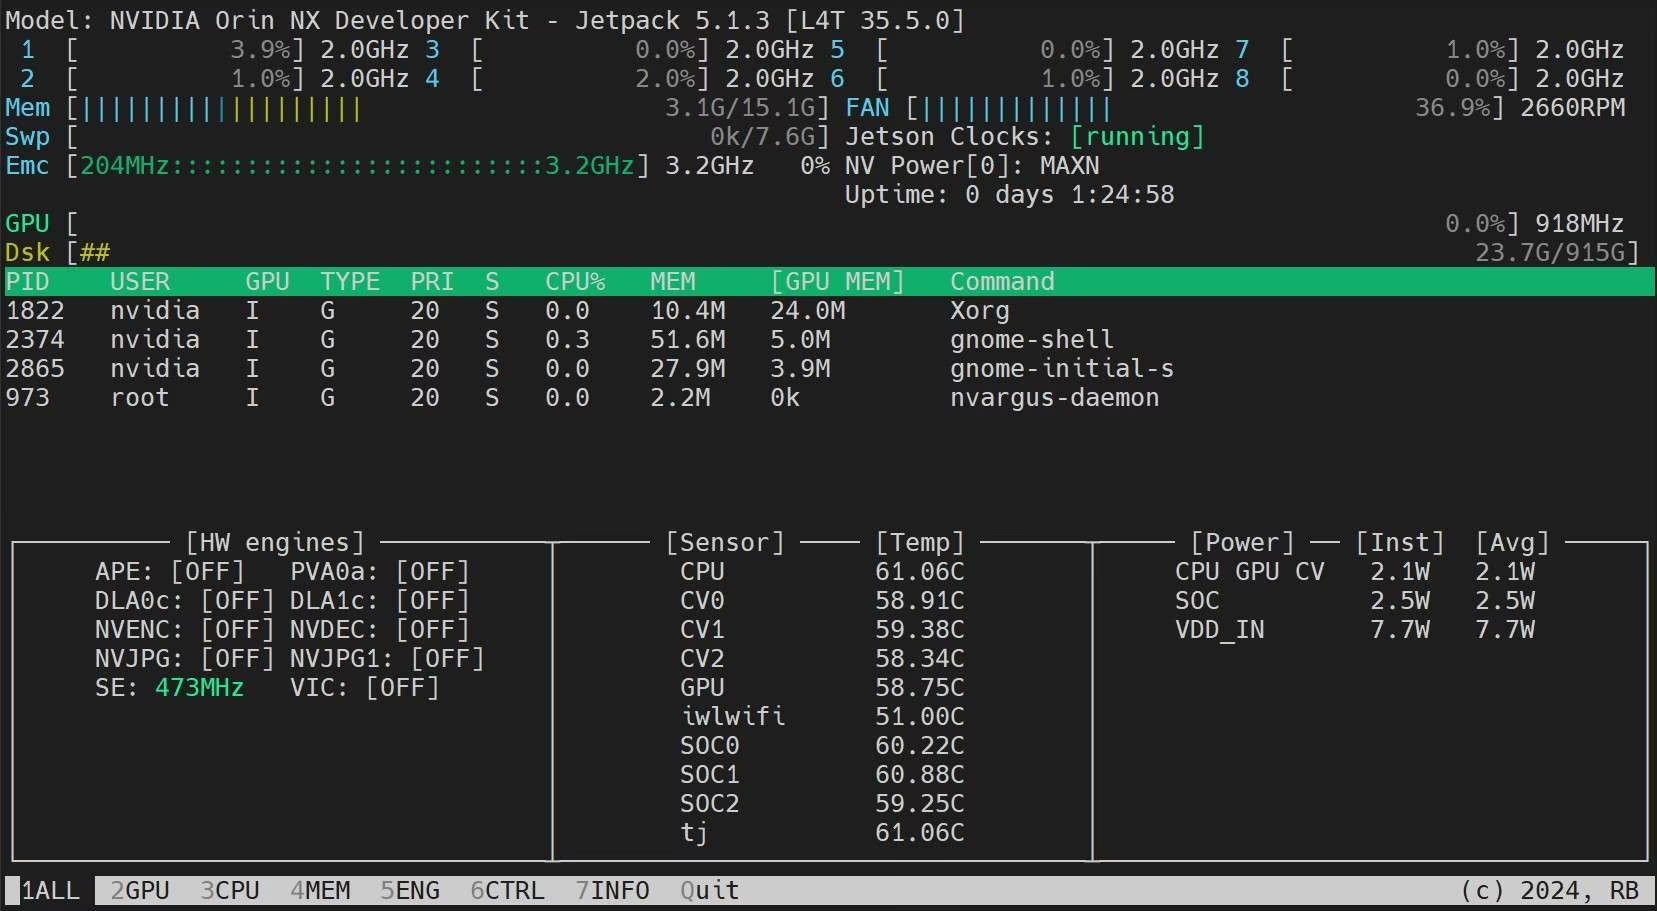
Mit der Anwendung jetson-stats kannst du die Temperaturen von Systemkomponenten überwachen, die Auslastung von CPU, GPU und RAM anzeigen, Leistungsmodi ändern, maximale Taktraten festlegen und Informationen zu JetPack prüfen.
sudo apt update
sudo pip install jetson-stats
sudo reboot
jtop
Tipps zur Speicheroptimierung für NVIDIA Jetson#
Der verfügbare Speicher ist auf Jetson-Geräten oft der begrenzende Faktor, insbesondere bei Varianten mit weniger Speicher wie Jetson Orin Nano (8 GB) oder Orin NX 8 GB. Die folgenden Tipps sind praktische, risikoarme Anpassungen, die zusammen mehrere hundert Megabyte freigeben und den Betrieb größerer YOLO-Modelle oder zusätzlicher paralleler Arbeitslasten ermöglichen können. Eine umfassende Beschreibung findest du im NVIDIA-Blog zur Maximierung der Speichereffizienz auf Jetson.
1. Ohne grafische Oberfläche starten#
Wenn dein Jetson über SSH verbunden ist oder als Produktionsgerät ohne angeschlossenen Bildschirm läuft, kannst du durch Entfernen der Desktop-Umgebung und des Anzeigeservers bis zu 865 MB RAM freigeben:
sudo systemctl set-default multi-user.target
sudo reboot
So stellst du die Desktop-Umgebung später wieder her:
sudo systemctl set-default graphical.target
sudo reboot
2. Nicht benötigte Systemdienste deaktivieren#
Nicht benötigte Hintergrunddienste (Bluetooth, Verbindungsmanager, ungenutzte Hardware-Daemons) verbrauchen zusammen etwa 32 MB. Zeige die aktiven Dienste an und deaktiviere alles, was deine Bereitstellung nicht benötigt:
# List running services
systemctl list-units --type=service --state=running

# Disable a service
sudo systemctl disable SERVICE_NAME
3. Speichernutzung analysieren#
Ermittle vor der Optimierung, welche Prozesse tatsächlich RAM verbrauchen. procrank sortiert Prozesse nach PSS (proportionale Speichergröße), wodurch der tatsächliche Speicherbedarf pro Prozess genauer dargestellt wird als mit RSS (Größe des residenten Arbeitssatzes: alle physischen RAM-Seiten, die einem Prozess zugeordnet sind, einschließlich der mit anderen Prozessen gemeinsam genutzten Seiten):
git clone https://github.com/csimmonds/procrank_linux.git
cd procrank_linux && make
sudo ./procrank
So zeigst du die GPU- und NvMap-Zuweisungen (CUDA-/Videopipeline) pro Prozess an:
sudo cat /sys/kernel/debug/nvmap/iovmm/clients4. Inferenz in der Produktion ohne Bildschirm ausführen#
Bei Inferenzpipelines ohne Live-Vorschau kannst du durch Deaktivieren bildschirmbezogener Komponenten (Tiler, OSD, DisplaySink) allein in der Pipeline 200+ MB einsparen. Unterdrücke mit Ultralytics YOLO die Anzeige und speichere die Ergebnisse stattdessen auf dem Datenträger:
from ultralytics import YOLO

model = YOLO("yolo26n.engine")

# show=False verhindert jedes Anzeigefenster; save=True speichert die annotierte Ausgabe auf dem Datenträger
results = model.predict(source="video.mp4", show=False, save=True)Gesamtauswirkung#
| Optimierung | Ungefähr eingesparter Speicher |
|---|---|
| Grafische Desktop-Oberfläche deaktivieren | ~865 MB |
| Nicht benötigte Betriebssystemdienste deaktivieren | ~32 MB |
| Inferenzpipeline ohne grafische Oberfläche (keine Anzeige) | ~200+ MB |
| Gesamt (einfache Maßnahmen) | ~1 GB+ |
Diese Änderungen zusammen sind besonders wertvoll, wenn du TensorRT-INT8-Modelle auf Geräten mit knappem Speicher einsetzt – sie können darüber entscheiden, ob eine größere Modellvariante in den Speicher passt oder nicht.
Nächste Schritte#
Weitere Informationen und Unterstützung findest du in der Ultralytics YOLO26-Dokumentation.
Häufig gestellte Fragen#
Um Ultralytics YOLO26 auf NVIDIA-Jetson-Geräten bereitzustellen, flashe dein Jetson-Gerät zunächst mit dem NVIDIA JetPack SDK. Verwende dann für die schnelle Einrichtung entweder ein vorgefertigtes Docker-Image oder installiere die erforderlichen Pakete manuell.
YOLO26-Modelle wurden auf den Geräten NVIDIA Jetson AGX Thor, AGX Orin, Orin Nano Super und Orin NX getestet; das TensorRT-Format erzielt dabei die beste Inferenzleistung. Im Abschnitt Detaillierte Vergleichstabellen findest du mAP50-95 und Inferenzzeit für jedes Modell und Exportformat.
Für die Bereitstellung von YOLO26-Modellen auf NVIDIA Jetson wird TensorRT empfohlen, da es das Modell für die GPU des Jetson optimiert und so die schnellste Inferenz aller Exportformate ermöglicht.
Um PyTorch und Torchvision auf NVIDIA Jetson zu installieren, deinstalliere zunächst alle vorhandenen Versionen, die möglicherweise über pip installiert wurden. Installiere anschließend manuell die mit der ARM64-Architektur von Jetson kompatiblen Versionen von PyTorch und Torchvision. Eine ausführliche Anleitung dazu findest du im Abschnitt PyTorch und Torchvision installieren.
Befolge diese bewährten Vorgehensweisen, um die Leistung von YOLO26 auf NVIDIA Jetson zu maximieren:
- Aktiviere MAX Power Mode, um alle CPU- und GPU-Kerne zu nutzen.
- Aktiviere Jetson Clocks, damit alle Kerne mit ihrer maximalen Frequenz laufen.
- Installiere die Jetson Stats-Anwendung, um Systemkennzahlen zu überwachen.
Befehle und weitere Informationen findest du im Abschnitt Bewährte Vorgehensweisen für die Verwendung von NVIDIA Jetson.
Der verfügbare RAM ist auf Jetson-Geräten mit wenig Speicher oft der Engpass. Drei einfache Maßnahmen können zusammen über 1 GB freigeben:
- Ohne grafische Oberfläche starten (
sudo systemctl set-default multi-user.target), um die grafische Desktop-Oberfläche zu entfernen (Einsparung: ~865 MB). - Nicht benötigte Dienste deaktivieren, etwa Bluetooth oder Verbindungsmanager (Einsparung: ~32 MB).
- Inferenz ohne Bildschirm ausführen, indem du
show=Falsein deinem YOLO-Aufrufpredictfestlegst. Dadurch wird kein Speicher für die Anzeigepipeline zugewiesen (Einsparung: ~200+ MB).
Verwende
procrank, um die RAM-Nutzung pro Prozess zu analysieren, undsudo cat /sys/kernel/debug/nvmap/iovmm/clients, um GPU-Zuweisungen zu prüfen. Alle Einzelheiten findest du im Abschnitt Tipps zur Speicheroptimierung.- Ohne grafische Oberfläche starten (
TensorRT 10.3.0, das mit JetPack 6 ausgeliefert wurde, weist ein bekanntes Problem auf, das das Erstellen von INT8-Engines mit Ausgaben ohne NMS (
nms=False) oder mit integrierter NMS (nms=True) verhindert. Erkennt Ultralytics diese Kombination, wählt es für Exporte ohne NMS den One-to-many-Kopf aus und bricht Exporte vonnms=Truemit einer Fehlermeldung ab.Um diese INT8-Exporte wieder zu ermöglichen, aktualisiere TensorRT auf eine neuere Version (z. B. 10.7.0+):
wget https://developer.download.nvidia.com/compute/cuda/repos/ubuntu2204/arm64/cuda-keyring_1.1-1_all.deb
sudo dpkg -i cuda-keyring_1.1-1_all.deb
sudo apt-get update
sudo apt-get install -y tensorrt
Führe den Export nach dem Upgrade erneut aus. Weitere Informationen findest du in GitHub-Problem #23841 und Problem #26655.


Kommentare194
Stell eine Frage, teile deine Ergebnisse oder hilf jemand anderem.
LG973641114
您好,如何用c++在jetson上部署YOLO26,有相关例子吗
1pknowler
Struggling with this on a new Jetson Orin Nano JP6.1. All good following the steps and installs to give torch.cuda.is_available as TRUE. The TensorRT export fails though with a number of dependency errors and I can’t re-install it with anything. Any pointers please?
1 Glenn JocherUltralytics
@pknowler it seems like the dependency errors during TensorRT export might stem from compatibility issues. Please ensure you’ve installed the required JetPack-compatible versions of PyTorch, Torchvision, and TensorRT as outlined in the Jetson Quick Start Guide. Additionally, verify that
onnxruntime-gpuandcuSPARSELtare correctly installed per the guide. If the issue persists, you can try reinstalling TensorRT using the NVIDIA SDK Manager for your JetPack version. Let me know if you need further clarification!Thank you. I will try again working through all of the steps and let you know how it goes!
I’ve tried again but this as far as I get… I have followed everything carefully.
WARNING ⚠️ TensorRT requires GPU export, automatically assigning device=0 Ultralytics 8.3.57 🚀 Python-3.10.16 torch-2.5.0a0+872d972e41.nv24.08 CUDA:0 (Orin, 7620MiB) YOLO11n summary (fused): 238 layers, 2,616,248 parameters, 0 gradients, 6.5 GFLOPs
PyTorch: starting from 'yolo11n.pt' with input shape (1, 3, 640, 640) BCHW and output shape(s) (1, 84, 8400) (5.4 MB)
ONNX: starting export with onnx 1.17.0 opset 19... ONNX: slimming with onnxslim 0.1.46... ONNX: export success ✅ 3.1s, saved as 'yolo11n.onnx' (10.2 MB) requirements: Ultralytics requirement ['tensorrt>7.0.0,!=10.1.0'] not found, attempting AutoUpdate... error: subprocess-exited-with-error
× python setup.py egg_info did not run successfully. │ exit code: 1 ╰─> [6 lines of output] Traceback (most recent call last): File "", line 2, in File "", line 34, in File "/tmp/pip-install-d0ljzl60/tensorrt-cu12_db0552ac431148489703f6f75df6764f/setup.py", line 71, in raise RuntimeError("TensorRT does not currently build wheels for Tegra systems") RuntimeError: TensorRT does not currently build wheels for Tegra systems [end of output]
note: This error originates from a subprocess, and is likely not a problem with pip. error: metadata-generation-failed
× Encountered error while generating package metadata. ╰─> See above for output.
note: This is an issue with the package mentioned above, not pip. hint: See above for details. Retry 1/2 failed: Command 'pip install --no-cache-dir "tensorrt>7.0.0,!=10.1.0" ' returned non-zero exit status 1. error: subprocess-exited-with-error
× python setup.py egg_info did not run successfully. │ exit code: 1 ╰─> [6 lines of output] Traceback (most recent call last): File "", line 2, in File "", line 34, in File "/tmp/pip-install-782zjqf9/tensorrt-cu12_44d261aea7c5489db3e9ce15cec8ee64/setup.py", line 71, in raise RuntimeError("TensorRT does not currently build wheels for Tegra systems") RuntimeError: TensorRT does not currently build wheels for Tegra systems [end of output]
note: This error originates from a subprocess, and is likely not a problem with pip. error: metadata-generation-failed
× Encountered error while generating package metadata. ╰─> See above for output.
note: This is an issue with the package mentioned above, not pip. hint: See above for details.
And I have TensorRT 10.7.0.23-1+cuda12.6
- Glenn JocherUltralytics
@pknowler it seems your TensorRT version is not compatible with the Jetson's ARM64 architecture. TensorRT does not provide pre-built Python wheels for Tegra systems. Please ensure you have TensorRT installed via the NVIDIA SDK Manager as part of the JetPack installation, and confirm compatibility with your JetPack version. The Jetson Quick Start Guide might also help clarify setup specifics. Let me know if further assistance is needed!
@glenn-jocher thank you. I have found the issue now. I am using miniconda and for some reason TensorRT Python bindings are not available in conda envs. So I can import Torch with no problem but the import TensorRT fails. I have re-installed without conda and all works as expected! 👍🏻
RasoulZardeyni
Which one reduce inference time using TensorRT or deepstream?
1 Paula DerrengerUltralytics(bearbeitet)
In terms of reducing inference time on your NVIDIA Jetson device, using TensorRT is generally recommended. TensorRT is specifically designed to provide high performance for NVIDIA hardware by optimizing deep learning models for inference. It accelerates models by fusing layers, pruning unused layers, and quantizing variables, among other optimizations. 🚀
DeepStream, on the other hand, is more focused on streaming analytics and can utilize TensorRT-optimized models. For most cases, directly using TensorRT for model optimization is your go-to for minimizing inference times.
Here's a quick example of exporting a YOLO model to TensorRT and running inference, tailored for your convenience:
from ultralytics import YOLO

# Load your YOLO model
model = YOLO('yolo26n.pt')

# Export to TensorRT format
model.export(format='engine')

# Load the TensorRT model
trt_model = YOLO('yolo26n.engine')

# Run inference using the TensorRT model
results = trt_model('your_image_or_video.jpg')
Feel free to explore more about deploying on NVIDIA Jetson with our Quick Start Guide for NVIDIA Jetson. Happy inferencing! 🌟
2Thanks!
1- Paula DerrengerUltralytics(bearbeitet)
Hey there! 😊 It looks like you're interested in speeding up your inference times. Between TensorRT and DeepStream on NVIDIA Jetson devices, TensorRT typically offers more direct optimization for reducing inference time for individual models by providing lower-level optimizations and quantization options.
DeepStream is a comprehensive framework for building end-to-end video analytics applications, which utilizes TensorRT under the hood for model inference. DeepStream excels in scenarios involving video streams, multi-stream input, and complex pipelines involving multiple AI models and analytics. If your primary goal is solely to minimize inference time for a specific model, direct optimization via TensorRT can provide more focused improvements.
A quick example of exporting a YOLO model to TensorRT:
from ultralytics import YOLO

# Load your YOLO model
model = YOLO('yolo26n.pt')

# Export to TensorRT format
model.export(format='engine')  # This creates 'yolo26n.engine'

# Done! Now you can use 'yolo26n.engine' for faster inference.
However, if your application benefits from a broader video analytics pipeline, incorporating DeepStream into your workflow can optimize and streamline these processes on top of efficiently handling inference with TensorRT optimized models. 🚀
Hope this gives you a clearer picture! If you have more questions, feel free to ask.
1
 Yufeng Wu(bearbeitet)
Hi, ultralytics team. I'm trying yolo26n-pose on Jetson orin agx 64gb and have this problem: I tried building engine with dynamic=true but failed, with the log saying ForeignNode[/model.23/Sigmoid.../model.23/Flatten] (Myelin) Skipping tactic ... Incompatible effective shapes in operation /model_23/Sub between: Unsqueeze_18_output_0 f32[1,2,33600] and Slice_output_0 f32[1,2,21504] Could not find any implementation for node {ForeignNode[/model.23/Sigmoid.../model.23/Flatten]} Is there a way to fix it?
- Glenn JocherUltralytics
This indicates a TensorRT dynamic-shape profile failure in the pose head. As a workaround, export a fixed-resolution engine, e.g.
yolo export model=yolo26n-pose.pt format=engine imgsz=640 batch=1 dynamic=False; build separate engines if multiple resolutions are required. If dynamic shapes are essential, please open a new issue with the full text log,yolo checksoutput, and JetPack/TensorRT/Ultralytics versions so we can reproduce it; see the TensorRT export guide.
 Haotian Gong(bearbeitet)
Hi, everyone,
I'd like to flag two issues with the Jetson installation guide that may need updating.
1. PyTorch 2.10.0 / Torchvision 0.25.0 doesn't work on JetPack 6.1
Following the "Start with naive installation" and "Run on JetPack 6.1" sections, I installed Pytorch 2.10.0 and Torchvision 0.25.0 as instructed.
Running my script then throws:
ImportError: libcublas.so.13: cannot open shared object file: No such file or directorySo I have to install Pytorch 2.8.0 with the guide:
https://forums.developer.nvidia.com/t/jetson-orin-nano-issues-running-yolo-ultralytics-due-to-pytorch-torchvision-compatibility-jetpack-6-x-cuda-12-6/365683/9And this version of Pytorch works. So maybe is the guide on Jetson obsolete or mistaken?
2. CSI camera requires the JetPack-bundled OpenCV, not the PyPI one
On Jetson, using a CSI camera (via
nvarguscamerasrc) requires the OpenCV that ships with JetPack, because the PyPIopencv-pythonwheel on aarch64 is built without GStreamer support.However,
pip install ultralyticspulls inopencv-pythonas a dependency, which shadows the JetPack-bundled version and silently breaks CSI camera pipelines.pip uninstall -y opencv-python opencv-python-headless sudo apt install -y python3-opencv # JetPack-bundled OpenCV with GStreamerThanks!
 Lakshantha DissanayakeUltralytics
Hi @ZephyrKeXiner Could you please double check whether you are using JetPack 6.1 system with CUDA 12.6? I have just verified on my JetPack 6.1 system with CUDA 12.6 with
torch-2.10.0andtorchvision-0.25.0as mentioned in the Ultralytics Jetson Guide and it works well.For JetPack 6.1, output of
cat /etc/nv_tegra_releaseshould look like below:(env) nvidia@ubuntu:~/yolo26/ultralytics$ cat /etc/nv_tegra_release # R36 (release), REVISION: 4.3, GCID: 38968081, BOARD: generic, EABI: aarch64, DATE: Wed Jan 8 01:49:37 UTC 2025 # KERNEL_VARIANT: oot TARGET_USERSPACE_LIB_DIR=nvidia TARGET_USERSPACE_LIB_DIR_PATH=usr/lib/aarch64-linux-gnu/nvidiaCould you also share yours please? Thanks!
cc: @raimbekovm
1- Haotian Gong
Hi @lakshanthad,
My output of
cat /etc/nv_tegra_releaseis below:$ cat /etc/nv_tegra_release # R36 (release), REVISION: 5.0, GCID: 43688277, BOARD: generic, EABI: aarch64, DATE: Fri Jan 16 03:50:45 UTC 2026 # KERNEL_VARIANT: oot TARGET_USERSPACE_LIB_DIR=nvidia TARGET_USERSPACE_LIB_DIR_PATH=usr/lib/aarch64-linux-gnu/nvidiaI notice that the revision is 5.0 not 4.3. Maybe does it cause the error?
smbunn(bearbeitet)
I would have thought the Jetson Orin Nano could do more than 5 streams, the deepstream examples with cars handles 16 streams of 1080p at what appears to be full framerate.
As a control systems engineer by training, edge devices seem a much better way to go so I prefer your jetson design. Even if one Jetson has an issue you are still processing 45 streams whereas a problem on your centralised server in option 2 takes everything down.
Are you going to set up an MQTT feed for alerts from each stream? Maybe consider secondary processing and a buffer, so the edge device detects what it thinks is an issue and a centralised server grabs 5 seconds of video of the incident and double checks.
Simon BUNN
General
From: Yash Patel @.> Sent: Friday, 22 May 2026 4:00 am To: ultralytics/ultralytics @.> Cc: Bunn, Simon @.>; Mention @.> Subject: Re: [ultralytics/ultralytics] guides/nvidia-jetson/ (Discussion #9942)
Hi, I am designing an AI-based CCTV surveillance system for a residential society with 50 RTSP camera streams. My current architecture uses multiple NVIDIA Jetson Orin Nano Super Developer Kit devices for distributed inference processing. I ZjQcmQRYFpfptBannerStart Attention The sender's identity could not be verified and someone may be impersonating the sender. L'identité de l'expéditeur n'a pas pu être vérifiée et quelqu'un pourrait se faire passer pour l'expéditeur.
ZjQcmQRYFpfptBannerEnd
Hi, I am designing an AI-based CCTV surveillance system for a residential society with 50 RTSP camera streams. My current architecture uses multiple NVIDIA Jetson Orin Nano Super Developer Kit devices for distributed inference processing. I estimate that one Jetson Orin Nano Super (8GB) can process around 5 RTSP streams at usable real-time FPS. This requires approximately 10 Jetson devices for the full deployment. Each device costs around ₹33,000 (~USD 395). The total estimated hardware cost is ₹330,000 (~USD 3,950). I want to compare this setup against a centralized Linux-based custom PC/server with NVIDIA GPU acceleration under the same budget. The comparison focuses on AI inference performance, scalability, reliability, and 24/7 operational efficiency. The workload mainly includes multi-stream YOLO/object detection inference on live RTSP feeds. I want to determine which architecture provides the best computation-to-cost ratio for this surveillance use case.
— Reply to this email directly, view it on GitHubhttps://urldefense.com/v3/__https://github.com/orgs/ultralytics/discussions/9942*discussioncomment-17006943__;Iw!!ElGdukoduuk!URiPjKkgDoMT_k2Y6pEd3XMEBGMDjhwgtQmwWXR9F4R4L7ymNloZD79NanOjYVg9YYmaARqyZGbgFv7U15KzgdcU$, or unsubscribehttps://urldefense.com/v3/__https://github.com/notifications/unsubscribe-auth/ABAAMILYUP7PPODNHDR3HC3434RYLAVCNFSM6AAAAABGAK2IGGVHI2DSMVQWIX3LMV43URDJONRXK43TNFXW4Q3PNVWWK3TUHMYTOMBQGY4TIMY__;!!ElGdukoduuk!URiPjKkgDoMT_k2Y6pEd3XMEBGMDjhwgtQmwWXR9F4R4L7ymNloZD79NanOjYVg9YYmaARqyZGbgFv7U1zjhi4YU$. Triage notifications on the go with GitHub Mobile for iOShttps://urldefense.com/v3/__https://apps.apple.com/app/apple-store/id1477376905?ct=notification-email&mt=8&pt=524675__;!!ElGdukoduuk!URiPjKkgDoMT_k2Y6pEd3XMEBGMDjhwgtQmwWXR9F4R4L7ymNloZD79NanOjYVg9YYmaARqyZGbgFv7U13gOq1qb$ or Androidhttps://urldefense.com/v3/__https://play.google.com/store/apps/details?id=com.github.android&referrer=utm_campaign*3Dnotification-email*26utm_medium*3Demail*26utm_source*3Dgithub__;JSUlJSU!!ElGdukoduuk!URiPjKkgDoMT_k2Y6pEd3XMEBGMDjhwgtQmwWXR9F4R4L7ymNloZD79NanOjYVg9YYmaARqyZGbgFv7U1zOl3XaF$. You are receiving this because you were mentioned.Message ID: @.***>
- Glenn JocherUltralytics
5streams on an Orin Nano Super is just a conservative YOLO/Python estimate; with a headless TensorRT or DeepStream pipeline, MAX power mode, andjetson_clocks, higher 1080p stream counts are definitely possible and depend heavily on the model size, input resolution, decode/encode, and any tracking or alert logic you add, so please drop your exactmodel,imgsz, FPS target, and RTSP resolution here and we can help size it more accurately using the Jetson deployment guide and DeepStream Jetson guide.
yashpatel2010
Hi, I am designing an AI-based CCTV surveillance system for a residential society with 50 RTSP camera streams. My current architecture uses multiple NVIDIA Jetson Orin Nano Super Developer Kit devices for distributed inference processing. I estimate that one Jetson Orin Nano Super (8GB) can process around 5 RTSP streams at usable real-time FPS. This requires approximately 10 Jetson devices for the full deployment. Each device costs around ₹33,000 (~USD 395). The total estimated hardware cost is ₹330,000 (~USD 3,950). I want to compare this setup against a centralized Linux-based custom PC/server with NVIDIA GPU acceleration under the same budget. The comparison focuses on AI inference performance, scalability, reliability, and 24/7 operational efficiency. The workload mainly includes multi-stream YOLO/object detection inference on live RTSP feeds. I want to determine which architecture provides the best computation-to-cost ratio for this surveillance use case.
RotatingGiraffe
Hi there, I am trying to run a fine-tuned YOLO26 based model for an OBB task on a Xavier NX running JetPack 5. I am using your container (ultralytics/ultralytics:latest-jetson-jetpack5) and trying to compile from PyTorch to TensorRT. I get the error: "mymodel.pt requires numpy>=1.26.1, however numpy==1.23.5 is installed."
Previously I have successfully the file on my host machine from PT to ONNX, copied ONNX to Jetson and then used tensorrtexec to compile to Engine. But the resulting models did not create any bounding boxes.
I wanted to ask if JetPack 5 even supports Yolo26 or if the model contains some incompatible layers? YOLO11 OBB works fine which I find extra-weird. Or is there likely an error somewhere else in my script?
- Glenn JocherUltralytics
Thanks for posting this here—JetPack 5 on Xavier NX is supported for YOLO26/TensorRT in our Jetson guide, so the
numpy>=1.26.1error points more to an environment/checkpoint mismatch than unsupported OBB layers; please paste the full text traceback andyolo checksoutput, and note that an engine built withtensorrtexeccan still produce empty OBB results if the Ultralytics export metadata/postprocessing is not preserved. Hi there, I tried to create a minimal reproducible example for you, based on what I am doing. I hope it helps with debugging.
The yolo checks you asked for is in the script output, along with the export script. I've also included the bit where I export via trtexex just for the sake of completion - it might very well be possible that I omit required metadata with this. My prefered goal would be that everything works via the Ultralytics Python API, but I had to search for workaround due to the NumPy error when compiling PT files.
I am now using the Ultralytics base image in the MRE which I hoped would be easier to debug for us. The NumPy error persists on the new image. Previously I was using something built upon l4t-ml.
Additionally, ONNX fails with an error ( `GLIBCXX_3.4.29' not found I think it was) but that is not a concern to me since I engine would be my prefered way to go. I have not installed any additional packages and kept it very vanilla (see dockerfile). The MRE also weirdly produced a new error during engine inference, but I'd say lets just focus on getting the Ultralytics native pipeline to work and then maybe all the other issues were just from my workarounds and disappear.
Execution Command
sudo docker compose up --buildDirectory Structure
obb-test-repro/
 ┣ 📂data/
 ┃ ┗ 📜mydataset.yaml
 ┣ 📂models/
 ┃ ┣ 📜my-yolo26m-model.onnx
 ┃ ┗ 📜my-yolo26m-model.pt
 ┣ 📂src/
 ┃ ┗ 📜main.py
 ┣ 📜docker-compose.yml
 ┣ 📜Dockerfile
 ┗ 📜requirements.txt
Dockerfile
FROM ultralytics/ultralytics:latest-jetson-jetpack5

WORKDIR /app

# Copy the test app
COPY src/ ./src/

# Run the test
CMD ["python3", "src/main.py"]
docker-compose.yml
version: '3.8'

services:
  obb-test-jp5:
    image: obb-test:latest
    container_name: obb_test_jp5
    build:
      context: .
      dockerfile: Dockerfile
    runtime: nvidia
    network_mode: host
    ipc: host
    restart: "no"
    volumes:
      - ./models:/app/models
      - ./data:/app/data
    environment:
      - NVIDIA_VISIBLE_DEVICES=all
      - NVIDIA_DRIVER_CAPABILITIES=all
main.py
"""
Minimal OBB model test script.

Behavior:
- Runs `yolo checks` to output environment details.
- Uses files in `/app/models` (container path mapped from `obb-test/models`).
- Expects two files (hard-coded):
  - `/app/models/my-yolo26m-model.pt` (optional) — used for Ultralytics native export
  - `/app/models/my-yolo26m-model.onnx` (optional) — used for trtexec compilation
- Runs both export methods (if files exist) and validates inference on each compiled engine using mydataset dataset.
"""

import logging
import sys
import subprocess
import os
from pathlib import Path
from ultralytics import YOLO

# Configure logging
logging.basicConfig(
    level=logging.INFO,
    format='%(asctime)s - %(levelname)s - %(message)s'
)
logger = logging.getLogger(__name__)


def run_yolo_checks():
    """Execute yolo checks via CLI to log environment details."""
    logger.info("=" * 60)
    logger.info("Environment Verification (yolo checks)")
    logger.info("=" * 60)
    try:
        res = subprocess.run(["yolo", "checks"], capture_output=True, text=True, check=True)
        logger.info("\n" + res.stdout.strip())
    except subprocess.CalledProcessError as e:
        logger.error(f"yolo checks failed:\n{e.stderr}")
    except FileNotFoundError:
        logger.error("yolo CLI command not found. Ensure ultralytics is installed in this environment.")


def test_export_to_engine():
    models_dir = Path("/app/models")
    pt_path = models_dir / "my-yolo26m-model.pt"
    onnx_path = models_dir / "my-yolo26m-model.onnx"
    dataset_yaml = "/app/data/mydataset.yaml"

    logger.info("=" * 60)
    logger.info("Minimal OBB Test - Export & Validation")
    logger.info("=" * 60)

    engines_tested = []

    # Part 1: Ultralytics native export (PT -> Engine)
    if pt_path.exists():
        try:
            logger.info(f"\nRunning Ultralytics native export for: {pt_path.name}")
            model = YOLO(str(pt_path))
            exported = model.export(format="engine", imgsz=1024, device=0, half=True)

            # Resolve the exported engine path
            native_engine = str(exported) if isinstance(exported, (str, Path)) else str(pt_path.with_suffix('.engine'))

            if os.path.exists(native_engine):
                logger.info(f"Ultralytics export successfully produced: {native_engine}")
                engines_tested.append(native_engine)
            else:
                logger.error(f"Ultralytics export completed, but engine file was not found at {native_engine}")
        except Exception as e:
            logger.error(f"Ultralytics native export failed: {e}", exc_info=True)
    else:
        logger.info(f"PT file not found ({pt_path}); skipping Ultralytics native export.")

    # Part 2: trtexec compilation (ONNX -> Engine)
    if onnx_path.exists():
        try:
            logger.info(f"\nRunning trtexec to compile ONNX: {onnx_path.name}")
            trt_engine = str(onnx_path.with_suffix('.trt.engine'))
            cmd = [
                "/usr/src/tensorrt/bin/trtexec",
                f"--onnx={onnx_path}",
                f"--saveEngine={trt_engine}",
                "--fp16",
                "--memPoolSize=workspace:768", # Prevents Out of Memory
            ]
            logger.info(f"Running command: {' '.join(cmd)}")
            res = subprocess.run(cmd, capture_output=True, text=True)

            if res.returncode != 0:
                logger.error("trtexec compilation failed.")
                logger.error(f"trtexec stderr:\n{res.stderr}")
            else:
                if os.path.exists(trt_engine):
                    logger.info(f"trtexec successfully saved engine to {trt_engine}")
                    engines_tested.append(trt_engine)
                else:
                    logger.error(f"trtexec returned success, but engine file was not found at {trt_engine}")
        except Exception as e:
            logger.error(f"trtexec execution failed: {e}", exc_info=True)
    else:
        logger.info(f"ONNX file not found ({onnx_path}); skipping trtexec compilation.")

    if not engines_tested:
        logger.error("\nNo engines are available to test. Exiting validation phase.")
        return False

    # Part 3: Inference Validation
    validation_success = True
    for eng in engines_tested:
        try:
            logger.info(f"\nValidating inference with engine: {eng}")

            model = YOLO(eng, task="obb")
            metrics = model.val(data=dataset_yaml, imgsz=1024, batch=1, verbose=False)

            logger.info(f"Validation metrics for {eng}: mAP50-95={metrics.box.map:.4f}, mAP50={metrics.box.map50:.4f}")
        except Exception as e:
            logger.error(f"Validation failed on {eng}: {e}", exc_info=True)
            validation_success = False

    logger.info("\nExecution complete.")
    return validation_success


if __name__ == "__main__":
    run_yolo_checks()

    try:
        success = test_export_to_engine()
        logger.info("\n" + "=" * 60)
        if success:
            logger.info("✓ Test passed")
        else:
            logger.info("✗ Test failed")
        logger.info("=" * 60)
        sys.exit(0 if success else 1)
    except Exception as e:
        logger.error(f"Unhandled script exception: {e}", exc_info=True)
        sys.exit(1)
Output
obb_test_jp5  | Creating new Ultralytics Settings v0.0.6 file ✅
obb_test_jp5  | View Ultralytics Settings with 'yolo settings' or at '/root/.config/Ultralytics/settings.json'
obb_test_jp5  | Update Settings with 'yolo settings key=value', i.e. 'yolo settings runs_dir=path/to/dir'. For help see https://docs.ultralytics.com/quickstart/#ultralytics-settings.
obb_test_jp5  | 2026-05-14 12:51:35,392 - INFO - ============================================================
obb_test_jp5  | 2026-05-14 12:51:35,392 - INFO - Environment Verification (yolo checks)
obb_test_jp5  | 2026-05-14 12:51:35,392 - INFO - ============================================================
obb_test_jp5  | 2026-05-14 12:51:50,554 - INFO -
obb_test_jp5  | Ultralytics 8.4.50 🚀 Python-3.8.10 torch-2.1.0a0+41361538.nv23.06 CUDA:0 (Xavier, 6833MiB)
obb_test_jp5  | Setup complete ✅ (2 CPUs, 6.7 GB RAM, 91.7/107.6 GB disk)
obb_test_jp5  |
obb_test_jp5  | OS                     Linux-5.10.216-tegra-aarch64-with-glibc2.29
obb_test_jp5  | Environment            Docker
obb_test_jp5  | Python                 3.8.10
obb_test_jp5  | Install                git
obb_test_jp5  | Path                   /ultralytics/ultralytics
obb_test_jp5  | RAM                    6.67 GB
obb_test_jp5  | Disk                   91.7/107.6 GB
obb_test_jp5  | CPU                    ARMv8 Processor rev 0 (v8l)
obb_test_jp5  | CPU count              2
obb_test_jp5  | GPU                    Xavier, 6833MiB
obb_test_jp5  | GPU count              1
obb_test_jp5  | CUDA                   11.4
obb_test_jp5  |
obb_test_jp5  | numpy                  ✅ 1.23.5>=1.23.0
obb_test_jp5  | matplotlib             ✅ 3.7.5>=3.3.0
obb_test_jp5  | opencv-python-headless ✅ 4.13.0.92>=4.6.0
obb_test_jp5  | pillow                 ✅ 10.4.0>=7.1.2
obb_test_jp5  | pyyaml                 ✅ 6.0.3>=5.3.1
obb_test_jp5  | requests               ✅ 2.32.4>=2.23.0
obb_test_jp5  | scipy                  ✅ 1.10.1>=1.4.1
obb_test_jp5  | torch                  ✅ 2.1.0a0+41361538.nv23.6>=1.8.0
obb_test_jp5  | torchvision            ✅ 0.16.2+c6f3977>=0.9.0
obb_test_jp5  | psutil                 ✅ 7.2.2>=5.8.0
obb_test_jp5  | polars                 ✅ 1.8.2>=0.20.0
obb_test_jp5  | ultralytics-thop       ✅ 2.0.19>=2.0.18
obb_test_jp5  | torch                  ✅ 2.1.0a0+41361538.nv23.6!=2.4.0,>=1.8.0; sys_platform == "win32"
obb_test_jp5  | 2026-05-14 12:51:50,562 - INFO - ============================================================
obb_test_jp5  | 2026-05-14 12:51:50,563 - INFO - Minimal OBB Test - Export & Validation
obb_test_jp5  | 2026-05-14 12:51:50,564 - INFO - ============================================================
obb_test_jp5  | 2026-05-14 12:51:50,565 - INFO -
obb_test_jp5  | Running Ultralytics native export for: my-yolo26m-model.pt
obb_test_jp5  | 2026-05-14 12:51:51,353 - ERROR - Ultralytics native export failed: ERROR ❌️ /app/models/my-yolo26m-model.pt requires numpy>=1.26.1, however numpy==1.23.5 is installed.
obb_test_jp5  | Traceback (most recent call last):
obb_test_jp5  |   File "/ultralytics/ultralytics/nn/tasks.py", line 1466, in torch_safe_load
obb_test_jp5  |     ckpt = _load()
obb_test_jp5  |   File "/ultralytics/ultralytics/nn/tasks.py", line 1463, in _load
obb_test_jp5  |     return torch_load(file, map_location="cpu")
obb_test_jp5  |   File "/ultralytics/ultralytics/utils/patches.py", line 181, in torch_load
obb_test_jp5  |     return torch.load(*args, **kwargs)
obb_test_jp5  |   File "/usr/local/lib/python3.8/dist-packages/torch/serialization.py", line 877, in load
obb_test_jp5  |     return _load(opened_zipfile, map_location, pickle_module, **pickle_load_args)
obb_test_jp5  |   File "/usr/local/lib/python3.8/dist-packages/torch/serialization.py", line 1253, in _load
obb_test_jp5  |     result = unpickler.load()
obb_test_jp5  |   File "/usr/local/lib/python3.8/dist-packages/torch/serialization.py", line 1246, in find_class
obb_test_jp5  |     return super().find_class(mod_name, name)
obb_test_jp5  | ModuleNotFoundError: No module named 'numpy._core'
obb_test_jp5  |
obb_test_jp5  | The above exception was the direct cause of the following exception:
obb_test_jp5  |
obb_test_jp5  | Traceback (most recent call last):
obb_test_jp5  |   File "src/minimal.py", line 58, in test_export_to_engine
obb_test_jp5  |     model = YOLO(str(pt_path))
obb_test_jp5  |   File "/ultralytics/ultralytics/models/yolo/model.py", line 76, in __init__
obb_test_jp5  |     super().__init__(model=model, task=task, verbose=verbose)
obb_test_jp5  |   File "/ultralytics/ultralytics/engine/model.py", line 144, in __init__
obb_test_jp5  |     self._load(model, task=task)
obb_test_jp5  |   File "/ultralytics/ultralytics/engine/model.py", line 283, in _load
obb_test_jp5  |     self.model, self.ckpt = load_checkpoint(weights)
obb_test_jp5  |   File "/ultralytics/ultralytics/nn/tasks.py", line 1537, in load_checkpoint
obb_test_jp5  |     ckpt, weight = torch_safe_load(weight)  # load ckpt
obb_test_jp5  |   File "/ultralytics/ultralytics/nn/tasks.py", line 1489, in torch_safe_load
obb_test_jp5  |     raise ModuleNotFoundError(
obb_test_jp5  | ModuleNotFoundError: ERROR ❌️ /app/models/my-yolo26m-model.pt requires numpy>=1.26.1, however numpy==1.23.5 is installed.
obb_test_jp5  | 2026-05-14 12:51:51,382 - INFO -
obb_test_jp5  | Running trtexec to compile ONNX: my-yolo26m-model.onnx
obb_test_jp5  | 2026-05-14 12:51:51,382 - INFO - Running command: /usr/src/tensorrt/bin/trtexec --onnx=/app/models/my-yolo26m-model.onnx --saveEngine=/app/models/my-yolo26m-model.trt.engine --fp16 --memPoolSize=workspace:768
obb_test_jp5  | 2026-05-14 13:21:39,214 - INFO - trtexec successfully saved engine to /app/models/my-yolo26m-model.trt.engine
obb_test_jp5  | 2026-05-14 13:21:39,217 - INFO -
obb_test_jp5  | Validating inference with engine: /app/models/my-yolo26m-model.trt.engine
obb_test_jp5  | Ultralytics 8.4.50 🚀 Python-3.8.10 torch-2.1.0a0+41361538.nv23.06 CUDA:0 (Xavier, 6833MiB)
obb_test_jp5  | Loading /app/models/my-yolo26m-model.trt.engine for TensorRT inference...
obb_test_jp5  | [05/14/2026-13:21:41] [TRT] [I] Loaded engine size: 43 MiB
obb_test_jp5  | [05/14/2026-13:21:45] [TRT] [I] [MemUsageChange] Init cuBLAS/cuBLASLt: CPU +260, GPU +306, now: CPU 648, GPU 5277 (MiB)
obb_test_jp5  | [05/14/2026-13:21:46] [TRT] [I] [MemUsageChange] Init cuDNN: CPU +82, GPU +156, now: CPU 730, GPU 5433 (MiB)
obb_test_jp5  | [05/14/2026-13:21:46] [TRT] [I] [MemUsageChange] TensorRT-managed allocation in engine deserialization: CPU +0, GPU +41, now: CPU 0, GPU 41 (MiB)
obb_test_jp5  | [05/14/2026-13:21:46] [TRT] [I] [MemUsageChange] Init cuBLAS/cuBLASLt: CPU +0, GPU +28, now: CPU 687, GPU 5422 (MiB)
obb_test_jp5  | [05/14/2026-13:21:46] [TRT] [I] [MemUsageChange] Init cuDNN: CPU +0, GPU +32, now: CPU 687, GPU 5454 (MiB)
obb_test_jp5  | [05/14/2026-13:21:46] [TRT] [I] [MemUsageChange] TensorRT-managed allocation in IExecutionContext creation: CPU +0, GPU +92, now: CPU 0, GPU 133 (MiB)
obb_test_jp5  | Setting batch=1 input of shape (1, 3, 1024, 1024)
obb_test_jp5  | 2026-05-14 13:21:54,562 - INFO - generated new fontManager
obb_test_jp5  | val: Fast image access ✅ (ping: 1.1±0.9 ms, read: 479.2±146.1 MB/s, size: 2563.4 KB)
val: Scanning /app/data/labels/rec26.cache... 2940 images, 26 backgrounds, 0 corrupt: 100% ━━━━━━━━━━━━ 2940/2940 14.4Mit/s 0.0s
obb_test_jp5  | 2026-05-14 13:22:01,033 - ERROR - Validation failed on /app/models/my-yolo26m-model.trt.engine: CUDA error: no kernel image is available for execution on the device
obb_test_jp5  | CUDA kernel errors might be asynchronously reported at some other API call, so the stacktrace below might be incorrect.
obb_test_jp5  | For debugging consider passing CUDA_LAUNCH_BLOCKING=1.
obb_test_jp5  | Compile with `TORCH_USE_CUDA_DSA` to enable device-side assertions.
obb_test_jp5  | Traceback (most recent call last):
obb_test_jp5  |   File "src/minimal.py", line 114, in test_export_to_engine
obb_test_jp5  |     metrics = model.val(data=dataset_yaml, imgsz=1024, batch=1, verbose=False)
obb_test_jp5  |   File "/ultralytics/ultralytics/engine/model.py", line 615, in val
obb_test_jp5  |     validator(model=self.model)
obb_test_jp5  |   File "/usr/local/lib/python3.8/dist-packages/torch/utils/_contextlib.py", line 115, in decorate_context
obb_test_jp5  |     return func(*args, **kwargs)
obb_test_jp5  |   File "/ultralytics/ultralytics/engine/validator.py", line 210, in __call__
obb_test_jp5  |     model.warmup(imgsz=(1 if pt else self.args.batch, self.data["channels"], imgsz, imgsz))  # warmup
obb_test_jp5  |   File "/ultralytics/ultralytics/nn/autobackend.py", line 313, in warmup
obb_test_jp5  |     non_max_suppression(warmup_boxes)  # warmup NMS
obb_test_jp5  |   File "/ultralytics/ultralytics/utils/nms.py", line 154, in non_max_suppression
obb_test_jp5  |     i = torchvision.ops.nms(boxes, scores, iou_thres)
obb_test_jp5  |   File "/usr/local/lib/python3.8/dist-packages/torchvision/ops/boxes.py", line 41, in nms
obb_test_jp5  |     return torch.ops.torchvision.nms(boxes, scores, iou_threshold)
obb_test_jp5  |   File "/usr/local/lib/python3.8/dist-packages/torch/_ops.py", line 646, in __call__
obb_test_jp5  |     return self._op(*args, **kwargs or {})
obb_test_jp5  | RuntimeError: CUDA error: no kernel image is available for execution on the device
obb_test_jp5  | CUDA kernel errors might be asynchronously reported at some other API call, so the stacktrace below might be incorrect.
obb_test_jp5  | For debugging consider passing CUDA_LAUNCH_BLOCKING=1.
obb_test_jp5  | Compile with `TORCH_USE_CUDA_DSA` to enable device-side assertions.
obb_test_jp5  |
obb_test_jp5  | 2026-05-14 13:22:01,521 - INFO -
obb_test_jp5  | Execution complete.
obb_test_jp5  | 2026-05-14 13:22:01,524 - INFO -
obb_test_jp5  | ============================================================
obb_test_jp5  | 2026-05-14 13:22:01,526 - INFO - ✗ Test failed
obb_test_jp5  | 2026-05-14 13:22:01,529 - INFO - ============================================================
obb_test_jp5 exited with code 1
Export Device
This is a bit of info on where my ONNX files come from and what my PC environment looks like where I compiled them.
Yolo Checks on the ONNX Export Device
Ultralytics 8.4.48 🚀 Python-3.13.9 torch-2.11.0+cu130 CPU (AMD Ryzen 5 5600G with Radeon Graphics)
Setup complete ✅ (12 CPUs, 15.0 GB RAM, 744.1/878.1 GB disk)

OS                     Linux-6.17.0-23-generic-x86_64-with-glibc2.39
Environment            Linux
Python                 3.13.9
Install                git
Path                   /home/myuser/projects/myproject/.venv/lib/python3.13/site-packages/ultralytics
RAM                    15.01 GB
Disk                   744.1/878.1 GB
CPU                    AMD Ryzen 5 5600G with Radeon Graphics
CPU count              12
GPU                    None
GPU count              None
CUDA                   None

numpy                  ✅ 2.4.4>=1.23.0
matplotlib             ✅ 3.10.9>=3.3.0
opencv-python          ✅ 4.13.0.92>=4.6.0
pillow                 ✅ 12.2.0>=7.1.2
pyyaml                 ✅ 6.0.3>=5.3.1
requests               ✅ 2.33.1>=2.23.0
scipy                  ✅ 1.17.1>=1.4.1
torch                  ✅ 2.11.0>=1.8.0
torch                  ✅ 2.11.0!=2.4.0,>=1.8.0; sys_platform == "win32"
torchvision            ✅ 0.26.0>=0.9.0
psutil                 ✅ 7.2.2>=5.8.0
polars                 ✅ 1.40.1>=0.20.0
ultralytics-thop       ✅ 2.0.19>=2.0.18
Export Code
from ultralytics import YOLO

# 1. Load the model weights
model_path = "my-yolo26m-model.pt"
model = YOLO(model_path)

# 2. Export the model
# Configured for OBB (Oriented Bounding Boxes) and legacy TensorRT compatibility
success = model.export(
    format="onnx",
    imgsz=1024,      # Target resolution
    opset=13,       # ONNX operator set version, also tried 12
    simplify=True,   # I hoped this would help
    task="obb",
    half=False,      # I tried this with True and False
    end2end=False    # For legacy TensorRT support...?
)

print(f"Export successful: {success}")
YOLO26m-obb summary (fused): 175 layers, 23,443,236 parameters, 0 gradients, 71.5 GFLOPs PyTorch: starting from 'my-yolo26m-model.pt' with input shape (1, 3, 1024, 1024) BCHW and output shape(s) (1, 6, 21504) (90.8 MB) ONNX: starting export with onnx 1.21.0 opset 13... ONNX: slimming with onnxslim 0.1.93... ONNX: export success ✅ 2.5s, saved as 'my-yolo26m-model.onnx' (81.3 MB) Export complete (4.3s)Old Container
Jut in case it is relevant, this is the yolo checks of my self-made container which is based on l4t-ml.
root@xaviernx-desktop:/app# yolo checks WARNING ⚠️ user config directory '/root/.config/Ultralytics' is not writable, using '/tmp/Ultralytics'. Set YOLO_CONFIG_DIR to override. Creating new Ultralytics Settings v0.0.6 file ✅ View Ultralytics Settings with 'yolo settings' or at '/tmp/Ultralytics/settings.json' Update Settings with 'yolo settings key=value', i.e. 'yolo settings runs_dir=path/to/dir'. For help see https://docs.ultralytics.com/quickstart/#ultralytics-settings. Ultralytics 8.4.49 🚀 Python-3.8.10 torch-2.0.0+nv23.05 CUDA:0 (Xavier, 6833MiB) Setup complete ✅ (2 CPUs, 6.7 GB RAM, 84.9/107.6 GB disk) OS Linux-5.10.216-tegra-aarch64-with-glibc2.29 Environment Docker Python 3.8.10 Install pip Path /usr/local/lib/python3.8/dist-packages/ultralytics RAM 6.67 GB Disk 84.9/107.6 GB CPU ARMv8 Processor rev 0 (v8l) CPU count 2 GPU Xavier, 6833MiB GPU count 1 CUDA 11.4 numpy ✅ 1.23.5>=1.23.0 matplotlib ✅ 3.7.5>=3.3.0 opencv-python ❌ (not installed)>=4.6.0 pillow ✅ 10.2.0>=7.1.2 pyyaml ✅ 5.3.1>=5.3.1 requests ✅ 2.32.4>=2.23.0 scipy ✅ 1.10.1>=1.4.1 torch ✅ 2.0.0+nv23.5>=1.8.0 torch ✅ 2.0.0+nv23.5!=2.4.0,>=1.8.0; sys_platform == "win32" torchvision ✅ 0.15.1a0+42759b1>=0.9.0 psutil ✅ 5.9.6>=5.8.0 polars ❌ (not installed)>=0.20.0 ultralytics-thop ❌ (not installed)>=2.0.18 Murat Raimbekov
Thanks for the detailed MRE. I reproduced the numpy failure end-to-end with
torch.save/torch.loadand have a verified fix. There are two independent issues here.1.
numpy._core/ "requires numpy>=1.26.1" — root cause and fixYour
.ptwas saved on your PC with numpy 2.x / Python 3.13, so the checkpoint pickle embeds the numpy-2numpy._coremodule path. JetPack 5 on Xavier NX runs Python 3.8, whose maximum numpy is 1.24.x, and Xavier cannot move to JetPack 6 (Orin-only). I verified that even numpy 1.26.x does not fully read such a checkpoint, so "upgrade numpy" is not a real option on JP5.The reliable fix is a small compatibility shim that aliases
numpy._coreto the legacynumpy.core, injected before the model is loaded. I confirmed this loads a numpy-2torch.savecheckpoint correctly under numpy 1.23.5 with the model and all fields intact. Put this at the very top of yourmain.py, beforefrom ultralytics import YOLO:import sys, numpy, numpy.core sys.modules["numpy._core"] = numpy.core for _s in ("multiarray", "numeric", "umath", "_multiarray_umath"): try: sys.modules[f"numpy._core.{_s}"] = __import__(f"numpy.core.{_s}", fromlist=[_s]) except Exception: passAlternatively, fix the checkpoint once on the PC (where numpy 2.x can read it) so the device never needs the shim — load it and re-save it after converting the auxiliary numpy fields, then copy the new
.ptto the Jetson.2. Empty boxes /
CUDA error: no kernel image is available for execution on the deviceThese are separate from numpy:
- The
trtexec-built engine produces no detections because a rawtrtexecengine carries none of the Ultralytics export metadata, so the OBB decoding/post-processing is never applied. Build the engine on the Jetson with Ultralytics directly from the.pt(after applying the shim above) so metadata is embedded:YOLO("model.pt").export(format="engine", imgsz=1024, half=True, device=0). no kernel image is availableis raised insidetorchvision.ops.nmson the GPU: the PyTorch/torchvision inultralytics/ultralytics:latest-jetson-jetpack5is built for Orin (SM 8.7), while Xavier NX is SM 7.2. That is exactly why YOLO11 OBB works in your older l4t-ml-based container (torch 2.0.0+nv23.5) but the official image fails. Recommended path: stay on the container that already works on your Xavier,pip install ultralytics opencv-python-headlessthere, and run the Ultralyticsexport(format="engine")+val()entirely on-device.
TL;DR: the numpy error is a pickle module-path mismatch from the numpy-2 export PC (fix with the shim above — verified), and the empty/CUDA errors are a raw-
trtexecmetadata loss plus a torch/torchvision build that doesn't target Xavier's SM 7.2.1- The
Hi there, thank you for the help! I just recently got around to trying out the shim and now everything works just fine, thank you for your help!
How to run deepstream for YOLO26 models in my jetson orin nano developer kit?
Is there any documentation for deepstream on jetson? I don't want any installation errors of version missmatch.
So give me any perfect guide link so that I will not miss anything while installation and run inference on live RTSP streams
githubwalt(bearbeitet)
Here you go: https://docs.ultralytics.com/guides/deepstream-nvidia-jetson/
Have a look in jtop (info) for your board compute capability (CUDA Arch BIN). If it's also 8.7, then see my posts here above to avoid problems with torch.
- Glenn JocherUltralytics
Adding one detail for
Jetson Orin Nano: keep the versions paired asJetPack 6.1+DeepStream 7.1from the Jetson quick-start and NVIDIA DeepStream getting started; for live RTSP, set theuriindeepstream_app_config.txtto your stream, and if you hit any mismatch please post the full text traceback plusyolo checksoutput here so the team can help. Thanks for your reply. Just onemore doubt to clear. docker pull nvcr.io/nvidia/deepstream:7.1-triton-multiarch
if I use above docker container for my jetpack6.1 so it there is no issue of version missmatch of deepstream right?
is it works very well with Yolo26 deepstream settings which is showing in this doc? https://docs.ultralytics.com/guides/deepstream-nvidia-jetson/
what is your recommendation to run Multiple RTSP streams with deepstream with docker containers or without docker containers manual installation?
- Glenn JocherUltralytics
Yes,
nvcr.io/nvidia/deepstream:7.1-triton-multiarchis the correct DeepStream 7.1 Jetson container forJetPack 6.1, but it still depends on the host having the JetPack BSP and NVIDIA container runtime installed, so it lowers mismatch risk rather than removing it completely; for YOLO26 + RTSP, the DeepStream multi-stream section is the right reference, and I’d suggest native setup first since that’s the install path used in the guide, then move to Docker once your pipeline is stable. (docs.ultralytics.com) Thanks. For native setup Is it good to install deepstream 7.1 while installing jetpack6.1 only?
- Glenn JocherUltralytics
Yes—on
Jetson Orin Nanonative setup,JetPack 6.1+DeepStream 7.1is the correct pairing; installJetPack 6.1first, boot and verify the system, then installDeepStream 7.1separately using the versions listed in the Jetson + YOLO26 guide and the DeepStream on Jetson guide to avoid mismatches.
Installing torch 2.11.0 from the official website pytorch.org on an AGX Orin 64Gb (dev kit) with JP6.2.2 or installing torch 2.10.0 and torchvision 0.25.0 following this page, give complaints about not being compatible with the Compute Capability (CC) of my machine which has 8.7, whatever that means. Only installing the previous versions torch 2.8.0 and torchvision 0.23.0 do work.
I understand that torch needs to be tailored specifically for the Jetson family and that is what this page is all about, so why do I have this issue if I follow the instructions given here? Is it because I am on Jetpack 6.2.2 and here it's 6.1?
I forgot the warning and error output when running a python test script:
UserWarning: Found GPU0 Orin which is of compute capability (CC) 8.7.The following list shows the CCs this version of PyTorch was built for and the hardware CCs it supports:- 8.0 which supports hardware CC >=8.0,<9.0 except {8.7}- 9.0 which supports hardware CC >=9.0,<10.0
torch.AcceleratorError CUDA error: no kernel image is available for execution on the device
- Glenn JocherUltralytics
Thanks, that traceback helps —
CC 8.7is the AGX Orin GPU architecture, andno kernel image is availablemeans the installed PyTorch wheel was built withoutsm_87support. So yes, this is most likely a JetPack/PyTorch wheel mismatch: the native steps in the JetPack 6.1 section don’t necessarily map cleanly toJP6.2.2, even though the page includesJP6.2benchmark coverage. For now I’d stick with the workingtorch 2.8.0+torchvision 0.23.0pair or use the JetPack 6 Docker setup; if you want us to check your exact environment, please postyolo checksand the full text traceback here in the discussion. Thanks, will stick to 2.8 🙂 👍 (I also posted on the guide page https://docs.ultralytics.com/guides/nvidia-jetson/#what-are-the-best-practices-for-maximizing-performance-on-nvidia-jetson-when-using-yolo26 , so you could ignore that if you like, can't delete my post there 😏 )
- Glenn JocherUltralytics
No worries — the duplicate is fine, and if you later confirm a stable
JP6.2.2+ PyTorch pairing on AGX Orin, please add it here so we can reflect it in the Jetson guide. Will do. Now trying to get the most out of the AGX. Experimenting with number of workers on a batch size of 16. So far 12 workers gave memory issues ... I chose 12 because of 12 cores, but that was a little too much. Now running with 8 workers ... so far so good. To be continued 🙂
Hi Glenn, I can confirm a stable JP6.2.2 + Pytorch (torch 2.8.0 and torchvision 0.23.0) on the AGX Orin.