Link to this section快速入门指南:Raspberry Pi 与 Ultralytics YOLO26#
Raspberry Pi 是一款经济实惠的小型计算机,它可以在边缘端运行 Ultralytics YOLO26 以实现实时 object detection,且无需 GPU。本指南将引导你在 Raspberry Pi 4 和 5 上部署 YOLO26:包括烧录操作系统、安装 Ultralytics、导出为 NCNN 以在 ARM 架构上实现最快的 inference,以及在实时摄像头画面上运行预测。此外,本指南还包含了十种导出格式的性能基准测试,帮助你为你的硬件选择最佳的速度与 accuracy 平衡方案。
跳转至 设置 Ultralytics、导出为 NCNN 并运行推理、基准测试 或 摄像头推理。
Watch: Raspberry Pi 5 updates and improvements.
本指南已在运行最新版 Raspberry Pi OS Bookworm (Debian 12) 的 Raspberry Pi 4 和 Raspberry Pi 5 上进行了测试。只要安装了相同的 Raspberry Pi OS Bookworm,本指南也适用于旧款 Raspberry Pi 设备,例如 Raspberry Pi 3。
Link to this section什么是 Raspberry Pi?#
Raspberry Pi 是一款小型、经济实惠的单板计算机。它已广泛应用于从业余爱好者的家庭自动化到工业用途的各种项目和应用中。Raspberry Pi 板卡能够运行多种操作系统,并提供 GPIO(通用输入/输出)引脚,可以轻松与传感器、执行器和其他硬件组件集成。它们有不同的型号,规格各异,但都遵循低成本、紧凑且通用的基本设计理念。
Link to this sectionRaspberry Pi 系列对比#
| Raspberry Pi 3 | Raspberry Pi 4 | Raspberry Pi 5 | |
|---|---|---|---|
| CPU | Broadcom BCM2837, Cortex-A53 64位 SoC | Broadcom BCM2711, Cortex-A72 64位 SoC | Broadcom BCM2712, Cortex-A76 64位 SoC |
| CPU 最高频率 | 1.4GHz | 1.8GHz | 2.4GHz |
| GPU | Videocore IV | Videocore VI | VideoCore VII |
| GPU 最高频率 | 400Mhz | 500Mhz | 800Mhz |
| 内存 | 1GB LPDDR2 SDRAM | 1GB, 2GB, 4GB, 8GB LPDDR4-3200 SDRAM | 4GB, 8GB LPDDR4X-4267 SDRAM |
| PCIe | 不适用 | 不适用 | 1xPCIe 2.0 接口 |
| 最大功耗 | 2.5A@5V | 3A@5V | 5A@5V (支持 PD) |
Link to this section什么是 Raspberry Pi OS?#
Raspberry Pi OS(前身为 Raspbian)是一款基于 Debian GNU/Linux 发行版的类 Unix 操作系统,专为 Raspberry Pi 基金会分发的 Raspberry Pi 系列紧凑型单板计算机设计。Raspberry Pi OS 针对带有 ARM CPU 的 Raspberry Pi 进行了高度优化,并使用经过修改的 LXDE 桌面环境和 Openbox 堆叠窗口管理器。Raspberry Pi OS 处于积极开发状态,重点在于提高尽可能多的 Debian 软件包在 Raspberry Pi 上的稳定性和性能。
Link to this section将 Raspberry Pi OS 刷写到 Raspberry Pi#
拿到 Raspberry Pi 后,首先要做的是将 Raspberry Pi OS 刷写到 micro-SD 卡中,将其插入设备并启动进入系统。请按照详细的 Raspberry Pi 入门文档 进行操作,为首次使用做好设备准备。
Link to this section设置 Ultralytics#
你可以通过两种方式在 Raspberry Pi 上设置 Ultralytics 软件包,以用于你的下一个 Computer Vision 项目:
Link to this section使用 Docker 开始#
在 Raspberry Pi 上开始使用 Ultralytics YOLO26 最快的方法是运行预构建的 Raspberry Pi Docker 镜像。
执行以下命令以拉取 Docker 容器并在 Raspberry Pi 上运行。此容器基于 arm64v8/ubuntu Docker 镜像,该镜像在 Python3 环境中运行 Ubuntu 24.04。
t=ultralytics/ultralytics:latest-arm64
sudo docker pull $t && sudo docker run -it --ipc=host $t
该 Docker 镜像已包含 Ultralytics,因此你可以直接跳转至 将模型导出为 NCNN。
Link to this section不使用 Docker 开始#
Link to this section安装 Ultralytics 包#
在此,我们将通过可选依赖项在 Raspberry Pi 上安装 Ultralytics 软件包,以便我们将 PyTorch 模型导出为其他格式。
-
更新软件包列表,安装 pip 并升级到最新版本
sudo apt update sudo apt install python3-pip -y pip install -U pip -
安装带有可选依赖项的
ultralyticspip 包pip install ultralytics[export] -
重启设备
sudo reboot
Link to this section在 Raspberry Pi 上使用 NCNN#
在 Ultralytics 支持的所有模型 export formats 中,NCNN 在 Raspberry Pi 设备上提供最佳的推理性能,因为它针对 ARM 架构等移动/嵌入式平台进行了高度优化。将你的 YOLO26n PyTorch 模型转换为 NCNN,然后使用导出的模型运行推理:
from ultralytics import YOLO

# Load a YOLO26n PyTorch model
model = YOLO("yolo26n.pt")

# Export the model to NCNN format
model.export(format="ncnn")  # creates 'yolo26n_ncnn_model'

# Load the exported NCNN model
ncnn_model = YOLO("yolo26n_ncnn_model")

# Run inference
results = ncnn_model("https://ultralytics.com/images/bus.jpg")有关支持的导出选项的更多详细信息,请参阅 模型部署选项指南。
Link to this sectionYOLO26 相比 YOLO11 的性能提升#
YOLO26 专为在硬件受限的设备(如 Raspberry Pi 5)上运行而设计。与 YOLO11n 相比,YOLO26n 在 Raspberry Pi 5 上使用 ONNX 导出模型时,在 640 输入尺寸下,FPS 提升了约 15%(6.79 → 7.79),同时提供了更高的 mAP(40.1 vs 39.5)。下表和图表展示了这一对比。

| 模型 | mAP50-95(B) | 推理时间 (ms/im) |
|---|---|---|
| YOLO26n | 40.1 | 128.42 |
| YOLO26s | 47.8 | 352.84 |
| YOLO26m | 52.5 | 993.78 |
| YOLO26l | 54.4 | 1259.46 |
| YOLO26x | 56.9 | 2636.26 |
使用 Ultralytics 8.4.14 进行基准测试。
Link to this sectionRaspberry Pi 5 YOLO26 基准测试#
YOLO26 benchmarks 由 Ultralytics 团队在十种不同的模型格式上运行,用于衡量速度和 accuracy:PyTorch、TorchScript、ONNX、OpenVINO、TF SavedModel、TF GraphDef、TF Lite、MNN、NCNN、ExecuTorch。基准测试是在 Raspberry Pi 5 上以默认输入图像尺寸 640 和 FP32 precision 运行的。
Link to this section对比图#
我们仅包含了 YOLO26n 和 YOLO26s 模型的基准测试,因为其他模型尺寸太大,无法在 Raspberry Pi 上运行,且无法提供理想的性能。
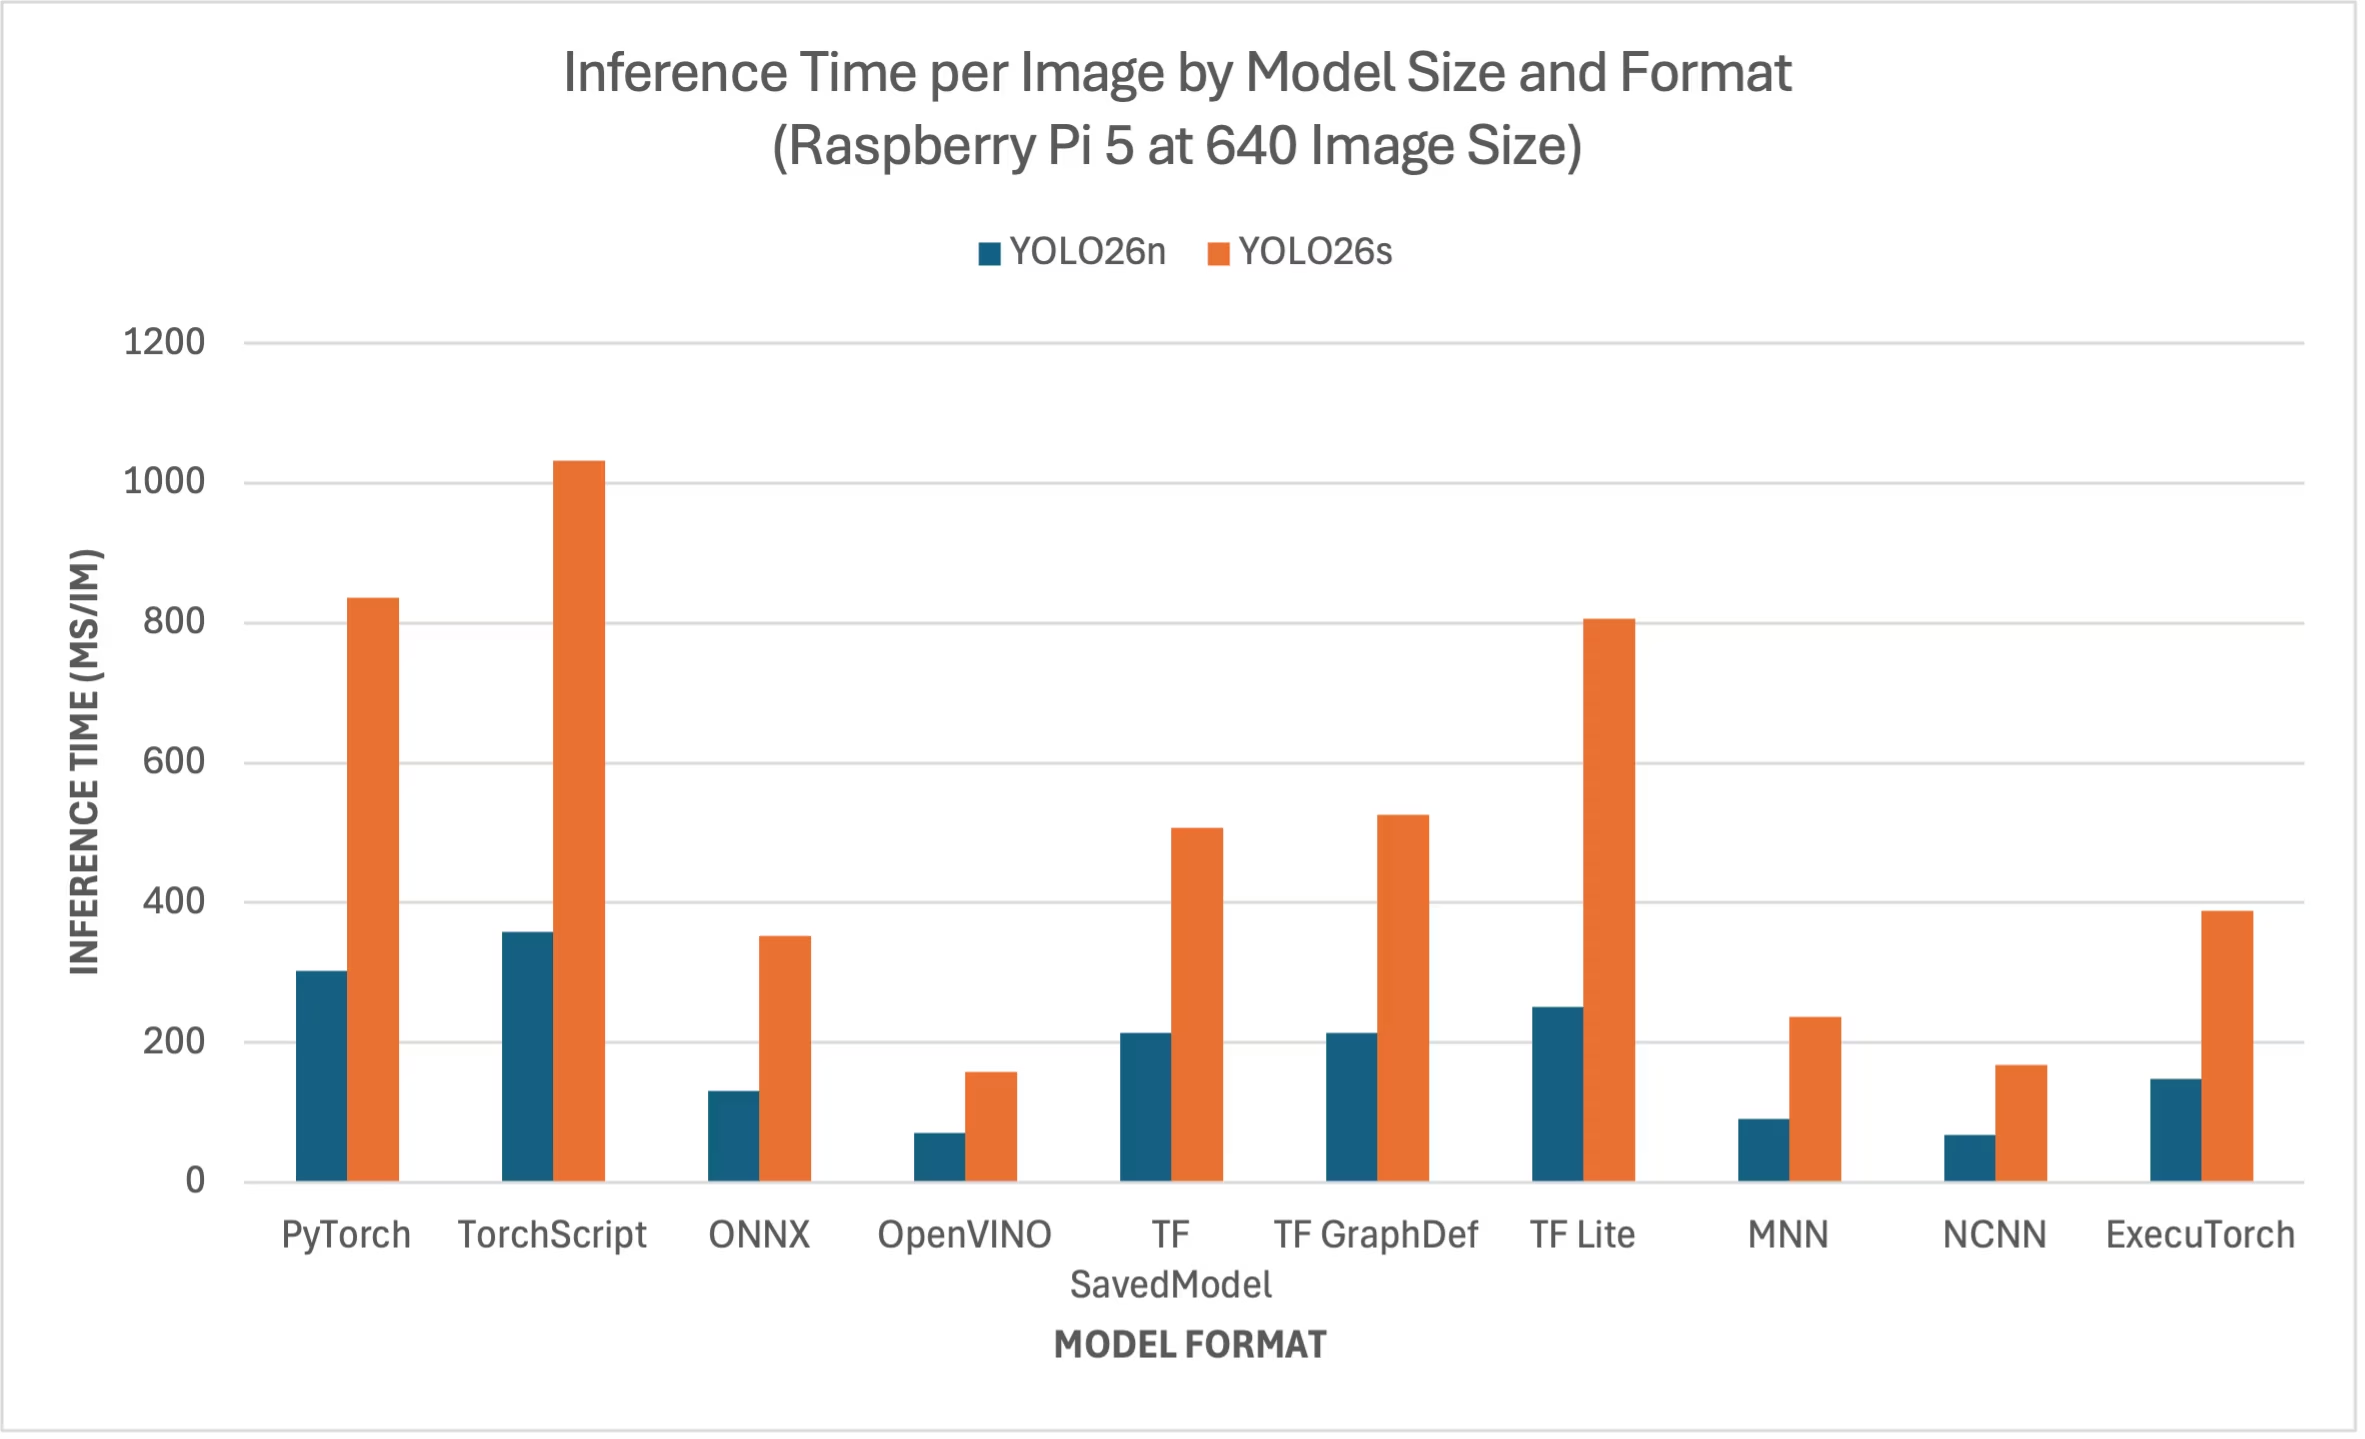
Link to this section详细对比表#
下表展示了在 Raspberry Pi 5 上运行的两种不同模型(YOLO26n, YOLO26s)在十种不同格式(PyTorch, TorchScript, ONNX, OpenVINO, TF SavedModel, TF GraphDef, TF Lite, MNN, NCNN, ExecuTorch)下的基准测试结果,提供了每种组合的状态、大小、mAP50-95(B) 指标和推理时间。
| 格式 | 状态 | 磁盘占用大小 (MB) | mAP50-95(B) | 推理时间 (ms/im) |
|---|---|---|---|---|
| PyTorch | ✅ | 5.3 | 0.4798 | 302.15 |
| TorchScript | ✅ | 9.8 | 0.4764 | 357.58 |
| ONNX | ✅ | 9.5 | 0.4764 | 130.33 |
| OpenVINO | ✅ | 9.6 | 0.4818 | 70.74 |
| TF SavedModel | ✅ | 24.6 | 0.4764 | 213.58 |
| TF GraphDef | ✅ | 9.5 | 0.4764 | 213.5 |
| TF Lite | ✅ | 9.9 | 0.4764 | 251.41 |
| MNN | ✅ | 9.4 | 0.4784 | 90.89 |
| NCNN | ✅ | 9.4 | 0.4805 | 67.69 |
| ExecuTorch | ✅ | 9.4 | 0.4764 | 148.36 |
使用 Ultralytics 8.4.1 进行基准测试
推理时间不包含预处理/后处理。
Link to this section重现我们的结果#
要重现上述所有 导出格式 的 Ultralytics 基准测试,请运行此代码:
from ultralytics import YOLO

# Load a YOLO26n PyTorch model
model = YOLO("yolo26n.pt")

# Benchmark YOLO26n speed and accuracy on the COCO128 dataset for all export formats
results = model.benchmark(data="coco128.yaml", imgsz=640)
请注意,基准测试结果可能会因系统的确切硬件和软件配置以及运行基准测试时系统的当前负载而有所不同。为获得最可靠的结果,请使用包含大量图像的数据集,例如 data='coco.yaml'(5000 张验证图像)。
Link to this section使用 Raspberry Pi 相机#
当使用 Raspberry Pi 进行计算机视觉项目时,获取实时视频流以进行推理至关重要。Raspberry Pi 上的板载 MIPI CSI 接口允许你连接官方 Raspberry Pi 相机模块。在本指南中,我们使用了 Raspberry Pi Camera Module 3 来获取视频流,并使用 YOLO26 模型进行推理。
了解更多关于 Raspberry Pi 提供的不同相机模块 以及 如何开始使用 Raspberry Pi 相机模块 的信息。
Raspberry Pi 5 使用比 Raspberry Pi 4 更小的 CSI 接口(15-pin vs 22-pin),因此你需要一根 15-pin 转 22-pin 转接线 才能连接到 Raspberry Pi 相机。
Link to this section测试相机#
将相机连接到 Raspberry Pi 后执行以下命令。你应该能看到来自相机的实时视频流,持续约 5 秒。
rpicam-hello在官方 Raspberry Pi 文档中了解更多关于 rpicam-hello 的用法
Link to this section使用相机进行推理#
有两种使用 Raspberry Pi 摄像头运行 YOLO26 模型推理的方法。
我们可以使用 Raspberry Pi OS 预装的 picamera2 来访问摄像头并运行 YOLO26 模型推理。
import cv2
from picamera2 import Picamera2

from ultralytics import YOLO

# Initialize the Picamera2
picam2 = Picamera2()
picam2.preview_configuration.main.size = (1280, 720)
picam2.preview_configuration.main.format = "RGB888"
picam2.preview_configuration.align()
picam2.configure("preview")
picam2.start()

# Load the YOLO26 model
model = YOLO("yolo26n.pt")

while True:
    # Capture frame-by-frame
    frame = picam2.capture_array()

    # Run YOLO26 inference on the frame
    results = model(frame)

    # Visualize the results on the frame
    annotated_frame = results[0].plot()

    # Display the resulting frame
    cv2.imshow("Camera", annotated_frame)

    # Break the loop if 'q' is pressed
    if cv2.waitKey(1) == ord("q"):
        break

# Release resources and close windows
cv2.destroyAllWindows()如果你想更改图像/视频输入类型,请查看我们关于 Inference Sources 的文档
Link to this section在 Raspberry Pi 上使用时的最佳实践#
为了在运行 YOLO26 的 Raspberry Pi 上实现最大性能,请遵循以下几项最佳实践。
-
使用 SSD
当 Raspberry Pi 需要 24x7 全天候持续使用时,建议使用 SSD 作为系统盘,因为 SD 卡无法承受持续写入,可能会损坏。借助 Raspberry Pi 5 上的板载 PCIe 连接器,现在可以使用适配器(例如 Raspberry Pi 5 NVMe 基板)连接 SSD。
-
无 GUI 刷写系统
在刷写 Raspberry Pi OS 时,你可以选择不安装桌面环境(即 Raspberry Pi OS Lite),这可以节省设备内存,为计算机视觉处理腾出更多空间。
-
超频 Raspberry Pi
如果你想在 Raspberry Pi 5 上运行 Ultralytics YOLO26 模型时获得性能提升,可以将 CPU 从基础频率 2.4GHz 超频至 2.9GHz,并将 GPU 从 800MHz 超频至 1GHz。如果系统变得不稳定或崩溃,请以 100MHz 为增量降低超频值。确保散热良好,因为超频会增加发热量并可能导致过热降频。
a. 升级软件
sudo apt update && sudo apt dist-upgradeb. 打开并编辑配置文件
sudo nano /boot/firmware/config.txtc. 在底部添加以下行
arm_freq=3000
gpu_freq=1000
force_turbo=1
d. 按 CTRL + X,然后按 Y,再按 ENTER 保存并退出
e. 重启 Raspberry Pi
Link to this section后续步骤#
你已成功在 Raspberry Pi 上设置好 YOLO26。如需进一步了解,请探索 Predict mode 以获取更多推理选项,查看 Export mode 获取更多部署格式,或者如果你需要在边缘端获得更强的计算能力,请参考 NVIDIA Jetson guide。有关完整文档,请访问 Ultralytics YOLO26 Docs。
Link to this section致谢与引用#
本指南最初由 Daan Eeltink 为 Kashmir World Foundation 创建,该组织致力于利用 YOLO 保护濒危物种。我们感谢他们在对象检测技术领域的开创性工作和教育重点。
有关 Kashmir World Foundation 活动的更多信息,请访问他们的 网站.
Link to this section常见问题解答#
Link to this section如何在不使用 Docker 的情况下在 Raspberry Pi 上设置 Ultralytics YOLO26?#
若要在没有 Docker 的情况下在 Raspberry Pi 上设置 Ultralytics YOLO26,请按照以下步骤操作:
- 更新软件包列表并安装
pip:sudo apt update sudo apt install python3-pip -y pip install -U pip - 安装包含可选依赖项的 Ultralytics 包:
pip install ultralytics[export] - 重启设备以应用更改:
sudo reboot
有关详细说明,请参考 不使用 Docker 启动 部分。
Link to this section为什么我在 Raspberry Pi 上执行 AI 任务时应该使用 Ultralytics YOLO26 的 NCNN 格式?#
Ultralytics YOLO26 的 NCNN 格式针对移动和嵌入式平台进行了高度优化,非常适合在 Raspberry Pi 设备上运行 AI 任务。NCNN 通过利用 ARM 架构最大限度地提高了推理性能,与其他格式相比,它提供了更快速、更高效的处理能力。有关支持的导出格式的更多详细信息,请参阅 模型导出选项。
Link to this section如何将 YOLO26 模型转换为 NCNN 格式以便在 Raspberry Pi 上使用?#
你可以使用 Python 或 CLI 命令将 PyTorch YOLO26 模型转换为 NCNN 格式:
from ultralytics import YOLO

# Load a YOLO26n PyTorch model
model = YOLO("yolo26n.pt")

# Export the model to NCNN format
model.export(format="ncnn")  # creates 'yolo26n_ncnn_model'

# Load the exported NCNN model
ncnn_model = YOLO("yolo26n_ncnn_model")

# Run inference
results = ncnn_model("https://ultralytics.com/images/bus.jpg")
更多详情,请参见 在 Raspberry Pi 上使用 NCNN 部分。
Link to this sectionRaspberry Pi 4 和 Raspberry Pi 5 在运行 YOLO26 方面有什么硬件差异?#
主要区别包括:
- CPU: Raspberry Pi 4 使用 Broadcom BCM2711,Cortex-A72 64 位 SoC;而 Raspberry Pi 5 使用 Broadcom BCM2712,Cortex-A76 64 位 SoC。
- 最大 CPU 频率: Raspberry Pi 4 的最大频率为 1.8GHz,而 Raspberry Pi 5 可达到 2.4GHz。
- 内存: Raspberry Pi 4 提供高达 8GB 的 LPDDR4-3200 SDRAM,而 Raspberry Pi 5 则采用 LPDDR4X-4267 SDRAM,有 4GB 和 8GB 版本。
这些改进使得 YOLO26 模型在 Raspberry Pi 5 上的性能基准优于 Raspberry Pi 4。有关更多详细信息,请参考 Raspberry Pi 系列对比 表。
Link to this section如何设置 Raspberry Pi 摄像头模块以配合 Ultralytics YOLO26 使用?#
有两种设置 Raspberry Pi 摄像头进行 YOLO26 推理的方法:
-
使用
picamera2:import cv2 from picamera2 import Picamera2 from ultralytics import YOLO picam2 = Picamera2() picam2.preview_configuration.main.size = (1280, 720) picam2.preview_configuration.main.format = "RGB888" picam2.preview_configuration.align() picam2.configure("preview") picam2.start() model = YOLO("yolo26n.pt") while True: frame = picam2.capture_array() results = model(frame) annotated_frame = results[0].plot() cv2.imshow("Camera", annotated_frame) if cv2.waitKey(1) == ord("q"): break cv2.destroyAllWindows() -
使用 TCP 流:
rpicam-vid -n -t 0 --inline --listen -o tcp://127.0.0.1:8888from ultralytics import YOLO model = YOLO("yolo26n.pt") results = model("tcp://127.0.0.1:8888")
有关详细的设置说明,请访问 使用摄像头进行推理 部分。