使用 Ultralytics YOLO 进行目标检测
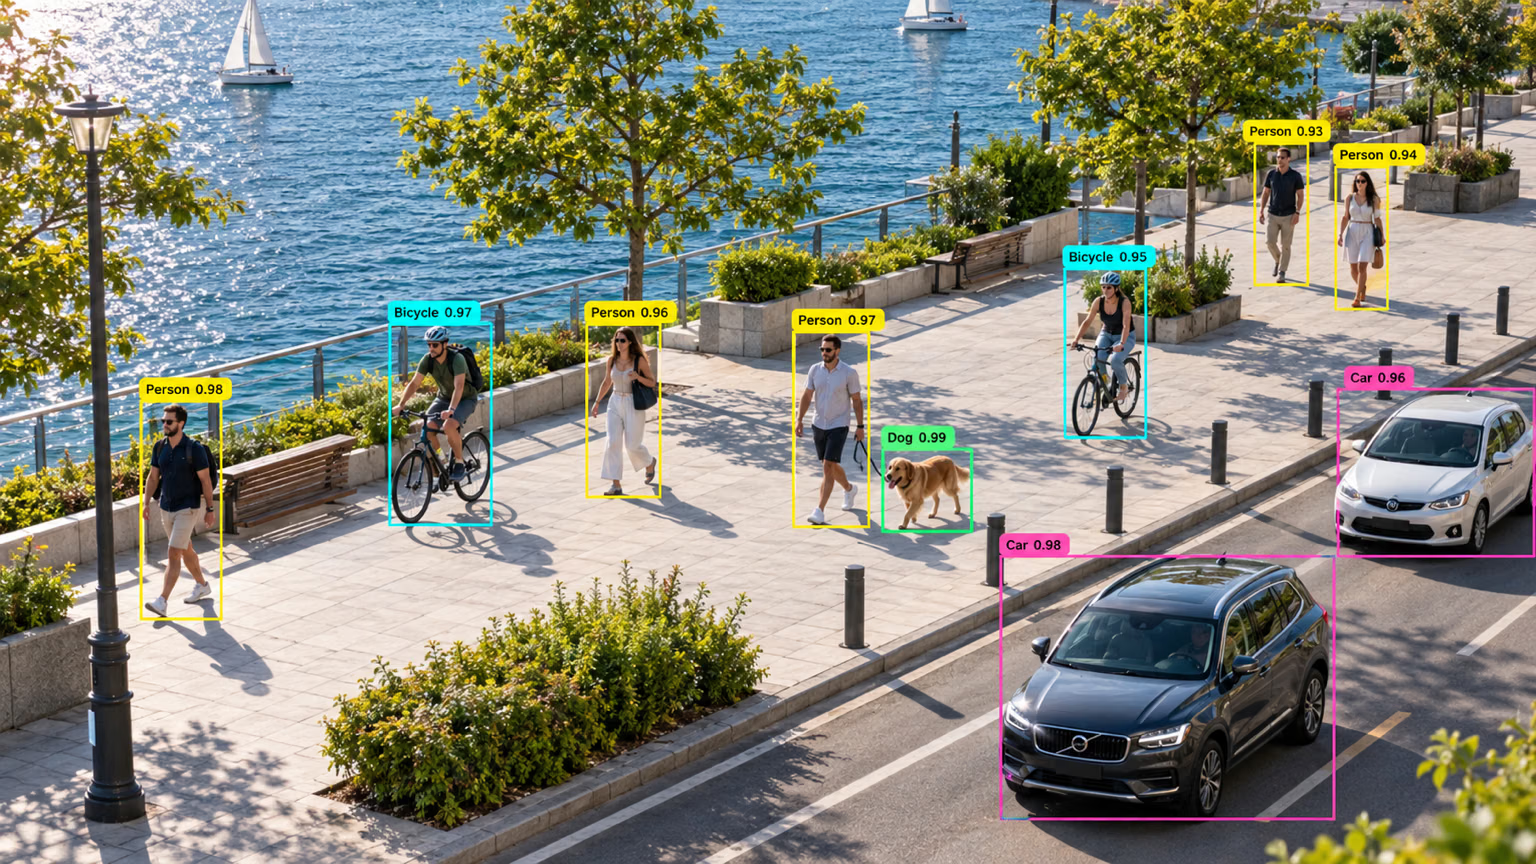
目标检测是一项用于识别图像或视频流中目标位置和类别的任务。
目标检测器的输出是一组包围图像中对象的边界框,以及每个框对应的类别标签和置信度分数。如果你需要识别场景中的目标对象,但不需要了解对象的确切形状,那么目标检测是不错的选择。
观看: 使用预训练的 Ultralytics YOLO 模型进行目标检测。
YOLO26 Detect 模型是默认的 YOLO26 模型,例如 yolo26n.pt,并使用 COCO 进行预训练。
模型#
以下展示了在 COCO 数据集上预训练的 YOLO26 Detect 模型。
首次使用时,模型会自动从 Ultralytics 最新版本下载。
| 模型 | 尺寸 (像素) | mAPval50-95 | mAP验证50-95 (e2e) | 速度 CPU ONNX (毫秒) | 速度 T4 TensorRT10 (ms) | 参数 (M) | FLOPs (B) |
|---|---|---|---|---|---|---|---|
| YOLO26n | 640 | 40.9 | 40.1 | 38.9 ± 0.7 | 1.7 ± 0.0 | 2.4 | 5.5 |
| YOLO26s | 640 | 48.6 | 47.8 | 87.2 ± 0.9 | 2.5 ± 0.0 | 9.5 | 20.9 |
| YOLO26m | 640 | 53.1 | 52.5 | 220.0 ± 1.4 | 4.7 ± 0.1 | 20.4 | 68.4 |
| YOLO26l | 640 | 55.0 | 54.4 | 286.2 ± 2.0 | 6.2 ± 0.2 | 24.8 | 86.8 |
| YOLO26x | 640 | 57.5 | 56.9 | 525.8 ± 4.0 | 11.8 ± 0.2 | 55.7 | 194.4 |
- mAPval 数值是在 COCO val2017 数据集上以单模型、单尺度方式测得的。
使用yolo detect val data=coco.yaml device=0复现。添加nms=False可复现 e2e 列。 - 速度是在 COCO val 图像上使用 ONNX(CPU)和 TensorRT10(NVIDIA T4 GPU)测得的平均值。
使用yolo detect val data=coco.yaml batch=1 device=0|cpu nms=False复现 - 参数量和 FLOPs 数值对应融合后的模型,该模型经过 Conv/BatchNorm 折叠并移除了未使用的检测分支。预训练检查点保留完整的训练架构,因此显示的数值可能更高。
查看尚未发布的 YOLO27 预览版,了解初步的 COCO 检测结果。
训练#
在 COCO8 数据集上以 640 的图像尺寸训练一个 YOLO26n 模型,训练 100 个周期。
from ultralytics import YOLO

# 加载模型
model = YOLO("yolo26n.yaml")  # 从 YAML 构建新模型
model = YOLO("yolo26n.pt")  # 加载预训练模型(推荐用于训练)
model = YOLO("yolo26n.yaml").load("yolo26n.pt")  # 从 YAML 构建模型并迁移权重

# 训练模型
results = model.train(data="coco8.yaml", epochs=100, imgsz=640)请参阅训练页面,了解完整的 train 模式详情。检测模型也可以通过 Ultralytics Platform 云训练进行训练。
数据集格式#
数据集指南详细介绍了 YOLO 检测数据集格式。若要将现有的 COCO JSON 数据集转换为 YOLO 格式,请使用COCO 转 YOLO 指南中介绍的内置 convert_coco 函数。你也可以使用 Ultralytics Platform 的 AI 辅助标注工具标注和管理检测数据集。
验证#
验证训练后的 YOLO26n 模型准确率,准确率以平均精度均值(mAP)衡量。无需提供参数,因为 model 会将训练时使用的 data 和参数保留为模型属性:训练示例中的 path/to/best.pt 会在 COCO8 上进行验证。官方权重记录的训练数据集路径在你的计算机上不存在,因此程序会发出警告,并回退到任务默认值 coco8.yaml。传入 data 可在其他数据集上进行验证。
from ultralytics import YOLO

# 加载模型
model = YOLO("yolo26n.pt")  # 加载官方模型
model = YOLO("path/to/best.pt")  # 加载自定义模型

# 验证模型
metrics = model.val()  # 无需参数,数据集和设置会自动记住
metrics.box.map  # map50-95
metrics.box.map50  # map50
metrics.box.map75  # map75
metrics.box.maps  # 每个类别的 mAP50-95;未出现在验证集中的类别采用整体 mAP 值
metrics.box.ap_class_index  # 实际参与评估的类别索引
metrics.box.image_metrics # 包含精确率、召回率、F1、TP、FP 和 FN 的逐图像指标字典预测#
使用训练好的 YOLO26n 模型对图像进行预测。
from ultralytics import YOLO

# 加载模型
model = YOLO("yolo26n.pt")  # 加载官方模型
model = YOLO("path/to/best.pt")  # 加载自定义模型

# 使用模型进行预测
results = model("https://ultralytics.com/images/bus.jpg")  # 对图像进行预测

# 访问结果
for result in results:
    xywh = result.boxes.xywh  # 中心点 x、中心点 y、宽度、高度
    xywhn = result.boxes.xywhn  # normalized
    xyxy = result.boxes.xyxy  # 左上角 x、左上角 y、右下角 x、右下角 y
    xyxyn = result.boxes.xyxyn  # normalized
    names = [result.names[cls.item()] for cls in result.boxes.cls.int()]  # 每个框的类别名称
confs = result.boxes.conf # 每个框的置信度分数请参阅预测页面,了解完整的 predict 模式详情。
结果输出#
目标检测会为每张图像返回一个 Results 对象。主要的预测字段是 result.boxes,其中包含 每个检测目标的边界框坐标、类别 ID 和置信度分数。
| 属性 | 类型 | 形状 | 说明 |
|---|---|---|---|
result.boxes | Boxes | (N) | 检测框。 |
result.boxes.data | torch.float32 | (N,6/7) | 原始 [x1,y1,x2,y2,conf,cls],以及可选的跟踪 ID。 |
result.boxes.xyxy | torch.float32 | (N,4) | xyxy 像素框。 |
result.boxes.conf | torch.float32 | (N,) | 置信度分数。 |
result.boxes.cls | torch.float32 | (N,) | 类别 ID;转换为 int 可获取类别名称。 |
如需了解所有任务中特定于任务的 Results 字段,请参阅按任务查看预测结果部分。
导出#
将 YOLO26n 模型导出为 ONNX、CoreML 等其他格式。
from ultralytics import YOLO

# 加载模型
model = YOLO("yolo26n.pt")  # 加载官方模型
model = YOLO("path/to/best.pt")  # 加载自定义模型

# 导出模型
model.export(format="onnx")
下表列出了可用的 YOLO26 导出格式。你可以使用 format 参数导出为任意格式,例如 format='onnx' 或 format='engine'。你可以直接在导出的模型上进行预测或验证,例如 yolo predict model=yolo26n.onnx。导出完成后,系统会显示适用于你的模型的用法示例。
| 格式 | format 参数 | 模型 | 元数据 | 参数 |
|---|---|---|---|---|
| PyTorch | - | yolo26n.pt | ✅ | - |
| TorchScript | torchscript | yolo26n.torchscript | ✅ | imgsz, quantize, dynamic, nms, batch, device |
| ONNX | onnx | yolo26n.onnx | ✅ | imgsz, quantize, dynamic, simplify, opset, nms, batch, data, fraction, device |
| OpenVINO | openvino | yolo26n_openvino_model/ | ✅ | imgsz, quantize, dynamic, nms, batch, data, fraction, device |
| TensorRT | engine | yolo26n.engine | ✅ | imgsz, quantize, dynamic, simplify, opset, workspace, nms, batch, data, fraction, device |
| CoreML | coreml | yolo26n.mlpackage | ✅ | imgsz, dynamic, quantize, nms, batch, device |
| Apple Core AI | coreai | yolo26n.aimodel | ✅ | imgsz, batch, quantize |
| TF SavedModel | saved_model | yolo26n_saved_model/ | ✅ | imgsz, quantize, opset, nms, batch, data, fraction, device |
| TF GraphDef | pb | yolo26n.pb | ❌ | imgsz, opset, batch, device |
| TF Edge TPU | edgetpu | yolo26n_edgetpu.tflite | ✅ | imgsz, quantize, opset, data, fraction, device |
| LiteRT | litert | yolo26n.tflite | ✅ | imgsz, quantize, batch, data, fraction, device |
| PaddlePaddle | paddle | yolo26n_paddle_model/ | ✅ | imgsz, batch, device |
| MNN | mnn | yolo26n.mnn | ✅ | imgsz, batch, dynamic, quantize, simplify, opset, nms, device |
| NCNN | ncnn | yolo26n_ncnn_model/ | ✅ | imgsz, quantize, device |
| IMX500 | imx | yolo11n_imx_model/ | ✅ | imgsz, quantize, data, fraction, nms, device |
| RKNN | rknn | yolo26n_rknn_model/ | ✅ | imgsz, batch, name, quantize, simplify, opset, data, fraction, device |
| ExecuTorch | executorch | yolo26n_executorch_model/ | ✅ | imgsz, quantize, batch, data, fraction, device |
| Axelera | axelera | yolo26n_axelera_model/ | ✅ | imgsz, batch, quantize, data, fraction, device |
| DEEPX | deepx | yolo26n_deepx_model/ | ✅ | imgsz, quantize, simplify, opset, data, optimize, device |
| Qualcomm QNN | qnn | yolo26n_qnn.onnx | ✅ | imgsz, batch, name, quantize, simplify, opset, data, fraction, device |
| Hailo | hailo | yolo26n_hailo_model/ | ✅ | imgsz, name, quantize, data, fraction, simplify, conf, iou, device |
| Huawei Ascend | ascend | yolo26n_ascend_model/ | ✅ | imgsz, batch, name, quantize, opset, simplify, nms, device |
| AMD Xilinx | xilinx | yolo26n_xilinx_model/ | ✅ | imgsz, name, quantize, data, fraction, opset, simplify, device |
| NXP | nxp | yolo26n_nxp.tflite | ✅ | imgsz, quantize, data, fraction, device |
| ST Edge AI | stedgeai | yolo26n_stedgeai.onnx | ✅ | imgsz, quantize, data, fraction, opset, simplify, device |
nms=None 默认输出原始结果,以便进行外部 NMS(YOLO26 在 Axelera 上保留其无 NMS 检测头)。设置 nms=False 以选择可用的无 NMS 检测头;不支持的格式会回退到其原生输出路径。上方的 nms 条目指出可通过 nms=True 嵌入 NMS 的格式。
请参阅 Export 页面,了解完整的 export 详情。
常见问题#
可以。Ultralytics Platform 快速入门介绍了基于浏览器的工作流程,你可以通过它标注数据集、在云端 GPU 上训练检测模型,并将模型部署到推理端点。
在自定义数据集上训练 YOLO26 模型需要几个步骤:
- 准备数据集:确保数据集采用 YOLO 格式。请参阅我们的数据集指南了解相关说明。
- 加载模型:使用 Ultralytics YOLO 库加载预训练模型,或根据 YAML 文件创建新模型。
- 训练模型:在 Python 中调用
train方法,或在 CLI 中执行yolo detect train命令。
示例from ultralytics import YOLO # 加载预训练模型 model = YOLO("yolo26n.pt") # 在你的自定义数据集上训练模型 model.train(data="my_custom_dataset.yaml", epochs=100, imgsz=640)如需查看详细的配置选项,请访问配置页面。
要验证训练后的 YOLO26 模型准确率,可以在 Python 中使用
.val()方法,或在 CLI 中使用yolo detect val命令。这会提供 mAP50-95、mAP50 等指标。示例from ultralytics import YOLO # 加载模型 model = YOLO("path/to/best.pt") # 验证模型 metrics = model.val() print(metrics.box.map) # mAP50-95如需了解更多验证详情,请访问验证页面。
Ultralytics YOLO26 为目标检测、实例分割、语义分割、姿态估计和其他受支持任务提供快速且准确的模型。主要优势包括:
- 预训练模型:使用在 COCO 和 ImageNet 等热门数据集上预训练的模型,加快开发进度。
- 高准确率:在 COCO 上达到较高的 mAP。
- 速度:针对延迟敏感应用中的实时推理进行了优化。
- 灵活性:将模型导出为 ONNX 和 TensorRT 等多种格式,以便部署到各种平台。


评论377
提出问题、分享结果,或帮助其他人。
C:\
Hello,
I'm training YOLO on a custom dataset with two classes that are coupled: class 0 contains class 1. The relationship is like "cat" and "a cat's ear", or "person" and "a person's head" — the category-0 region geometrically encloses the category-1 region.
When I modify YOLO, the accuracy either stays flat, or one class improves while the other drops by roughly the same amount. I've tried many variants and the overall metric refuses to move.
Could you help me understand why? Is this a problem with my dataset/annotation design, or is it something about how YOLO handles nested classes? If the latter, is there a recommended way to formulate such data?
Thank you.
1 Paula DerrengerUltralytics
Nested boxes are valid: annotate the whole object and its part as separate instances using the YOLO detection format; standard detection does not explicitly encode their parent–part relationship. Nesting alone does not establish why accuracy plateaus. One possible contributor is competition during target assignment: a prediction candidate selected for multiple ground-truth boxes ultimately receives only one target, but this does not prevent detecting both objects. Before changing the architecture further, establish an unmodified baseline and audit missing part labels and inconsistent box boundaries; compare per-class AP on the same validation split. Could you share your model/package version, training command, before/after per-class AP, and one representative image with its labels? That would help distinguish annotation or small-part localization problems from an assignment-related trade-off.
1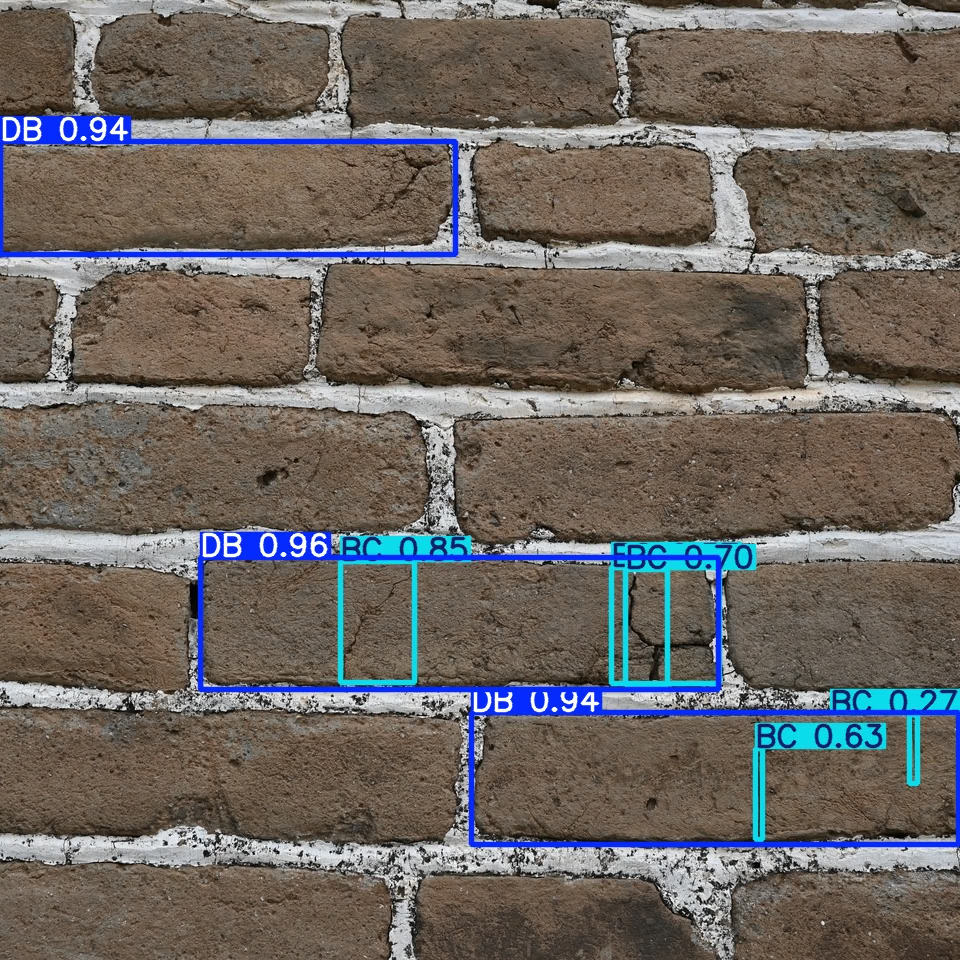 Hi Paula,
Thanks a lot for the detailed reply — that was very helpful.
To answer your questions:
- Model: YOLO11n, trained from scratch (pretrained=False, i.e. the .yaml architecture, not the COCO weights).
- Version: ultralytics 8.4.183.
- Dataset: about 540 images, self-collected for damage detection in this domain (masonry/brick walls). Two classes: class 0 = damaged brick (large region), class 1 = crack (thin structure). Box counts are roughly balanced between the two classes, but the scale is not: the median class-0 box covers about 50% of the image width, while the median class-1 box has a short edge of ~40 px, and every class-1 box lies geometrically inside some class-0 box.
- Training: imgsz 960, batch 8, SGD, 150 epochs, single GPU.
The per-class behaviour is exactly what you described: class 0 AP keeps improving when I change the architecture, class 1 stays flat or drops by a similar amount, and the overall metric does not move.
Your point about target assignment competition is the one that matches my numbers best. Since class 1 always sits inside class 0, one candidate location is usually covered by both a class-0 and a class-1 ground-truth box, and TAL will assign it to only one of them. If that is the mechanism, is there a recommended way to handle it — for example tuning the TAL hyperparameters (topk / alpha / beta), decoupling the assignment per class, or treating the nested relationship explicitly rather than as two independent classes?
I can also share the per-class AP before/after numbers and a labelled sample image if that would help.
- Paula DerrengerUltralytics
I’d keep the two-class formulation and avoid changing TAL yet: your AP trade-off does not establish assignment competition. Being inside both boxes only makes a location eligible; a conflict occurs when both ground truths select the same candidate after top-k filtering. (docs.ultralytics.com) In 8.4.183, the detection loss initialization uses
topk=10,alpha=0.5, andbeta=6.0; these are internal settings, not standard training arguments. Simply assigning each location independently per class would leave conflicting regression targets because that location predicts one box, not a separate box per class. (docs.ultralytics.com) My first diagnostic would be a crack-only run, removing brick annotations but retaining identical images, splits, initialization, and training settings, then comparing crack AP across multiple seeds. A consistent improvement would indicate an interaction between the tasks, but would not isolate TAL specifically. If you investigate assignment afterward, measure positives retained per crack before/after conflict resolution rather than tuning blindly. Explicit parent–crack association could instead be handled with a custom brick-detection → crack-detection-on-crops pipeline. Please share the before/after per-class AP50 and AP50–95 numbers; those are still missing.1 Thanks a lot for your help! I'm currently running some other models, and given my limited compute I'll work through the diagnostics you suggested over the coming days. I'd like to keep in touch on this — hope that's okay.
Hi Paula,
Thanks again for the detailed guidance — it was useful, and I followed it.
I trained on a BC-only version of the dataset: all brick annotations removed, with images, splits, initialisation and training settings left unchanged. Crack accuracy did not improve. I'm now confident that there is no parent–child interference between DB and BC in this data, at least none that shows up in accuracy.
What I do see consistently is this: across the variants I have tried, DB improves substantially while BC barely moves. My reading is that BC is hard for two reasons.
The first is simply how few pixels a crack occupies.
The second, and I think the larger one, is annotation noise. I have annotated this dataset three times over and re-checked it, and I still cannot resolve it — because the boundary of a crack has no unique answer. A brick box is fixed by the mortar joint: a clear line. A crack is a grey-to-black gradient. You can draw the box around the darkest core, or around everything faintly visible, and both are defensible. A crack running across two bricks can be one box or two. These are judgement calls rather than facts, and the same careful annotator, working a week later, will land a few pixels away.
On detecting cracks inside brick crops: I take the point, but it gives up the speed advantage that makes a single-stage detector worth using in the first place.
Do you have any further suggestions for this poor crack detection performance?
- Paula DerrengerUltralytics
Your BC-only result makes assignment competition a lower-priority hypothesis, although it does not prove there is no interaction. I’d focus next on separating missed cracks from box-localization errors: compare BC AP50 with AP50–95 and inspect the predictions; a large gap would be consistent with localization sensitivity, not proof of annotation noise. This metrics guide explains the distinction. Rather than annotating everything again, write a fixed operational rule—core versus faint extent, when to split, and whether mortar boundaries matter—and apply it to a small audit subset. Independently relabel that subset without seeing the old labels, then compare the boxes’ IoU; this would quantify ambiguity rather than assume it explains the plateau. For your next training run, I’d prioritize COCO-pretrained YOLO11n, using
yolo11n.ptrather than the YAML initialization, while retaining the same split and resolution. That keeps your single-stage inference setup unchanged. If you share a few BC prediction overlays showing both misses and apparently correct detections scored poorly, we can better distinguish visibility, localization, and annotation-policy problems before spending compute on further architecture changes. Hi Paula,
Thank you very much for the detailed reply — I really appreciate the time you put into it.
Yes, I understand that pretrained weights matter a lot here. My worry is the opposite one: if I load them, the baseline becomes strong enough that my own improvement no longer stands out. Here are my numbers.
Setup. Everything else is identical: same dataset and split, same test set (100 images, 506 instances — DB 227, BC 279), imgsz 960, batch 8, SGD, 150 epochs, 3 seeds per configuration, each run evaluated with its own best checkpoint selected on val. The only difference is the initialization: "scratch" starts from the YAML architecture with random weights; "pretrained" starts from the COCO weights (yolo11n.pt).

Per-seed overall mAP50 — scratch: 85.43 / 84.15 / 83.61; COCO-init: 83.77 / 84.82 / 84.78.
So on overall AP50 the two are indistinguishable, and on AP50-95 essentially the whole gain lands on the crack class. That is consistent with your reading that BC is limited by box quality rather than visibility — but it also means pretraining did not give me a stronger baseline on the metric I care about, and it did not move BC AP50 at all.
The overlays below are generated at conf=0.01, iou=0.7 (the default 0.25 would have removed every low-scoring detections, which is exactly what I want you to see).
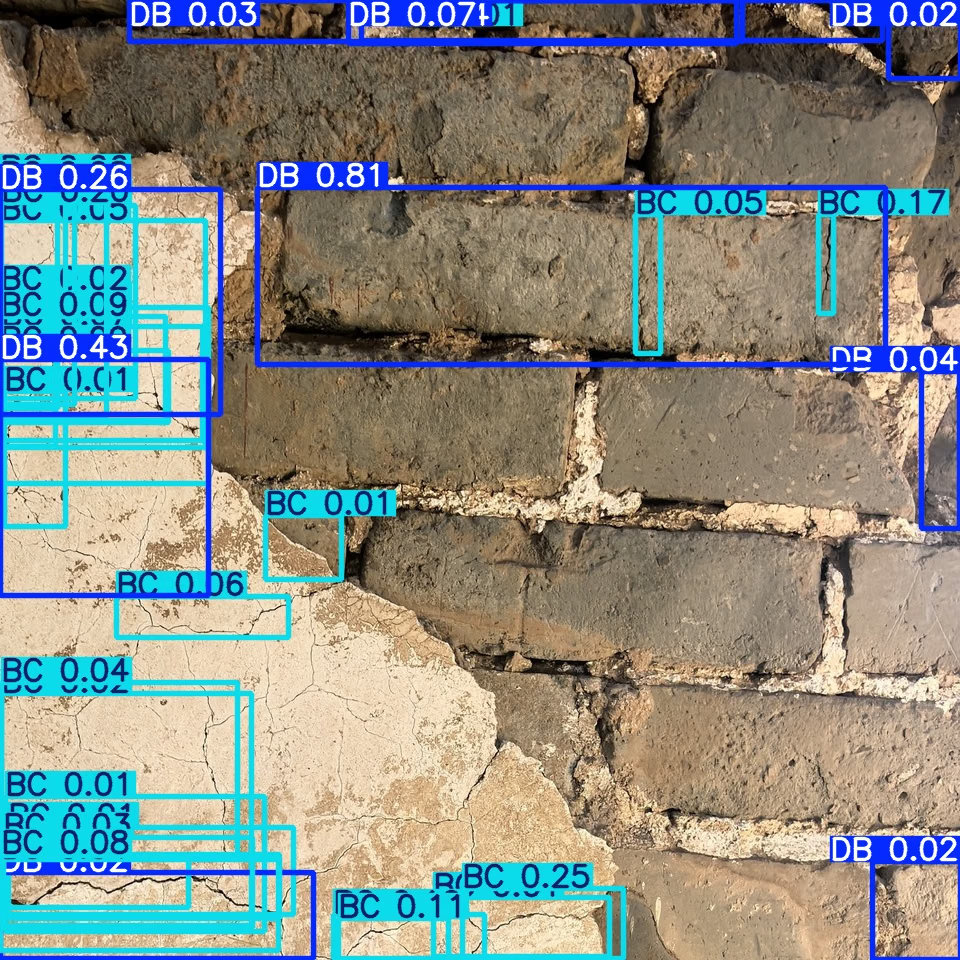
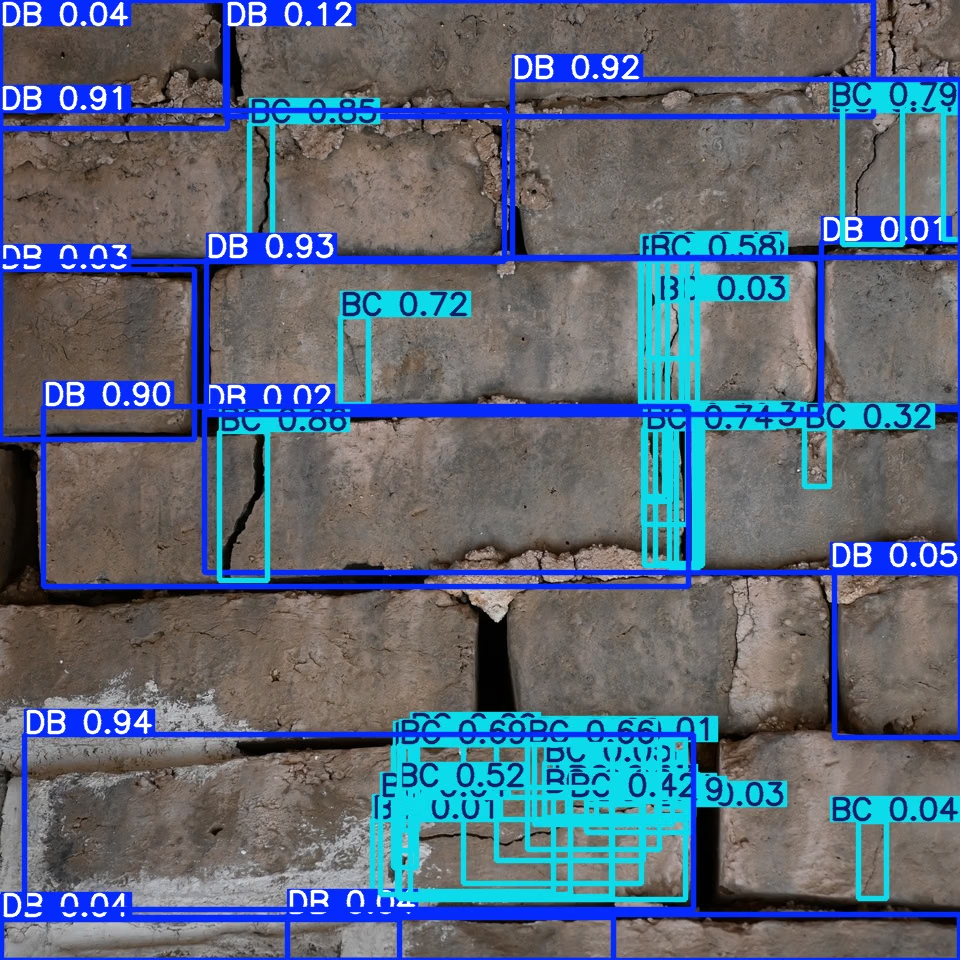
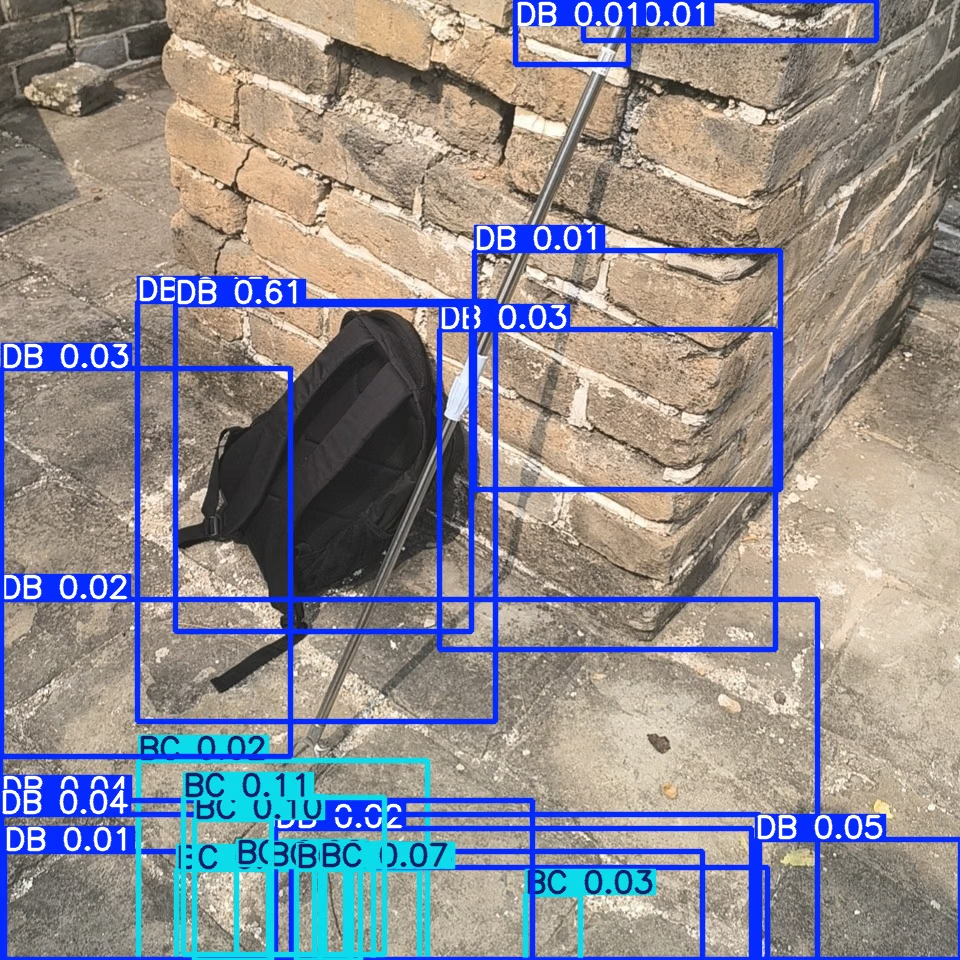
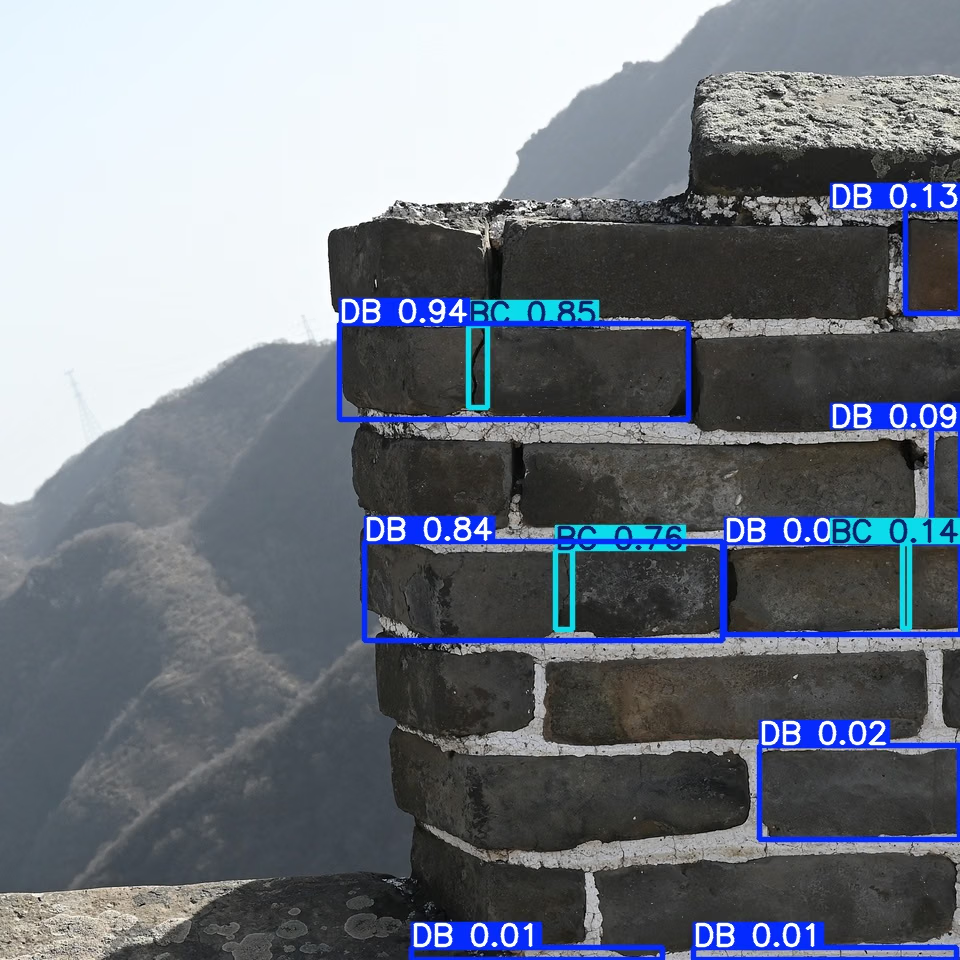
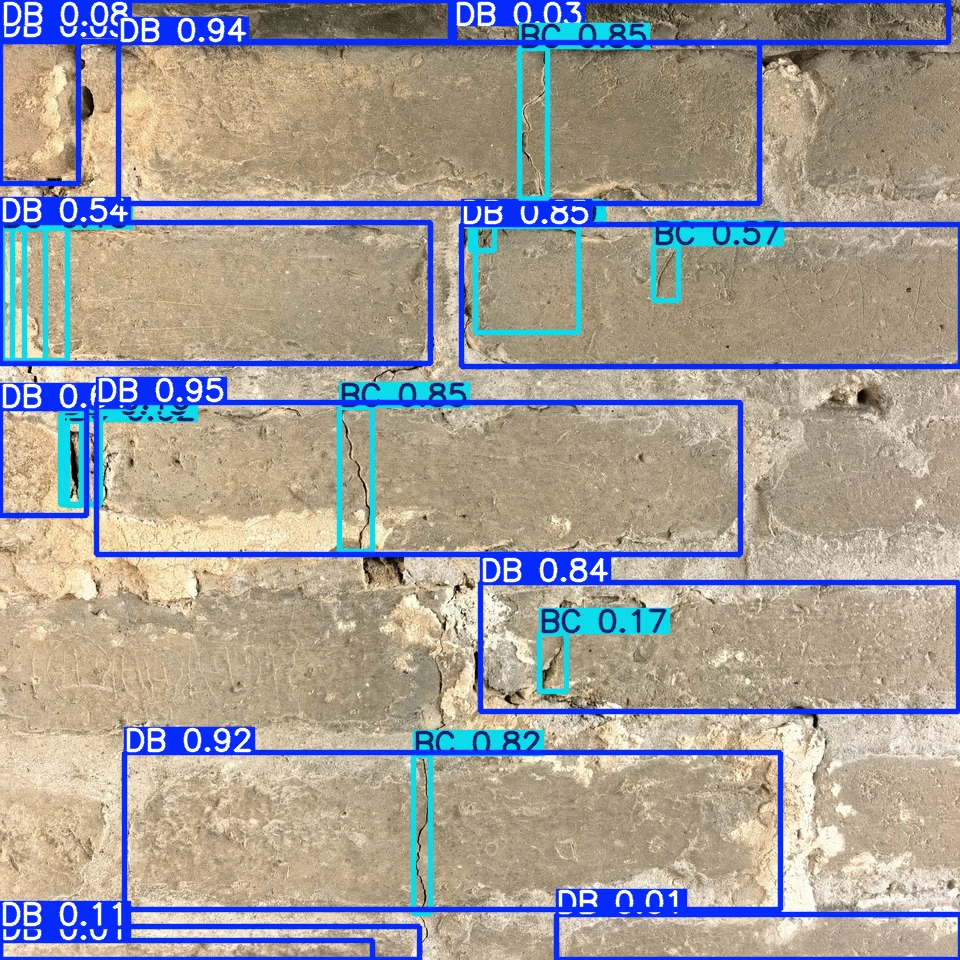
- Paula DerrengerUltralytics
Your three-seed results support no clear overall AP50 benefit from pretraining here; the BC AP50–95 gain suggests better localization, but does not establish annotation noise as the limiting cause. I also wouldn’t weaken the baseline to make an architectural gain stand out—report whether that gain survives both initializations. I couldn’t retrieve the overlay images, so I can’t reliably diagnose their individual detections. The next low-compute step is to inspect BC’s precision–recall curve using validation with
conf=0.001, plots=True(validation settings): lowering the display threshold exposes candidates, but does not show whether true cracks rank above false positives. Choose any deployment threshold on validation data, leaving the test set for final comparison. Could you share the BC PR curve and an accessible side-by-side ground-truth/prediction example? That would distinguish a usable low-confidence operating point from poor ranking or localization without another training run. 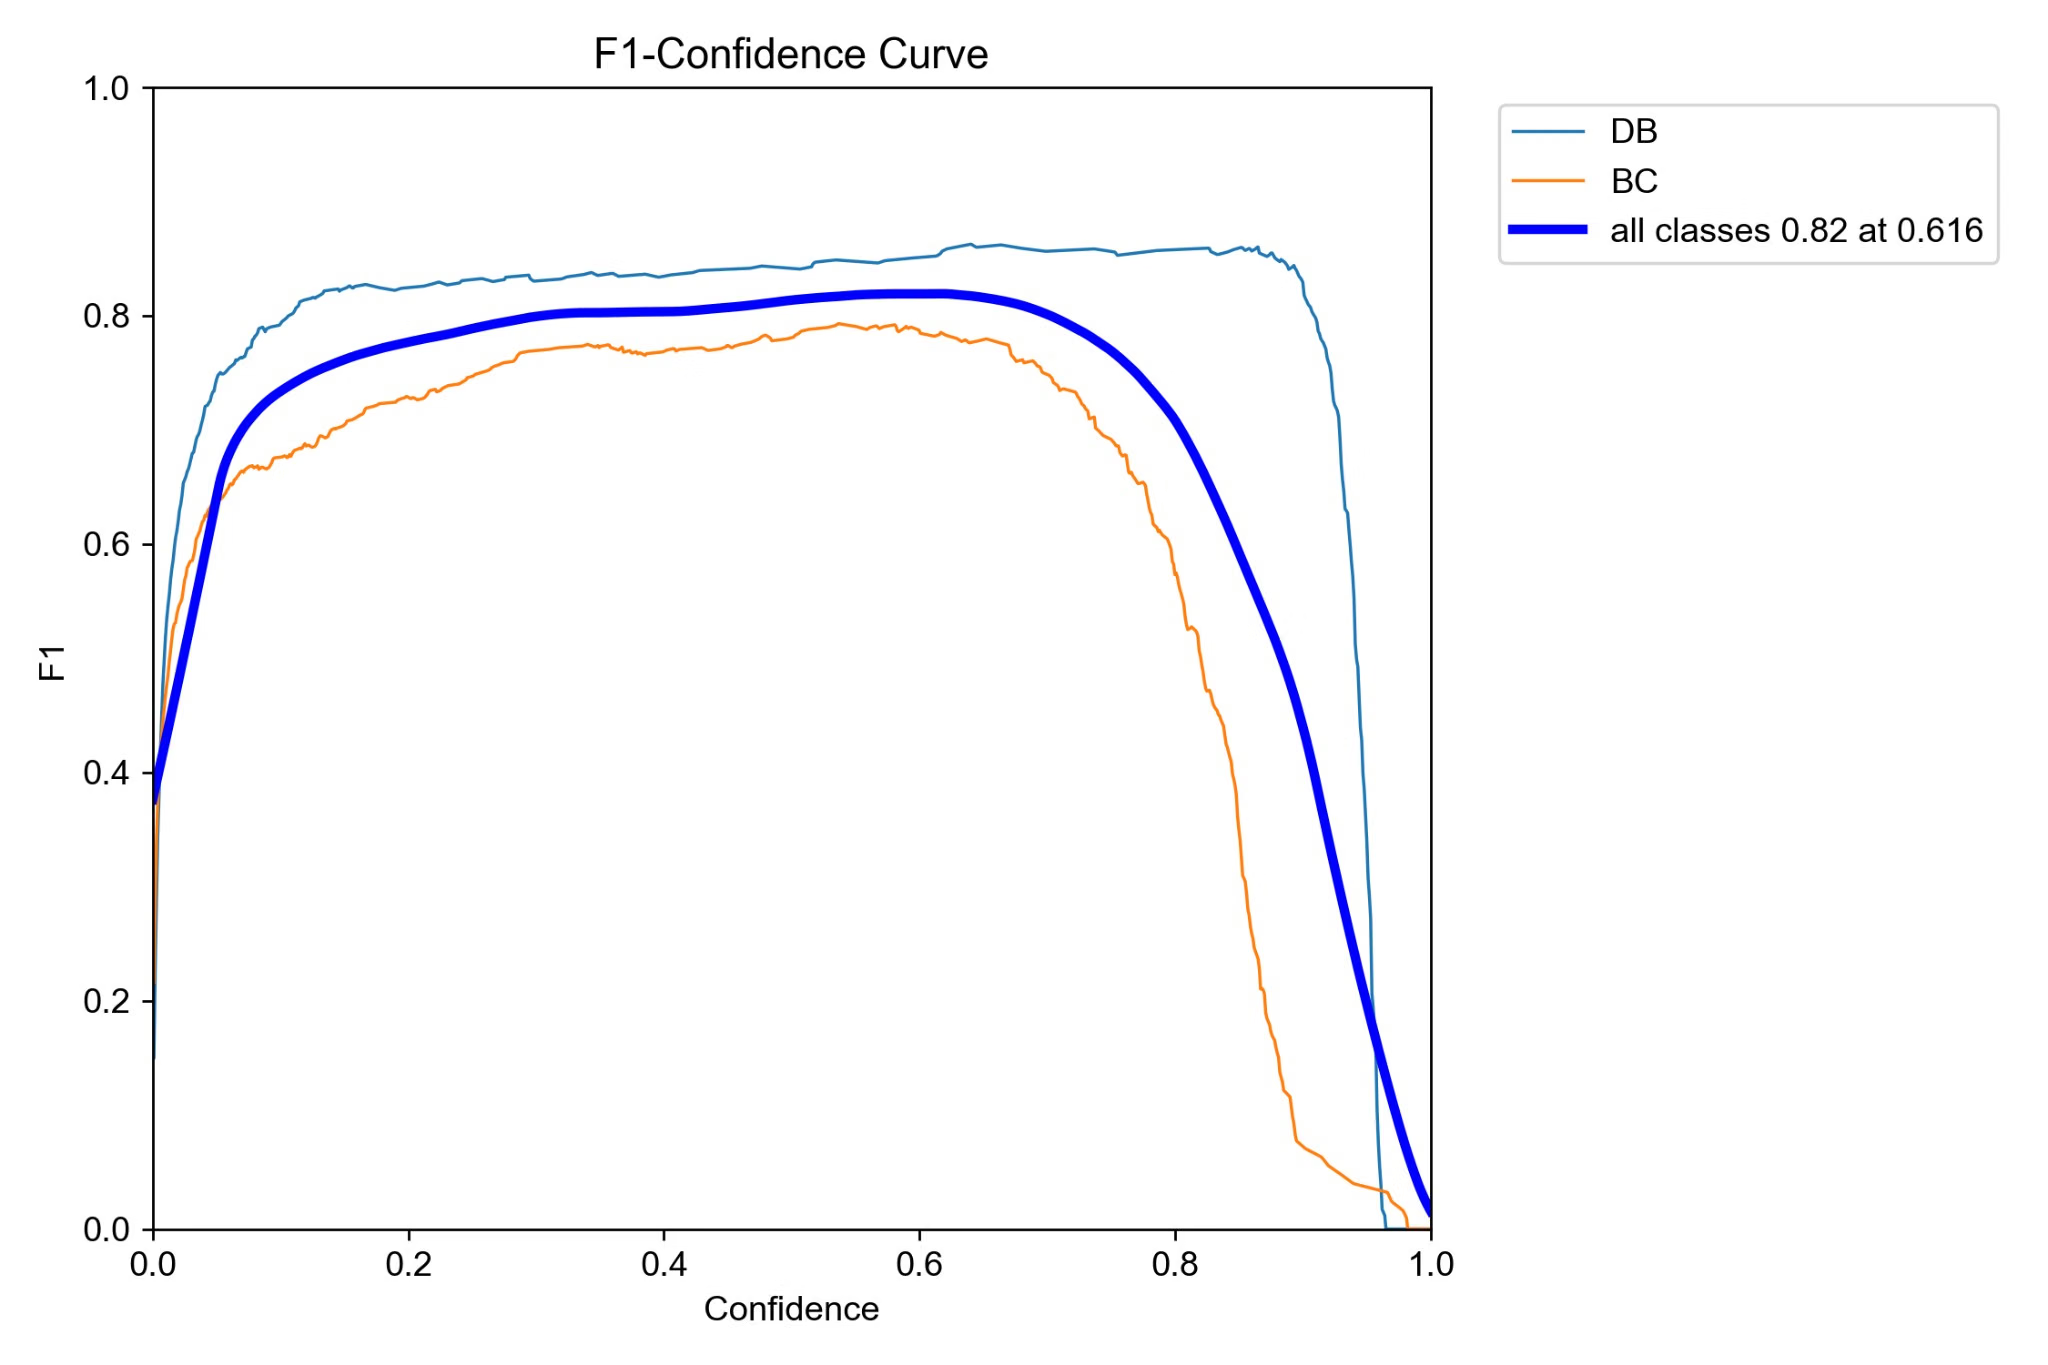
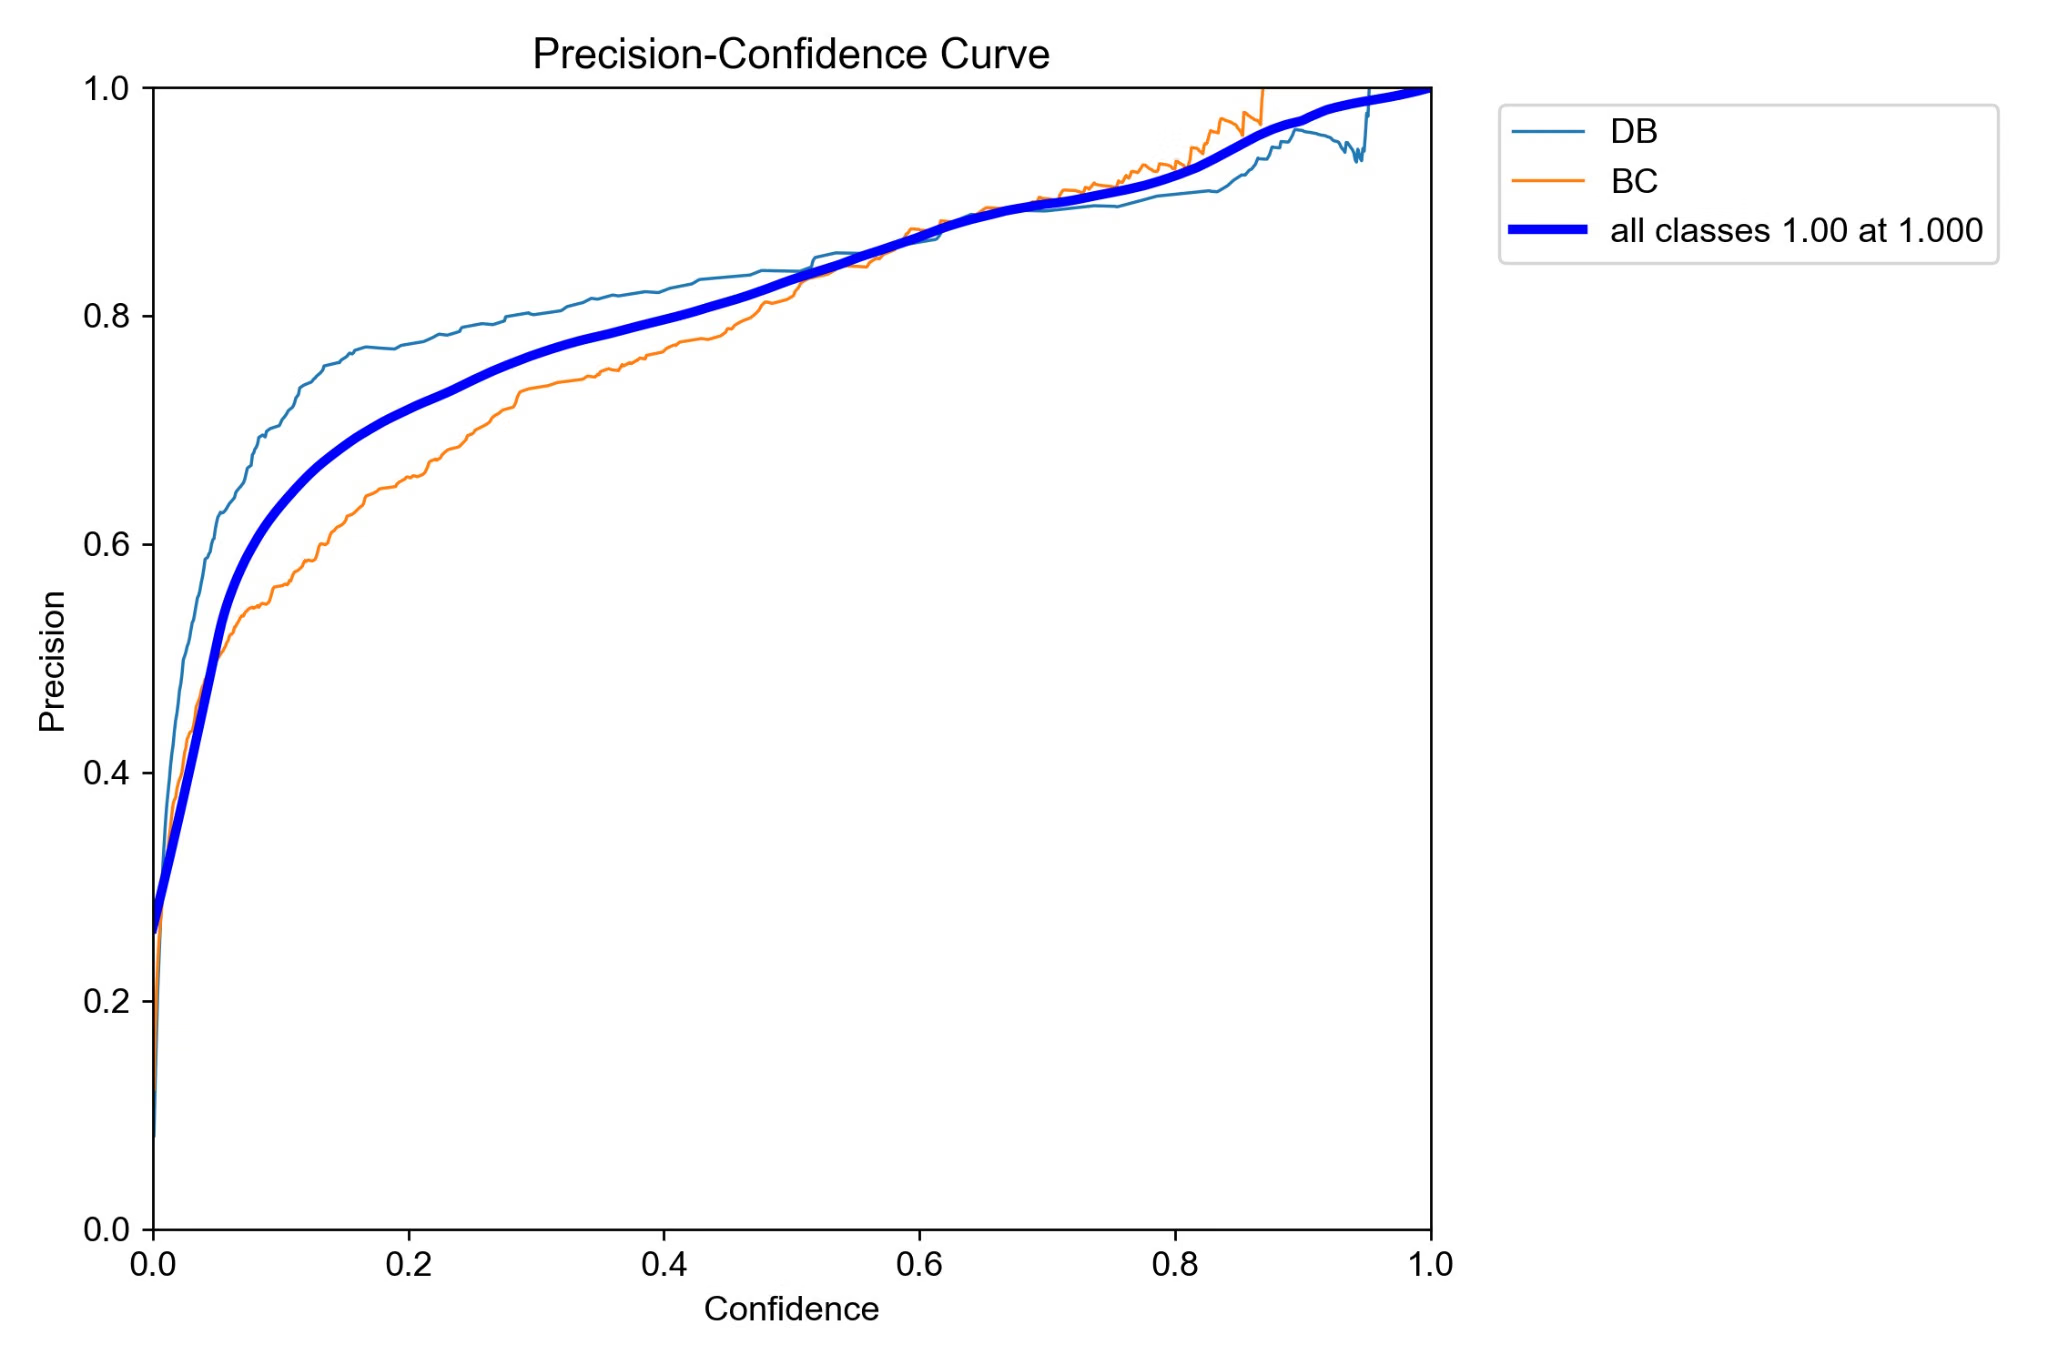
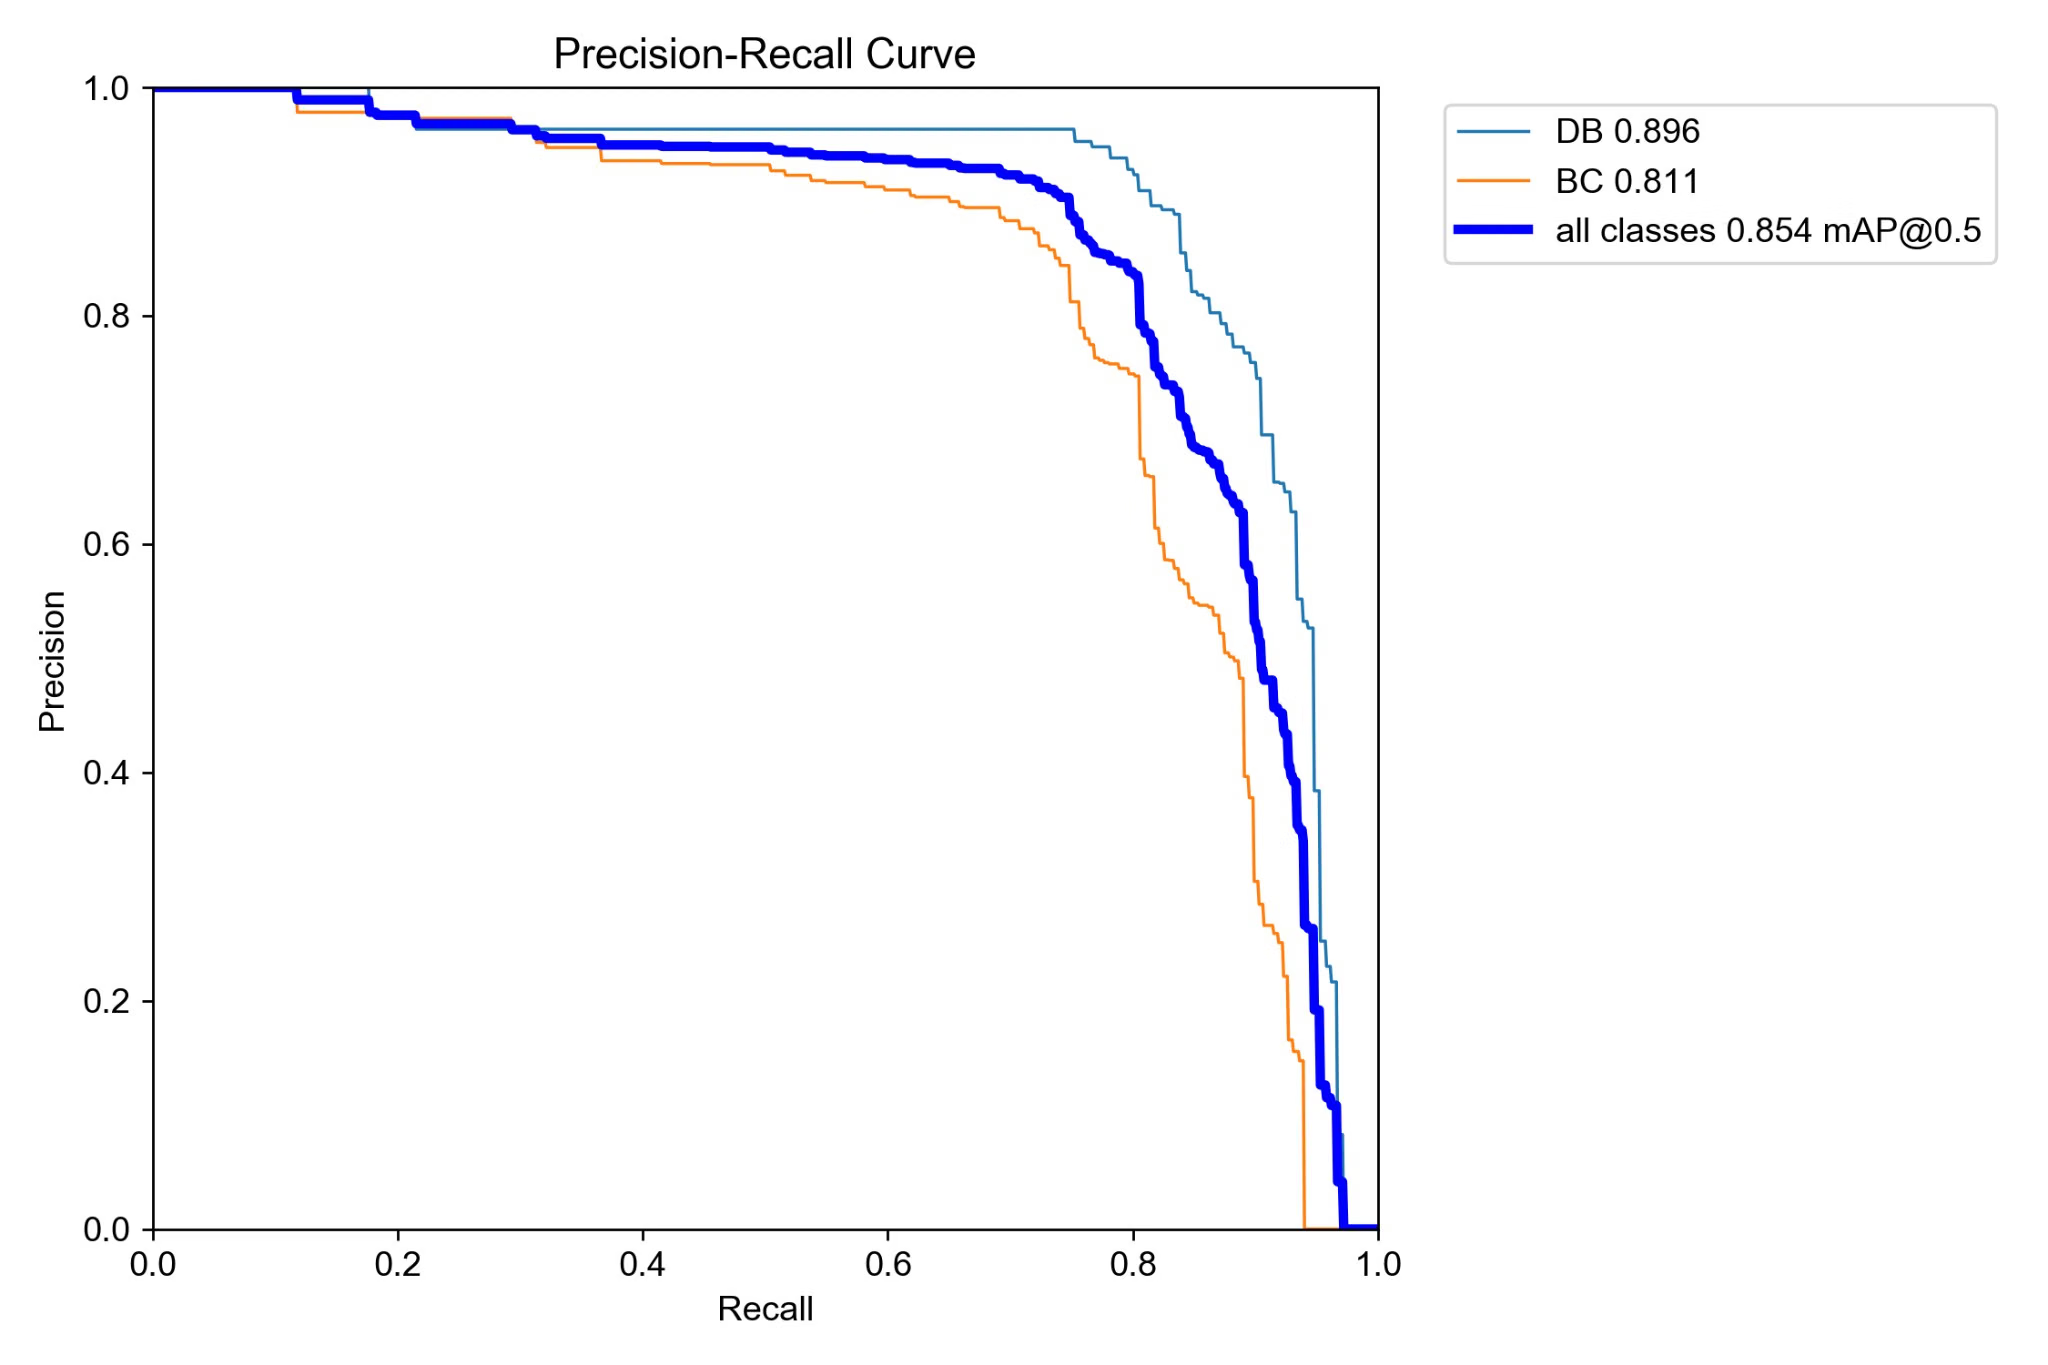
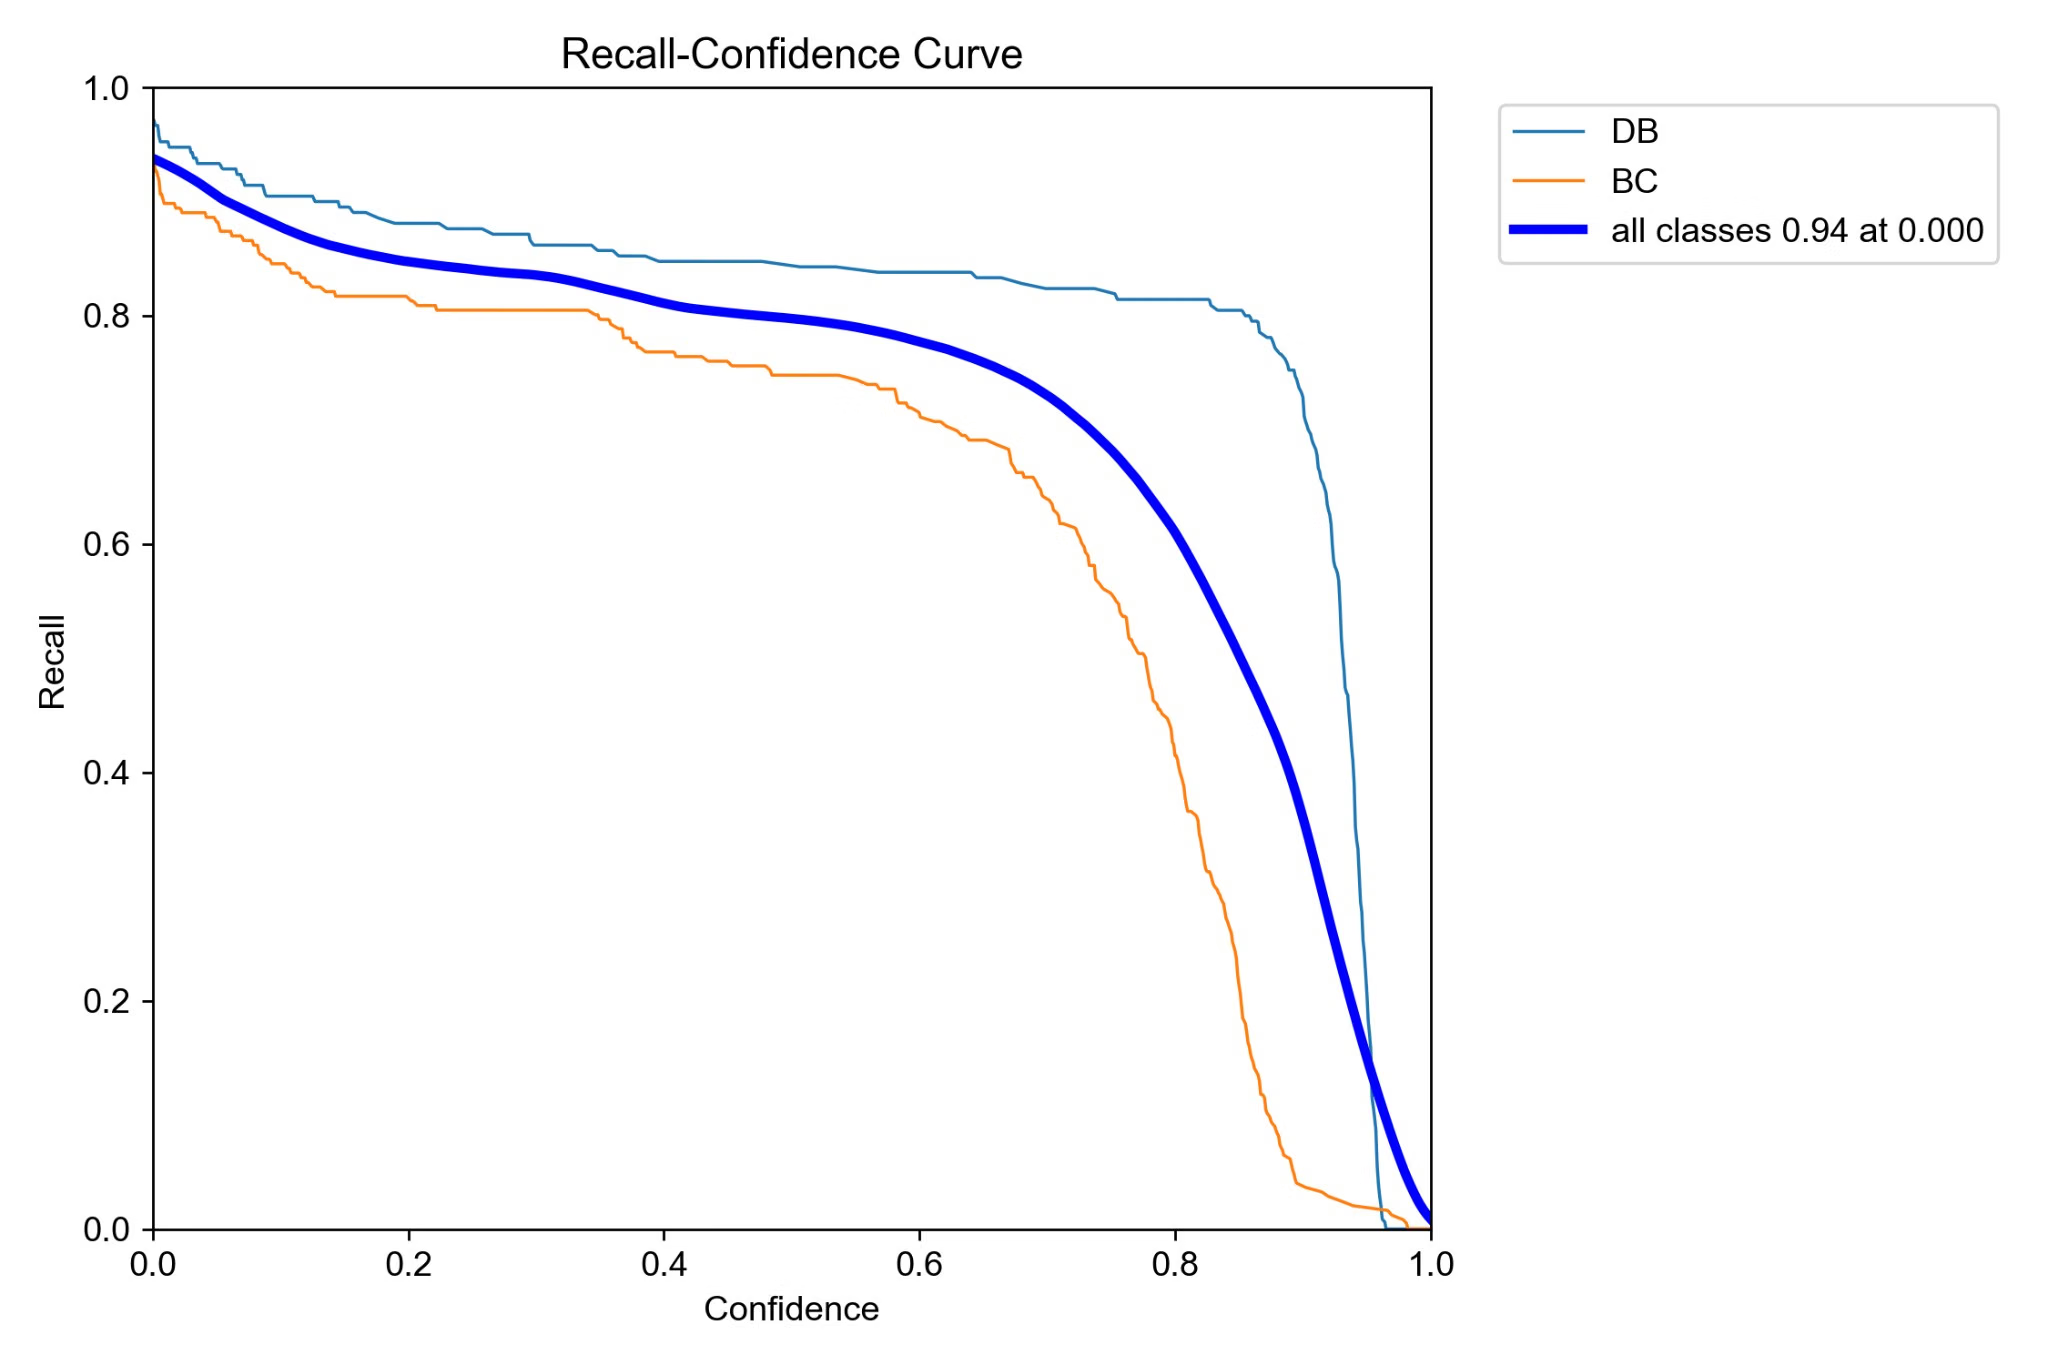
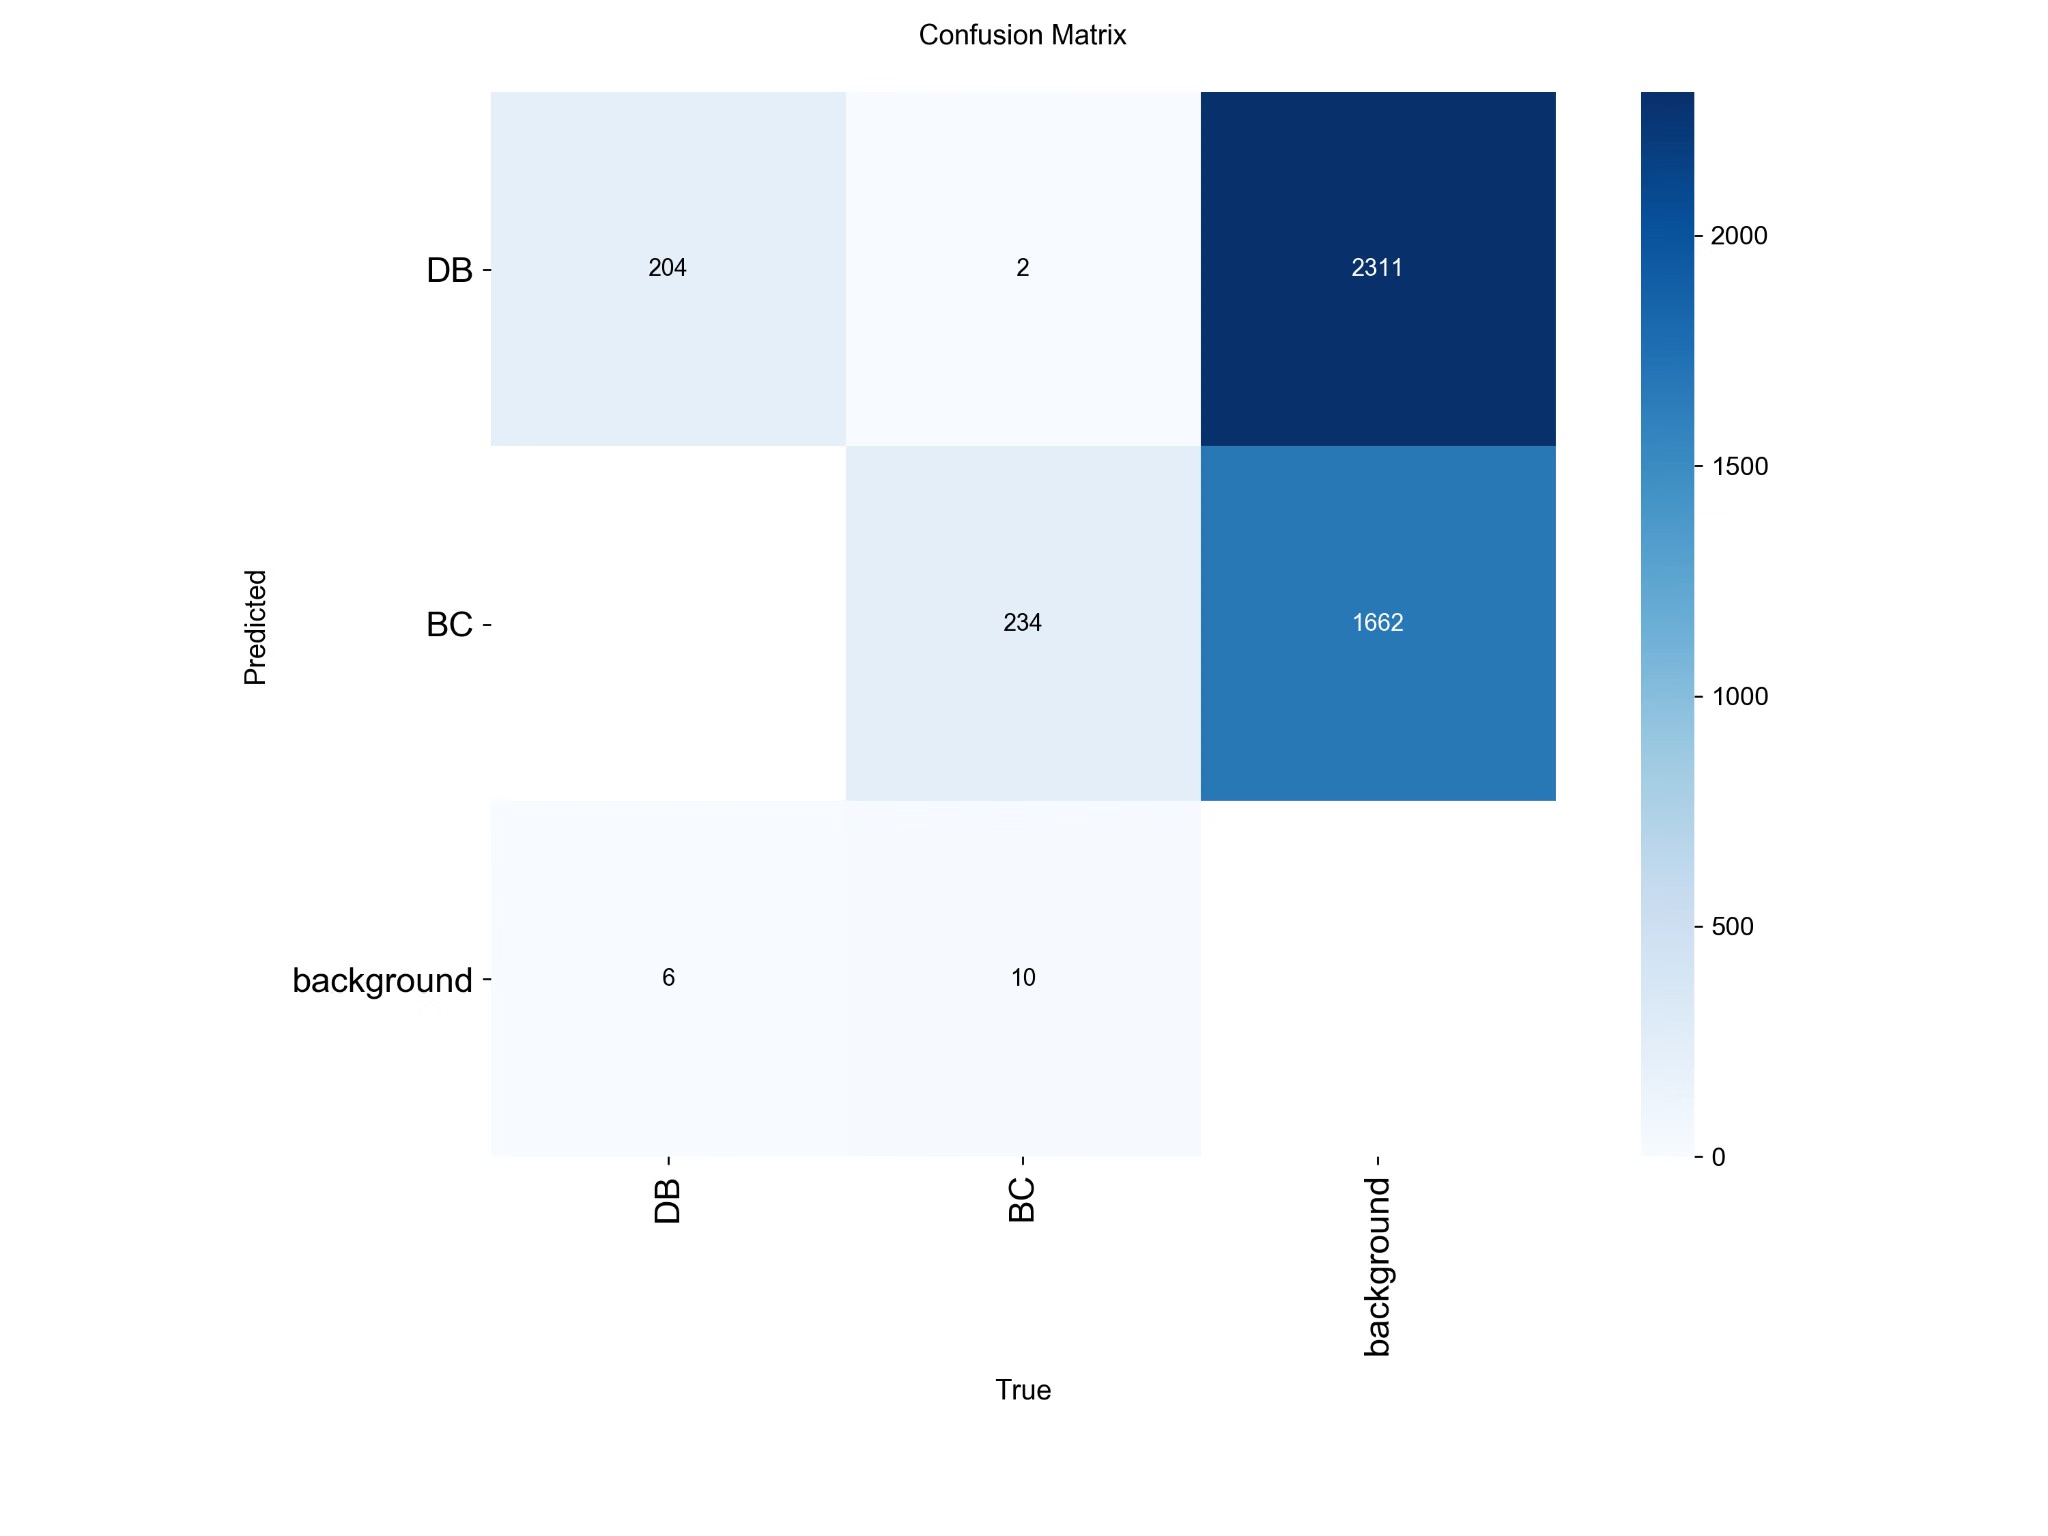
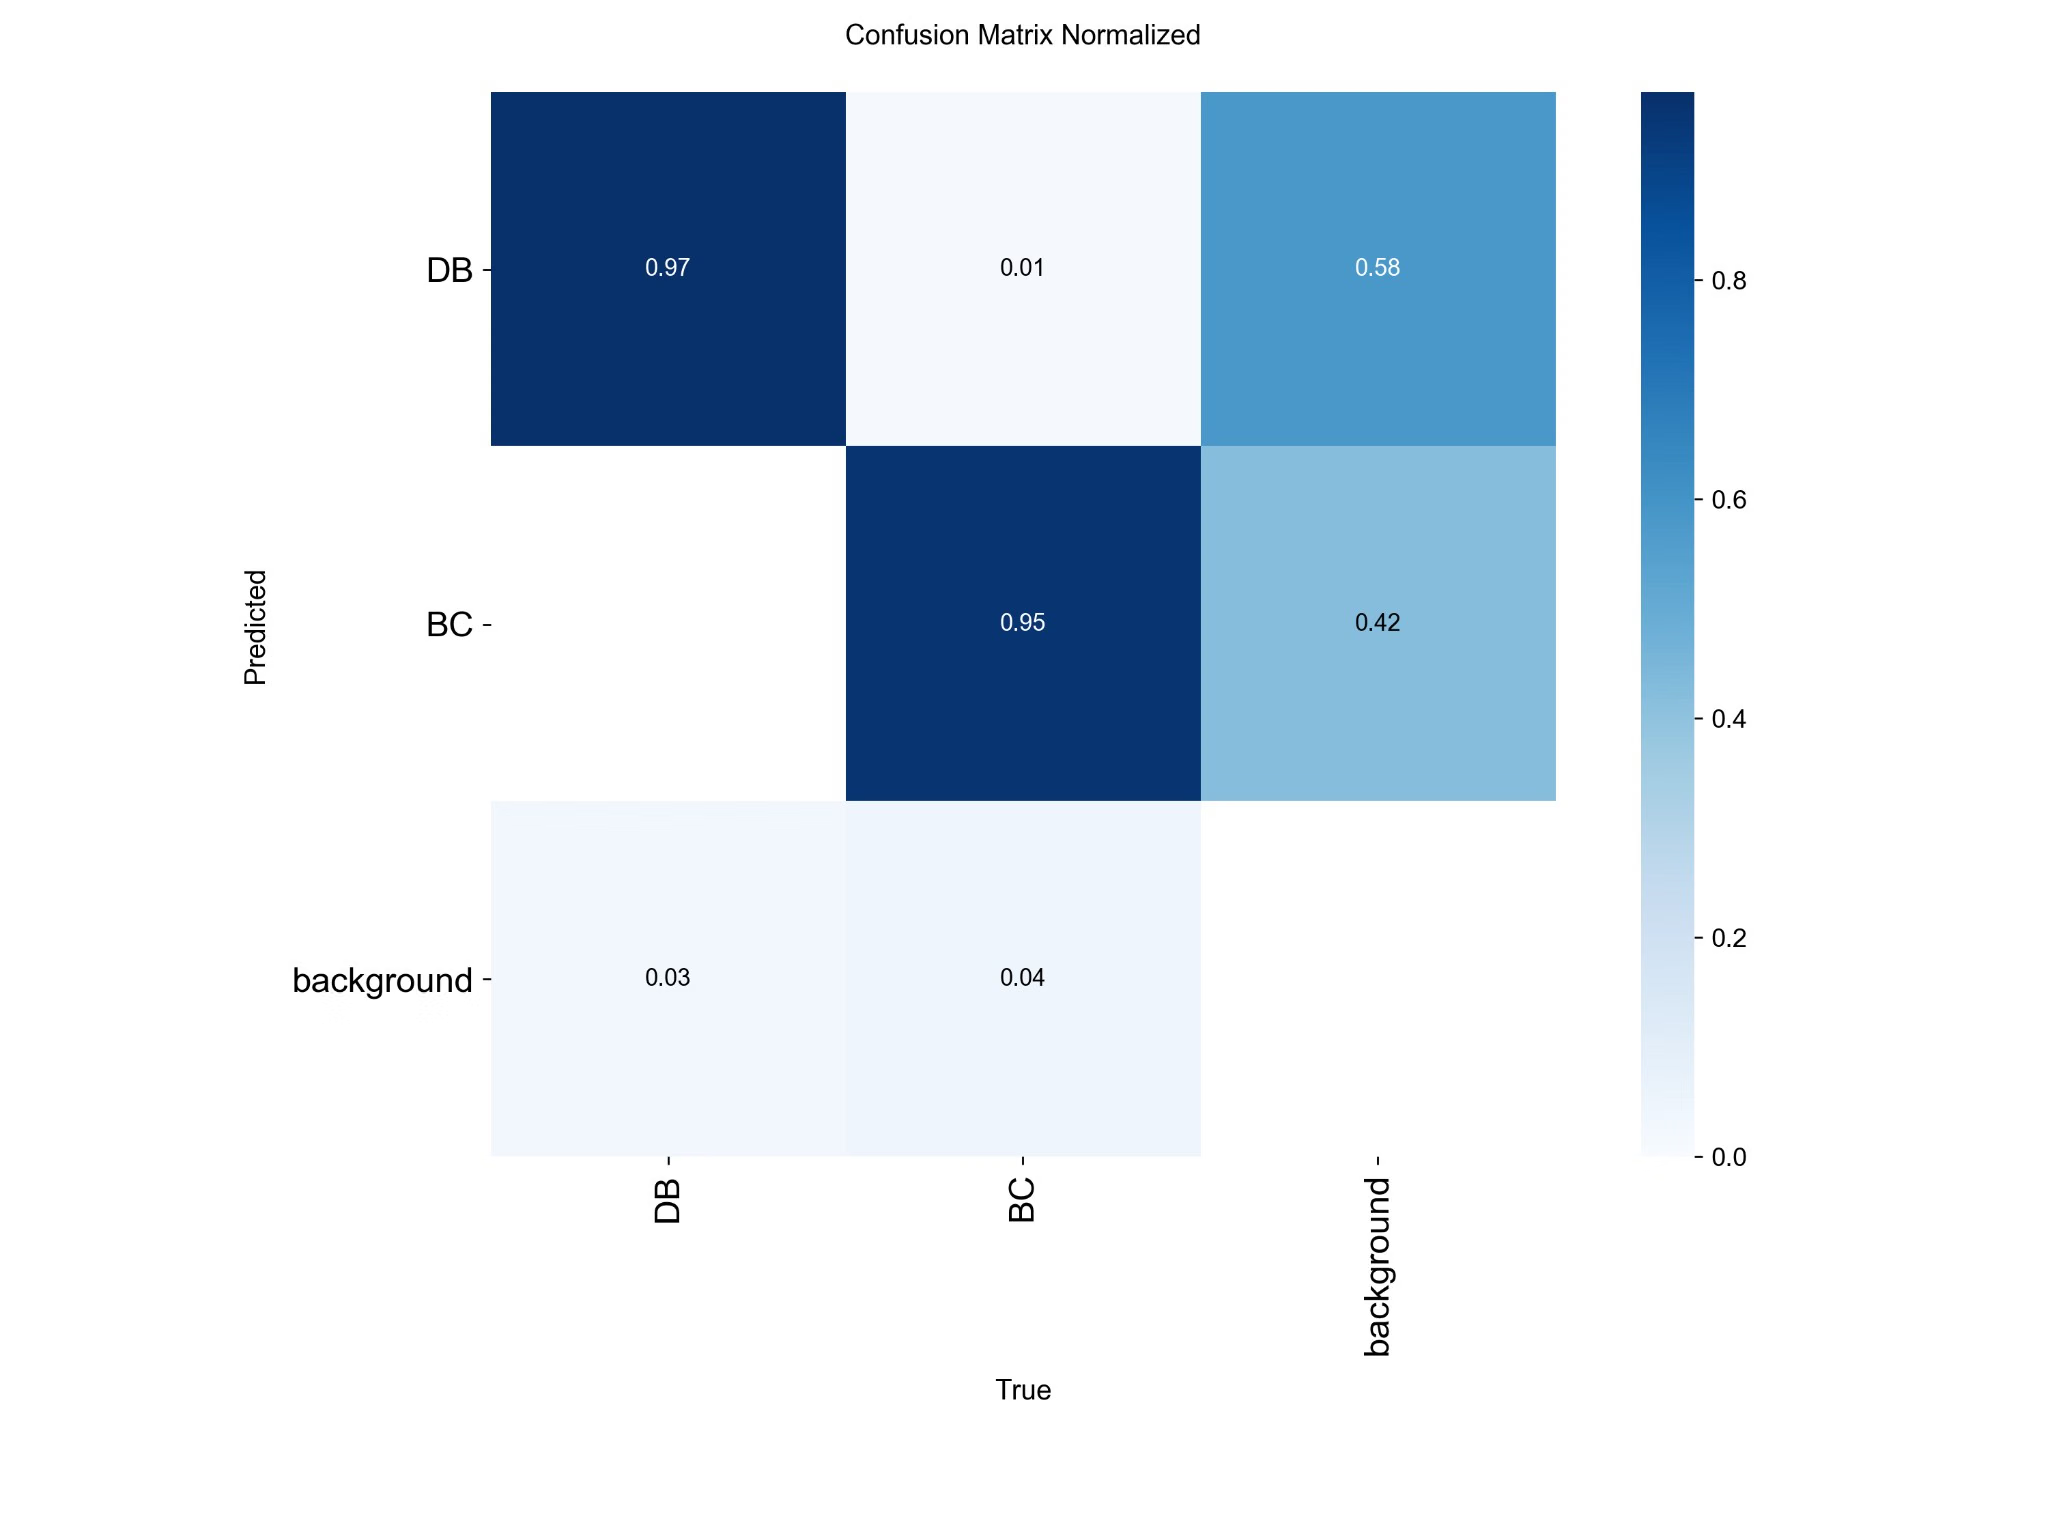
- Paula DerrengerUltralytics
Thanks for posting the plots. I can’t read the values from the attachments here. Could you paste BC precision and recall at
conf=0.25and at a lower threshold that still gives an acceptable false-positive rate on validation? If recall improves without too many false positives, use that lower threshold for BC only and leave DB unchanged—no retraining or extra inference pass. If precision falls before recall improves, lowering the threshold won’t solve the crack misses; a side-by-side label and prediction for one missed crack would help distinguish a poorly placed box from no nearby candidate.
MrBug1024
I have been using YOLO for many years, but I have always been looking forward to the official release of a face recognition solution. Because the current open-source solutions in the face recognition field, whether in terms of performance or subsequent enhanced training, are not as simple as training a custom object detection model with YOLO. This is what shocks me. Therefore, I still hope that the official team can provide a convenient solution like object detection in the fields of face recognition and OCR!
1sabrinabounehar
Hello, I'm currently working on a project for detecting downy mildew on grapevines using the YOLOv8 model. I've successfully retrained it with my own dataset, and it performs well during testing on images. However, when transitioning to real-time detection, the model produces false detections due to color issues. The disease appears as yellow, gray, and brown spots on the vines, but in real-time, the model detects anything of these colors as the disease. I'm seeking assistance to address this specific problem. thanks
1- Paula DerrengerUltralytics
Hello! It's great to hear about your progress with detecting downy mildew on grapevines using YOLOv8. 🌿 The issue of color-based false detections in a real-time setting can indeed pose a challenge. To refine your model's ability to distinguish between actual disease symptoms and similar-colored objects, you might consider a few strategies:
-
Data Augmentation: Enhance your dataset with more varied lighting and background conditions. Incorporating images that have similar colors but are not the disease can help the model learn to discriminate better.
-
Fine-tuning with Hard Examples: Identify cases where the model currently fails and add more such examples to your training set. This could include images with objects that are similar in color to the disease but aren't the disease itself.
-
Adjust Confidence Threshold: Experiment with adjusting the confidence threshold of your detection. A higher threshold may reduce false positives but be careful to not miss genuine cases of mildew.
results = model.predict('image.jpg', conf=0.5) # Adjusting confidence threshold- Post-Processing: Implement a custom post-processing step that considers additional context or rules specific to your problem domain, for instance, the typical size or shape of diseased spots, or their common locations on a vine.
It's a process of trial and error, so don't hesitate to iterate on these strategies. If you continue to experience issues, please share some examples or further details so we can offer more targeted advice. 🍇
-
arifan-instrumentasi-UB
Hi, can yolov8 detect color sequence?. i create color sequence of rainbow (red, yellow, green) as a real rainbow. if i change the yellow to orange, can yolov8 detect it as a wrong rainbow?
1 Glenn JocherUltralytics
@arifan-instrumentasi-UB hi there! 🌈
YOLOv8 is primarily designed for detecting objects and their categories, rather than the sequence or color composition of objects. It can recognize objects (like a rainbow) based on the training data it has been exposed to, but it doesn't inherently understand the "correct" color sequence of a natural rainbow.
However, you could approach the problem creatively by training your model on labeled data specifying "correct" and "incorrect" rainbows. Here’s a simplified example of how your training annotations might look:
- Image 1 (correct rainbow): Class label “rainbow_correct”
- Image 2 (rainbow with yellow replaced by orange): Class label “rainbow_incorrect”
This way, YOLOv8 could potentially learn to distinguish between the different types of rainbows based on your specific definitions of "correct" and "incorrect."
Remember, accurate detection relies heavily on the diversity and quality of the training dataset. 📊
Hope that helps!
lixjohn
I am working on an object detection project. During the annotation phase, the challenge is that there are a large number of objects in a single image, making the labeling effort extremely high. So my question is, for an object detection task, do we have to label all objects in the image? Or can we just label a few of them and leave the rest unlabeled during training? If not, are there any best practices for this kind of challenge? I appreciate any suggestions..
- Glenn JocherUltralytics
For YOLO detection training, you should label all visible instances of the classes you want the model to learn in each training image; leaving same-class objects unlabeled usually turns them into false background and hurts training. If images are very dense, the usual workaround is to tile/crop them into smaller patches and use model-assisted pre-annotation plus active learning or the Ultralytics Platform annotation tools to reduce manual effort, and you can find more dataset guidance in the data collection and annotation guide.
Thank you for the helpful response. I will proceed with training a model on the initial annotations and integrate it into the active learning cycle. I have one follow-up question: if I train the model on small 640×640 patches cropped from a typical 5k×3k image, can I safely perform inference on the original 5k×3k images?
- Glenn JocherUltralytics
Yes—you can train on
640x640crops and run inference on the original5k×3kimages, but if you infer at a smallimgszthe objects may shrink too much after resize, so for dense/small targets the usual best practice is a largerimgszor tiled inference with SAHI, as noted in the image tiling guidance. Got point. Appricate your help on that, I do believe I will have more questions in project. :-)
- Glenn JocherUltralytics
Happy to help—feel free to post any follow-up questions here so the team and community can weigh in, and if you end up working with tiny or dense targets the small-object mAP guide has a few practical tuning ideas.
Thanks for further information, I see the sentence in guild "there are P2 model variants of the Ultralytics YOLOv8 model that are optimized for preserving fine spatial detail.", does it mean p2 yolo structure such as yolo26-p2.yaml? I plan use this to train my model. And one more question, if I use orignal image size 5k*3k to train model, and use SAHI to do inference, is it right approch for small object?
The project I am working on is a little bit tricky. It includes both dense and sparse objects with vastly different sizes. Some images just have a couple of big objects, but some images include over one hundred small objects. My plan is to label all of them first and train a YOLO model with the original image size of 5k × 3k using an imgsz of 1024 or higher. For the inference phase, I can use SAHI, but the question is, it seems like I cannot apply SAHI to all images because most of the images are sparse. So, how do I handle this situation?
- Glenn JocherUltralytics
Yes, the
P2note refers to the small-object architecture variants such asyolo26-p2.yaml; for training you’d normally use a scaled config likemodel=yolo26n-p2.yaml, and the YOLO26 model docs note these are YAML-only architectures. For your mixed dense/sparse case, using5k×3ksources is fine but the model still trains at your chosenimgsz, so a practical setup is one model trained with all labels at the largestimgszyou can afford, optionally adding tiled crops for the densest images, then using normal inference by default and routing only the high-resolution or small-object cases to SAHI when you need extra recall. Thanks, I will use yolo train model=yolo26x-p2.yaml pretrained=yolo26x.pt as training command. In terms of router, the key is I have to indentify the image is dense/sparse automaticlly, however, seems like no way to know if the image is dense/sparse before inference?
- Glenn JocherUltralytics
Correct—you usually cannot know dense vs. sparse reliably before inference, so a practical setup is a cheap first pass with normal YOLO at your target
imgsz, then re-run only the uncertain high-resolution cases with tiled inference when you see no detections, very low confidence, or mostly tiny boxes; sparse images can stay on the standard object detection pipeline. I see. I've completed an end-to-end cycle from labeling to prediction. Thanks for your help!
During the process, one issue I encountered is that some objects cluster together as a group, so I labeled them with one box and assigned the same label as a single object. The reason for this is that we still need to recognize the object group as well, not just individual objects. Is this the right approach? Or do we have to assign a new, distinct label for the grouped objects?
Another issue is that the predictor assigns multiple/duplicate labels to a single object, the boxes are most overlap. I tried using agnostic_nms and tweaking the iou parameter to reduce these multiple/duplicate labels, but it didn't work well. I am wondering if the final solution to eliminate multiple/duplicate labels is a custom post-prediction step? For example, calculating box overlaps manually and keeping only the one with the highest confidence score?
- Glenn JocherUltralytics
If a cluster is a different target from a single instance, give it a separate class such as
object_groupand apply that rule consistently; mixing single objects and merged clusters under the same class usually creates ambiguous supervision and can cause overlapping duplicates. I’d avoid a custom post-filter first—if you can share 2–3 labeled images and the matching predictions here, we can check whether this is a labeling consistency or small-object resolution issue, since with Ultralytics YOLO26 end-to-end inference and standard NMS behavior, persistent same-class duplicates are usually caused upstream rather than by a missing manual overlap step. Understood. The situation is that there is no exact number of objects in a group—it could range from one to a hundred. This makes it difficult to decide which labels to create, so currently, I put them under the same label regardless of how many objects are in the group. What is the right approach here? Could this ambiguity be the root cause of the duplicate label issue?
I have attached 3 pictures (sorry I am not allowed to share data so I am using masks and fake labels):
Objects 1a and 1b represent an object group containing 3 individual objects. The inference outputs show two different-sized rectangles with the same label. (Confidence = 0.25, IoU = 0.70; changing IoU to 0.25 did not help, agnostic_nms=False).
Object 2 is a single object, but it produces two almost identical, overlapping rectangles with the same label. At a low confidence threshold of 0.10, both rectangles appear; changing it to 0.25 leaves just one.
Is this expected behavior given the IoU settings, or is it a result of the labeling issue?
Thanks again.
- Glenn JocherUltralytics
The better rule here is to define labels by visual granularity rather than count: annotate an individual object when it can be boxed cleanly, annotate a separate
object_groupclass only when the cluster itself is the target or the instances cannot be separated, and avoid mixing large cluster boxes and tight instance boxes under the same class over the same region, since that teaches the model two valid box scales for one label and is a likely cause of yourobject1duplicates; forobject2, seeing two boxes atconf=0.10but one at0.25is generally expected low-threshold behavior, and IoU mainly governs overlap matching rather than fixing class-definition ambiguity, so I’d standardize the labels before adding any custom post-processing. Thank you very much, let me summarize to ensure I understand the label approach:
- Define two labels: one for a single object (object) and another for an object cluster (object_group).
- Annotate an individual object when it can be boxed cleanly — use the object label. 3.Use the object_group label when the cluster itself is the target or the instances cannot be separated. That means if there are multiple objects that cannot be separated and the cluster is the target, use the object_group label.
- Avoid mixing large cluster boxes and tight instance boxes under the same class over the same region — I'm a little confused here: in one image, there must be both single objects and clusters, so how do I avoid mixing large cluster boxes (object_group) and tight instance boxes (object)? I guess the same region means object box and cluster object box overlap?
- Glenn JocherUltralytics
Yes—“same region” means overlapping annotations for the same underlying objects; in one image it’s fine to have both
objectandobject_group, but they should be mutually exclusive by area: useobjectwhere instances can be boxed cleanly, and use oneobject_groupbox only for the dense patch where they cannot, without also boxing those same members individually. If you train both levels on the same pixels, duplicate predictions are very likely, so the key is a consistent one-representation-per-region rule as described in the annotation best-practices guide. Thanks, understand the approach. Really appricate your help! Will let you know any further question. :)
- Glenn JocherUltralytics
Glad that clarified it; if any new edge cases come up, please share a couple of representative labels and predictions here before retraining and we can help sanity-check the annotation rule.
Thanks again! Yes for sure, we'll follow the annotation rule and how things go, keep you post if anything new.
- Glenn JocherUltralytics
Sounds good—after updating the annotations, please delete any
*.cachefiles in yourlabelsfolder before retraining, and feel free to post back here if any edge cases still produce duplicate boxes. Got it. Thanks for reminding. :-)
- Glenn JocherUltralytics
You’re welcome—if anything unexpected shows up after retraining, share a sample label/prediction pair and the
yolo checksoutput here and the Ultralytics team can help verify it.
mslabdelhak29
Hello i want to use yollo in Detection and Tracking for Surveillance Cameras wich is the best config
- Glenn JocherUltralytics(已编辑)
For surveillance, a strong default is Ultralytics YOLO
yolo26s.ptfor balanced speed/accuracy oryolo26m.ptfor denser scenes, paired withmodel.track(..., tracker="bytetrack.yaml"); the detection guide and tracking docs are good references, and if you share your camera resolution, FPS, and hardware here in Discussions the Ultralytics team can suggest a tighter config.
Hassaan149
Multi-GPU TensorRT Inference Issue (Docker + RTSP Stream)
I am running object detection on an RTSP input inside the
predictfunction.I want to dynamically assign specific GPUs based on VRAM usage (which I monitor using py-nvml).
However, even when I pass:
model.predict(source=stream_url, stream=True, device=str(device))(where
deviceis0or1), the engine file always loads on GPU 0.
Docker Compose Configuration
My
docker-compose.ymlincludes all GPUs:deploy: resources: reservations: devices: - driver: nvidia count: all capabilities: [gpu]
Expected Behavior
- My code automatically selects the GPU ID (
0or1) based on VRAM usage. - I have exported
.enginefiles per GPU. - If
device = 0→ load engine exported for GPU 0. - If
device = 1→ load engine exported for GPU 1.
Current Problem
Regardless of the
devicevalue passed tomodel.predict(), the engine always loads on GPU 0 inside Docker.
Goal
Ensure that:
- The correct GPU is selected at runtime.
- The corresponding
.enginefile (exported for that GPU) is loaded. - Inference runs on the intended GPU device instead of defaulting to GPU 0.
- Glenn JocherUltralytics
For TensorRT
*.enginemodels the GPU is effectively chosen when the engine is deserialized/loaded, anddevice=inmodel.predict()won’t “move” an already-loaded engine off CUDA:0; to avoid PyTorch’s default CUDA init grabbing GPU 0, set the device before creatingYOLO(...)(or pin the process withCUDA_VISIBLE_DEVICES), as noted in our common multi-GPU troubleshooting guidance and predict docs.import os os.environ["CUDA_VISIBLE_DEVICES"] = "1" # pin to physical GPU 1 (it becomes cuda:0 in-process) from ultralytics import YOLO model = YOLO("yolo26n.engine") # load AFTER pinning results = model.predict(source=stream_url, stream=True, device=0)If you need to switch GPUs dynamically per stream/job, you’ll generally need separate processes (or separate containers) per GPU; also please paste
!yolo checksplusnvidia-smi -Lfrom inside the container and the full text logs showing the engine load so we can confirm whether the issue is GPU index remapping vs. early CUDA initialization. I am using Python multiprocessing to offload inference input streams onto separate processes. In each process, I instantiate a YOLO model (TensorRT
.enginefile) for GPU inference.I attempt to assign a specific GPU per process using:
os.environ["CUDA_VISIBLE_DEVICES"] = str(device)However, even when
device=1, the process still runs on GPU 0.
Environment
Inside the container:
nvidia-smi -LOutput:
GPU 0: NVIDIA GeForce RTX 2080 SUPER (UUID: GPU-xxxx...)
GPU 1: NVIDIA GeForce RTX 2080 SUPER (UUID: GPU-yyyy...)
On container startup, I see this warning:
/opt/venv/lib/python3.10/site-packages/torch/cuda/_init_.py:65: FutureWarning:
The pynvml package is deprecated. Please install nvidia-ml-py instead.
If you did not install pynvml directly, please report this to the maintainers
of the package that installed pynvml for you.
  import pynvml
INFO:     Started server process [1]
INFO:     Waiting for application startup
Worker Function (Per Stream Process)
def inference_worker(
    stream_url: str,
    frame_queue,
    idx: int,
    width: int = 640,
    height: int = 480,
    conf: float = 0.7,
    polygon: list = None,
    thread_name: str = None,
    camera_name: str = None,
    device: int = 0,
):
    """Runs YOLO inference in a separate process"""

    alert_thread = {}
    KNOWN_HEIGHT_CM = 155
    FOCAL_LENGTH = 1400

    # Attempt to set device per process
    os.environ["CUDA_VISIBLE_DEVICES"] = str(device)

    try:
        from ultralytics import YOLO
    except Exception as e:
        frame_queue.put(("_ERROR_", f"Import error: {e}"))
        return

    try:
        model = YOLO(model _path+ f"_{device}.engine")
    except Exception:
        model = export(intruder_path + f"_{device}.pt", device=device)
        return
Issue
Even when:
device = 1
os.environ["CUDA_VISIBLE_DEVICES"] = "1"
The inference still runs on GPU 0 instead of GPU 1.
- Glenn JocherUltralytics
This is almost always caused by Linux
multiprocessingdefaulting tofork: if your main server process (e.g. Uvicorn/FastAPI) importstorch/ultralytics(or anything that initializes CUDA/TensorRT) before the fork, the child workers inherit a CUDA context already bound to physical GPU 0, and changingCUDA_VISIBLE_DEVICESinsideinference_worker()won’t take effect; the fix is to usespawn(or run 1 worker process per GPU as a separate OS process/container) and ensure CUDA-related imports only happen after the env var is set, per our multi-GPU troubleshooting guide.# main.py (make sure ultralytics/torch are NOT imported at module top-level) import multiprocessing as mp def inference_worker(stream_url: str, device: int): import os os.environ["CUDA_VISIBLE_DEVICES"] = str(device) # set BEFORE any torch/ultralytics import import torch from ultralytics import YOLO print("CUDA_VISIBLE_DEVICES:", os.environ["CUDA_VISIBLE_DEVICES"]) print("torch sees", torch.cuda.device_count(), "GPU(s); current:", torch.cuda.get_device_name(0)) model = YOLO(f"{model_path}_{device}.engine") for r in model.predict(source=stream_url, stream=True, device=0): pass if __name__ == "__main__": mp.set_start_method("spawn", force=True) # start processes hereIf this still pins to physical GPU 0, please paste the
!yolo checksoutput from inside the container and confirm whether any part of your server importstorchbefore the worker processes are started. Thanks alot Glen, this helped, I had an ocr code which was subtly initializing cuda contexts at container startup, thus preventing GPU selections using os.environ["CUDA_VISIBLE_DEVICES"] = str(device)
- Glenn JocherUltralytics
Glad that surfaced it — anything that touches CUDA (OCR libs,
torch, TensorRT, etc.) must be imported/initialized only afterCUDA_VISIBLE_DEVICESis set in each spawned worker (see PyTorch multiprocessing notes), and you can also swappynvml→nvidia-ml-pyto clear the deprecation warning you’re seeing.
- My code automatically selects the GPU ID (
VeryOnline
你好,yolo的开发者,我使用yolo的CLI转换ONNX模型后,得到的onnx模型输出是一个float32[1,300,6]的输出,这里的输出是如何定义的?我没有找到相关的定义,能帮我解释一下这个输出么?
- Glenn JocherUltralytics(已编辑)
你好,你看到的
float32[1,300,6]是 YOLO26 的 NMS-free(端到端)检测头的输出,导出时使用nms=False会得到这种格式:300表示最多保留的检测数(max_det),每个检测的 6 个值对应x1, y1, x2, y2, conf, cls(cls以 float 形式存储)。如果你想拿到未做 NMS 的原始输出用于自定义后处理,请使用默认设置导出(不设置nms),此时输出为(B, 4+num_classes, num_predictions)结构,参考 导出文档里的输出张量说明,以及 端到端检测指南。yolo export model=yolo26n.pt format=onnx nms=False # (1, 300, 6) yolo export model=yolo26n.pt format=onnx # (1, 4+nc, N) 原始输出如果方便的话,把你实际的导出命令(包含
imgsz/nms等参数)和 ONNX 的 input/output 名称贴在这个讨论里,我们可以更精确地确认每一维的含义和坐标尺度。
ghost
I want to detect only 'Person' class. Do I need to modify some yaml file and retrain the model for that - I want to reduce the parameters.
rugvedjalit
Not specifically you can use the pretrained model of yolo you just ne to call on person id and reflect it on your processed frames. Class_id == 0 : person
- Glenn JocherUltralytics(已编辑)
@ShahnawazHusian to add new classes you should fine‑tune from your existing checkpoint on a dataset that contains both the old and new classes; YOLO doesn’t support “locking” all old weights and only appending new ones. By default all layers are trainable, but you can freeze early layers to preserve most features, for example:
from ultralytics import YOLO

model = YOLO("path/to/old/best.pt")  # model already trained on old classes

results = model.train(
    data="data_with_old_and_new_classes.yaml",
    epochs=100,
    freeze=10,          # freeze first 10 layers (backbone-heavy); head stays trainable
    lr0=0.001           # often use a smaller LR when extending a trained model
)
If you want to “re‑train” an existing class, just keep that class in your labels and oversample or rebalance your dataset; freezing the head/neck/backbone entirely would stop any learning. The
freezeargument and related options are summarized in the training configuration docs.
@heymuun as @rugvedjalit mentioned, you don’t need to change the YAML or retrain if you only want the
personclass: you can filter at inference time withclasses=0(COCO’s person index), for example:from ultralytics import YOLO model = YOLO("yolo26n.pt") # COCO‑pretrained results = model.predict(source="video.mp4", classes=0)This keeps the model size the same but returns only person detections; if you truly need fewer parameters, use a smaller model variant (e.g.,
yolo26n.pt) or retrain anc: 1model, though the parameter reduction from changingncalone is quite small.
legend-zhen
Hello, I would like to use the weight file obtained after modifying the YOLO11 model to provide a checkbox for the top-down pose estimation algorithm. Why can it only run normally under the official weight file(yolo11.pt)? When using the weight of the YOLO11 structure improved by myself, the following error message appears. Please ask what should be done to use the weight file trained by myself. D:\Anaconda\envs\openmmlab\python.exe D:\openmmlab\mmpose-11\topdown_demo_with_YOLO1111.py D:\Anaconda\envs\openmmlab\lib\site-packages\mmengine\utils\package_utils.py:48: UserWarning: pkg_resources is deprecated as an API. See https://setuptools.pypa.io/en/latest/pkg_resources.html. The pkg_resources package is slated for removal as early as 2025-11-30. Refrain from using this package or pin to Setuptools<81. from pkg_resources import DistributionNotFound, get_distribution WARNING ⚠️ D:\YOLO\YOLO11\ultralytics-main\runs\detect\train8\weights\best.pt appears to require 'ultralytics.nn.add_modules', which is not in Ultralytics requirements. AutoInstall will run now for 'ultralytics.nn.add_modules' but this feature will be removed in the future. Recommend fixes are to train a new model using the latest 'ultralytics' package or to run a command with an official Ultralytics model, i.e. 'yolo predict model=yolov8n.pt' Traceback (most recent call last): File "D:\Anaconda\envs\openmmlab\lib\site-packages\ultralytics\nn\tasks.py", line 837, in torch_safe_load ckpt = torch.load(file, map_location="cpu") File "D:\Anaconda\envs\openmmlab\lib\site-packages\ultralytics\utils\patches.py", line 86, in torch_load return _torch_load(*args, **kwargs) File "D:\Anaconda\envs\openmmlab\lib\site-packages\torch\serialization.py", line 712, in load return _load(opened_zipfile, map_location, pickle_module, **pickle_load_args) File "D:\Anaconda\envs\openmmlab\lib\site-packages\torch\serialization.py", line 1049, in _load result = unpickler.load() File "D:\Anaconda\envs\openmmlab\lib\site-packages\torch\serialization.py", line 1042, in find_class return super().find_class(mod_name, name) ModuleNotFoundError: No module named 'ultralytics.nn.add_modules'
During handling of the above exception, another exception occurred:
Traceback (most recent call last): File "D:\openmmlab\mmpose-11\topdown_demo_with_YOLO1111.py", line 316, in main() File "D:\openmmlab\mmpose-11\topdown_demo_with_YOLO1111.py", line 196, in main model_yolo11 = YOLO(args.det_checkpoint) File "D:\Anaconda\envs\openmmlab\lib\site-packages\ultralytics\models\yolo\model.py", line 23, in init super().init(model=model, task=task, verbose=verbose) File "D:\Anaconda\envs\openmmlab\lib\site-packages\ultralytics\engine\model.py", line 145, in init self._load(model, task=task) File "D:\Anaconda\envs\openmmlab\lib\site-packages\ultralytics\engine\model.py", line 285, in _load self.model, self.ckpt = attempt_load_one_weight(weights) File "D:\Anaconda\envs\openmmlab\lib\site-packages\ultralytics\nn\tasks.py", line 910, in attempt_load_one_weight ckpt, weight = torch_safe_load(weight) # load ckpt File "D:\Anaconda\envs\openmmlab\lib\site-packages\ultralytics\nn\tasks.py", line 857, in torch_safe_load ckpt = torch.load(file, map_location="cpu") File "D:\Anaconda\envs\openmmlab\lib\site-packages\ultralytics\utils\patches.py", line 86, in torch_load return _torch_load(*args, **kwargs) File "D:\Anaconda\envs\openmmlab\lib\site-packages\torch\serialization.py", line 712, in load return _load(opened_zipfile, map_location, pickle_module, **pickle_load_args) File "D:\Anaconda\envs\openmmlab\lib\site-packages\torch\serialization.py", line 1049, in _load result = unpickler.load() File "D:\Anaconda\envs\openmmlab\lib\site-packages\torch\serialization.py", line 1042, in find_class return super().find_class(mod_name, name) ModuleNotFoundError: No module named 'ultralytics.nn.add_modules'
- Glenn JocherUltralytics(已编辑)
@legend-zhen Thanks for the traceback. Your checkpoint was saved with custom code (
ultralytics.nn.add_modules) from a modified Ultralytics repo, but you’re loading it with the pip-installed package where that module doesn’t exist. Fix by either installing your modified repo into the same environment, or exporting to a format that doesn’t require the original Python classes:# Option A: load with the same modified code pip uninstall -y ultralytics pip install -e path\to\your_modified_ultralytics # Option B: export once from the environment where it loads, then use the artifact yolo export model="D:\YOLO\YOLO11\ultralytics-main\runs\detect\train8\weights\best.pt" format=onnxPlease also run and paste the text output of:
yolo checksto confirm you’re not mixing a local repo and a pip install; compare the Ultralytics install path it prints with the paths in your traceback. Export formats and usage are summarized in the Export guide and general troubleshooting tips are in Troubleshooting Common YOLO Issues.