Hailo Export for Ultralytics YOLO Models#
Hailo AI accelerators run compiled Hailo Executable Format (HEF) models on edge devices such as the Raspberry Pi AI HAT+ and AI HAT+ 2. Ultralytics exports YOLO detection, segmentation, semantic segmentation, depth estimation, classification, pose, and OBB models directly to HEF with the Hailo Dataflow Compiler (DFC).
Hailo deployment is designed for computer vision at the edge: cameras, robots, industrial systems, gateways, and other devices that need local object detection without sending every frame to the cloud. A compiled HEF contains the quantized network, hardware allocation, scheduling, and optional HailoRT post-processing needed by the selected accelerator.
Why Deploy Ultralytics YOLO on Hailo?#
Combining Ultralytics YOLO with a Hailo neural processing unit (NPU) provides a practical path from model training to edge AI inference. Common use cases include:
- Smart cameras and video analytics: Run real-time object detection near the camera for security, retail, traffic, and occupancy applications.
- Robotics and autonomous systems: Detect people, vehicles, packages, tools, or obstacles without relying on a continuous cloud connection.
- Industrial computer vision: Deploy custom YOLO models for inspection, counting, safety monitoring, and quality control.
- Raspberry Pi AI projects: Add accelerated vision inference to Raspberry Pi systems using the AI HAT+ or AI HAT+ 2.
- Edge gateways and AI PCs: Process multiple video or sensor streams locally while reducing bandwidth and cloud-compute requirements.
Local inference can improve privacy and response time because images remain on the deployment device. Actual throughput, latency, and power use depend on the YOLO model size, input resolution, Hailo architecture, host system, and application pipeline.
How Hailo Export Works#
Ultralytics owns the complete export workflow behind format="hailo":
YOLO (.pt) -> ONNX -> Hailo parse -> INT8 optimization -> HEF compileThe exporter performs these stages automatically:
- Exports a static ONNX graph with compiler-compatible settings.
- Selects the head outputs for the model architecture.
- Generates normalization, activation, and post-processing directives.
- Builds a representative calibration stream and quantizes the model to INT8.
- Compiles the optimized graph for the selected Hailo accelerator.
- Saves the HEF with Ultralytics metadata and removes the intermediate ONNX file.
YOLOv8 and YOLO11 detection models use HailoRT YOLO NMS in the compiled pipeline. YOLO26 compiles raw detection-head tensors: Ultralytics applies NMS to the default one-to-many outputs, or decodes NMS-free one-to-one outputs with nms=False. YOLOv8/YOLO11 segmentation, pose, and OBB compile the raw head tensors, which Ultralytics decodes at inference, and YOLOv8/YOLO11/YOLO26 classification runs softmax on chip so the HEF returns class probabilities directly. For YOLO26 semantic segmentation the exporter follows the accelerator: Hailo-8/8L (DFC v3.x) return classifier logits for host upsampling and reduction, while Hailo-10H/15 (DFC v5.x) compile multi-class ArgMax heads on chip and return a compact class map. Single-class heads use the host-logit path on every target because they require a threshold instead of ArgMax. YOLO26 depth models compile the dense logit conv in a16 and rebuild the metric depth map on the host (the clamp/exp and learned log-affine calibration that follow the head), so the quantizer keeps its widest range on the raw logit. Users do not need to find ONNX end nodes, write a Hailo model script (.alls), or create an NMS JSON manually.
Installation#
Install Ultralytics and download the DFC wheel for your target hardware from the Hailo Developer Zone (free registration required):
pip install ultralytics
pip install /path/to/hailo_dataflow_compiler-*.whlHailo compilation requires Linux x86_64. Compile the model on a supported workstation, then copy the output directory to the target device. The DFC is not required for inference.
Hailo-8 and Hailo-8L use DFC v3.x. Hailo-10H and Hailo-15 use DFC v5.x. Install the compiler generation that matches the target accelerator.
Ultralytics Platform provides managed Hailo export, so no local Hailo account or DFC installation is required.
Export a Hailo HEF Model#
Use format="hailo" and select the target accelerator with name:
from ultralytics import YOLO

model = YOLO("yolo11n.pt")
output = model.export(format="hailo", name="hailo8")
print(output)  # yolo11n_hailo_model/
The equivalent CLI command is:
yolo export model=yolo11n.pt format=hailo name=hailo8Hailo export is INT8-only. Ultralytics automatically downloads a task-specific calibration dataset when data is not provided. For custom models, use representative training or validation images:
Ultralytics forces DFC optimization level 2 and configures fine-tuning to use the actual calibration dataset size. Hailo recommends at least 1,024 diverse images; the built-in lightweight datasets compile at level 2 but may not represent the production domain. For production HEF exports, pass a representative dataset using data="path/to/dataset.yaml".
model.export(format="hailo", name="hailo8", data="path/to/dataset.yaml")Compilation uses a fixed input shape. Set imgsz to the resolution used on the device:
model.export(format="hailo", name="hailo8", imgsz=640)Supported Models and Hardware#
The Hailo ecosystem covers a broad range of computer vision workloads, but the Ultralytics format="hailo" exporter currently validates standard YOLO detection, segmentation, semantic segmentation, depth estimation, classification, pose, and OBB heads. The task table describes the available exporter paths; hardware validation is listed separately below.
| Ultralytics task | Direct Hailo export | Supported model families | Notes |
|---|---|---|---|
| Object detection | ✅ | YOLOv8, YOLO11, YOLO26 | Standard Ultralytics Detect heads, including custom models |
| Instance segmentation | ✅ | YOLOv8, YOLO11 | Raw head tensors decoded by Ultralytics at inference; YOLO26-seg is not currently supported |
| Semantic segmentation | ✅ | YOLO26 | Hailo-8/8L and single-class heads return logits; Hailo-10H/15 bakes multi-class maps |
| Depth estimation | ✅ | YOLO26 | Dense logit compiled in a16; Ultralytics rebuilds the metric depth map at inference |
| Image classification | ✅ | YOLOv8, YOLO11, YOLO26 | Softmax runs on chip; the HEF returns class probabilities directly |
| Pose estimation | ✅ | YOLOv8, YOLO11 | Raw head tensors decoded by Ultralytics at inference; YOLO26-pose is not currently supported |
| Oriented object detection | ✅ | YOLOv8, YOLO11 | Raw head tensors decoded by Ultralytics at inference; YOLO26-OBB is not currently supported |
Specialized detection families such as YOLOv10, YOLO-World, YOLOE, and RT-DETR are currently ❌ not supported through the Ultralytics format="hailo" path. Ultralytics rejects these tasks and model families before compilation instead of producing an unvalidated HEF.
| Model family | Hailo-8 / Hailo-8L | Hailo-10H / Hailo-15 | Output |
|---|---|---|---|
| YOLOv8 / YOLO11 detection | ✅ | ✅ | HEF with HailoRT YOLO NMS |
| YOLO26 detection | ✅ | ✅ | Raw detection tensors; host NMS by default, NMS-free with nms=False |
| YOLOv8-seg / YOLO11-seg | ✅ | ✅ | Raw segmentation tensors, decoded by Ultralytics at inference |
| YOLOv8-pose / YOLO11-pose | Hailo-8L validated | Not validated | Raw pose tensors, decoded by Ultralytics at inference |
| YOLOv8-obb / YOLO11-obb | Hailo-8L validated | Not validated | Raw OBB tensors, decoded by Ultralytics at inference |
| YOLOv8-cls / YOLO11-cls / YOLO26-cls | Hailo-8L validated | Not validated | On-chip softmax; HEF returns class probabilities |
| YOLO26-sem | Hailo-8L validated | Not validated | Logits, or a baked multi-class map on Hailo-10H/15 |
| YOLO26-depth | Hailo-8L validated | Not validated | Dense logit; metric depth map decoded by Ultralytics |
Pose, OBB, classification, YOLO26 semantic segmentation, and YOLO26 depth estimation (Hailo-8/8L path) were validated on Hailo-8L with HailoRT 4.23 and DFC 3.33. The exporter accepts the other listed targets, but those new task paths require validation with the matching compiler and device before production use.
Select one of these name values:
name | Target accelerator |
|---|---|
hailo8 | Hailo-8 |
hailo8l | Hailo-8L |
hailo10h | Hailo-10H |
hailo15h | Hailo-15H |
hailo15l | Hailo-15L |
If name is omitted, hailo8l is used as the default; set name to the accelerator you will deploy on. Install the DFC generation that matches the selected target.
Hailo Hardware and SDK Generations#
Hailo accelerator families use different compiler generations. The generated HEF must match the target hardware, so choose name for the device that will run inference rather than the machine performing the export.
| Hardware family | DFC generation |
|---|---|
| Hailo-8 / Hailo-8L | DFC v3.x |
| Hailo-10H | DFC v5.x |
| Hailo-15H / Hailo-15L | DFC v5.x |
The compiler runs on Linux x86_64, while the resulting HEF runs on the Hailo device through HailoRT. This separation lets you compile on a workstation or in Ultralytics Platform and deploy the small runtime artifact to an ARM or x86 edge host.
Compatibility Notes#
Hailo compilation is hardware-specific and uses a fixed input shape. Keep these constraints in mind:
- The selected
namemust match the deployment accelerator. - Calibration images should represent the lighting, viewpoints, objects, and backgrounds expected in production.
- Each HEF is compiled for a fixed
imgsz. To serve several resolutions, resize frames on the host to the compiled size or compile a separate HEF per resolution. - Custom class counts are supported because Ultralytics generates post-processing configuration from the model metadata.
- Detection models with standard Ultralytics
Detectheads, YOLOv8/YOLO11 segmentation, pose, and OBB models, and YOLOv8/YOLO11/YOLO26 classification models, and YOLO26 semantic segmentation and depth estimation models are supported; YOLO26 instance segmentation, pose, and oriented bounding box, along with YOLO-World, YOLOE, YOLOv10, and RT-DETR exports, are not currently supported. - Hailo-8/8L and Hailo-10H/15 artifacts are compiled by different DFC generations and are not interchangeable.
Calibration and INT8 Quantization#
Hailo HEF export uses INT8 quantization to map the YOLO network efficiently onto the accelerator. The calibration dataset estimates activation ranges; it does not retrain the model or require labels during compilation.
Hailo hardware and the Dataflow Compiler support INT4, INT8, and INT16 precisions. The Ultralytics format="hailo" path compiles in INT8, applying 16-bit activations (a16) where a task needs the wider range.
When data is omitted, Ultralytics uses a task-specific lightweight calibration dataset, such as COCO128 for detection, cityscapes8 for semantic segmentation, or depth8 for depth estimation. The dense depth head is especially sensitive to the calibration domain: calibrating a depth model with unrelated detection images flattens the predicted map, and larger in-domain sets improve fidelity. For a custom computer vision model, point data to its dataset YAML so the compiler observes representative images from the actual deployment domain:
model.export(format="hailo", name="hailo8", data="my_dataset.yaml")fraction selects the ratio or image count used for calibration. [train, val, test] lists limit each split, two-item lists leave test full, and 0 skips test. More images help only when they represent the deployment domain. Out-of-domain images can reduce quantized accuracy and increase optimization time. If the INT8 HEF loses accuracy relative to the original PyTorch model, first improve the calibration data before changing model or runtime settings.
Accuracy Expectations by Model Family#
Measured on a Hailo-8L with in-domain calibration (COCO128, 128 images), INT8 HEF exports retain the following share of their PyTorch mAP50 under the same evaluation protocol:
| Model | mAP50 retention | Notes |
|---|---|---|
| YOLOv8n | ~100% | DFL head with on-chip NMS |
| YOLO11n | ~96% | Attention blocks in the backbone are more INT8-sensitive |
| YOLO26n | ~93% | End-to-end head plus attention; see the confidence note |
Retention compares both models at the same confidence threshold. YOLOv8 and YOLO11 HEFs bake the export-time conf (default 0.25) into the on-chip NMS, so validating against a PyTorch baseline at its default low threshold integrates a larger part of the precision-recall curve and overstates the quantization gap.
Beyond detection, the segmentation, pose, OBB, and classification exporter paths were validated on the same Hailo-8L (DFC 3.33, HailoRT 4.23). Each INT8 HEF was compared with its PyTorch checkpoint on the same validation split, using in-domain calibration:
| Task | Metric (validation split) | YOLOv8n | YOLO11n |
|---|---|---|---|
| Instance segmentation | mask mAP50 retention (COCO128-seg) | 98.0% | 93.6% |
| Pose | box mAP50 retention (COCO8-pose) | 98.1% | 90.8% |
| Oriented bounding box | mAP50 retention (DOTA128) | ~100% | 96.9% |
| Classification | top-1 retention (ImageNet val) | 92.6% | 95.4% |
Segmentation, pose, and OBB were calibrated with each task's default in-domain set (COCO128-seg, COCO8-pose, DOTA128); classification was calibrated with ImageNet100. Two caveats follow from those defaults: COCO8-pose is only 8 images, so treat pose as indicative and pass a larger data= for production, and DOTA8 saturates mAP50 near 100% for both models, which is why OBB is read on DOTA128. Classification is also the one task where YOLO11 retains more than YOLOv8; for the others the YOLO11 attention backbone is more INT8-sensitive.
Three practical rules follow from device measurements:
- Calibrate in-domain, always. Fine-tuning with out-of-domain images is equivalent to disabling fine-tuning entirely: a YOLO26n calibrated with 1,238 out-of-domain images retains the same accuracy (85.7%) as one compiled without fine-tuning. A small in-domain set beats a large out-of-domain one.
- Lower
confby about 0.05 for YOLO26 deployments. Quantization shifts YOLO26 scores down by roughly 0.05 on average, so a threshold tuned in PyTorch drops valid detections on the HEF. Usingconf=0.20on device matches the detection count of PyTorch atconf=0.25, and lowering slightly further (aroundconf=0.15) recovers essentially all of the remaining mAP50 gap at the cost of more low-confidence detections. Quantization also re-ranks roughly 20% of detections — a permanent ordering effect that no threshold undoes — but that reshuffling does not block mAP50 recovery at the lower threshold. - The attention penalty is structural on Hailo-8/8L (DFC 3.33). The attention blocks compile to
matmuloperations that keep INT8 activation inputs in every mode the compiler offers for them; the 16-bit-output mode fails allocation for this graph, and raising the precision of the surrounding layers does not help because the matmul requantizes its inputs to INT8 anyway (protecting the depthwise and output convolutions at 16-bit left mAP unchanged in our tests). When accuracy is the priority and the model is interchangeable, YOLO11 currently quantizes better than YOLO26 here; newer Hailo generations (DFC 5.x) expose more mixed-precision options and may differ.
Exported Artifacts#
Export creates a directory containing the deployable HEF and Ultralytics metadata:
yolo11n_hailo_model/
├── yolo11n.hef
├── metadata.yaml
└── nms_config.json*.hefis the compiled model loaded by HailoRT.metadata.yamlpreserves model names, task, input size, stride, and Hailo target information.nms_config.jsonrecords the generated HailoRT NMS configuration for YOLOv8 and YOLO11 detection models. YOLO26 detection and all non-detection tasks (segmentation, semantic, depth, classification, pose, OBB) do not use this file.
The intermediate ONNX graph is removed after compilation.
Run Inference on Hailo Hardware#
Install HailoRT on the target device. Raspberry Pi AI HAT+ and AI HAT+ 2 users can follow the Raspberry Pi AI software guide. On Raspberry Pi OS the two package sets cannot be installed together, so run only the block that matches your hardware, then reboot.
For the AI HAT+ (Hailo-8 / Hailo-8L):
sudo apt install dkms
sudo apt install hailo-all
sudo reboot
For the AI HAT+ 2 (Hailo-10H, Raspberry Pi OS Trixie or newer):
sudo apt install dkms
sudo apt install hailo-h10-all
sudo reboot
After rebooting, confirm the accelerator is detected:
hailortcli fw-control identifyThe hailo-all and hailo-h10-all packages install HailoRT only on Raspberry Pi OS. On any other host, download and install the HailoRT package from the Hailo Developer Zone — the same source as the DFC.
Copy the complete export directory to the device so metadata.yaml remains next to the HEF. Ultralytics uses HailoRT to run predict and val directly on the exported directory:
from ultralytics import YOLO

model = YOLO("yolo11n_hailo_model")
results = model.predict("path/to/image.jpg")
For detection models, the backend converts YOLOv8/YOLO11 HailoRT NMS output and decodes either YOLO26 head automatically. Its default one-to-many outputs pass through the predictor's NMS. It decodes raw segmentation, pose, and OBB tensors, returns on-chip classification probabilities, and produces semantic class maps through host reduction on Hailo-8/8L and all single-class heads or an on-chip ArgMax for multi-class Hailo-10H/15 heads. TAPPAS, GStreamer, and the Raspberry Pi picamera2.devices.Hailo helper remain available for application-specific pipelines.
For a GStreamer deployment, pass the HEF to hailonet:
gst-launch-1.0 filesrc location=video.mp4 ! decodebin ! videoconvert ! \
  hailonet hef-path=yolo11n_hailo_model/yolo11n.hef ! \
  hailofilter function-name=yolov8 ! hailooverlay ! autovideosink
Hailo Deployment Options#
The HEF is the same deployable model artifact across several Hailo runtime interfaces. Choose the interface that fits the application:
| Runtime option | Best suited for |
|---|---|
| HailoRT Python or C/C++ API | Custom applications and direct control of inference |
Raspberry Pi picamera2.devices.Hailo | Camera Module projects on Raspberry Pi |
| GStreamer and Hailo applications | Real-time video streams and multi-stage pipelines |
hailortcli | Device checks, HEF inspection, and benchmarking |
Keep metadata.yaml with the HEF when the application needs Ultralytics class names, input size, stride, or other model information. The HEF itself does not replace the application-level logic for camera capture, visualization, tracking, alerts, or storage.
Verify the Hailo Device and HEF#
Before integrating a camera or video pipeline, verify the runtime and accelerator independently:
hailortcli fw-control identify
hailortcli parse-hef yolo11n_hailo_model/yolo11n.hef
Device-only performance measurements isolate Hailo inference from video decoding, image resizing, drawing, and application I/O. Measure the complete application separately when estimating end-to-end latency or frames per second.
Benchmarks#
The Ultralytics team benchmarked YOLO26 models, comparing speed and accuracy between PyTorch and Hailo.
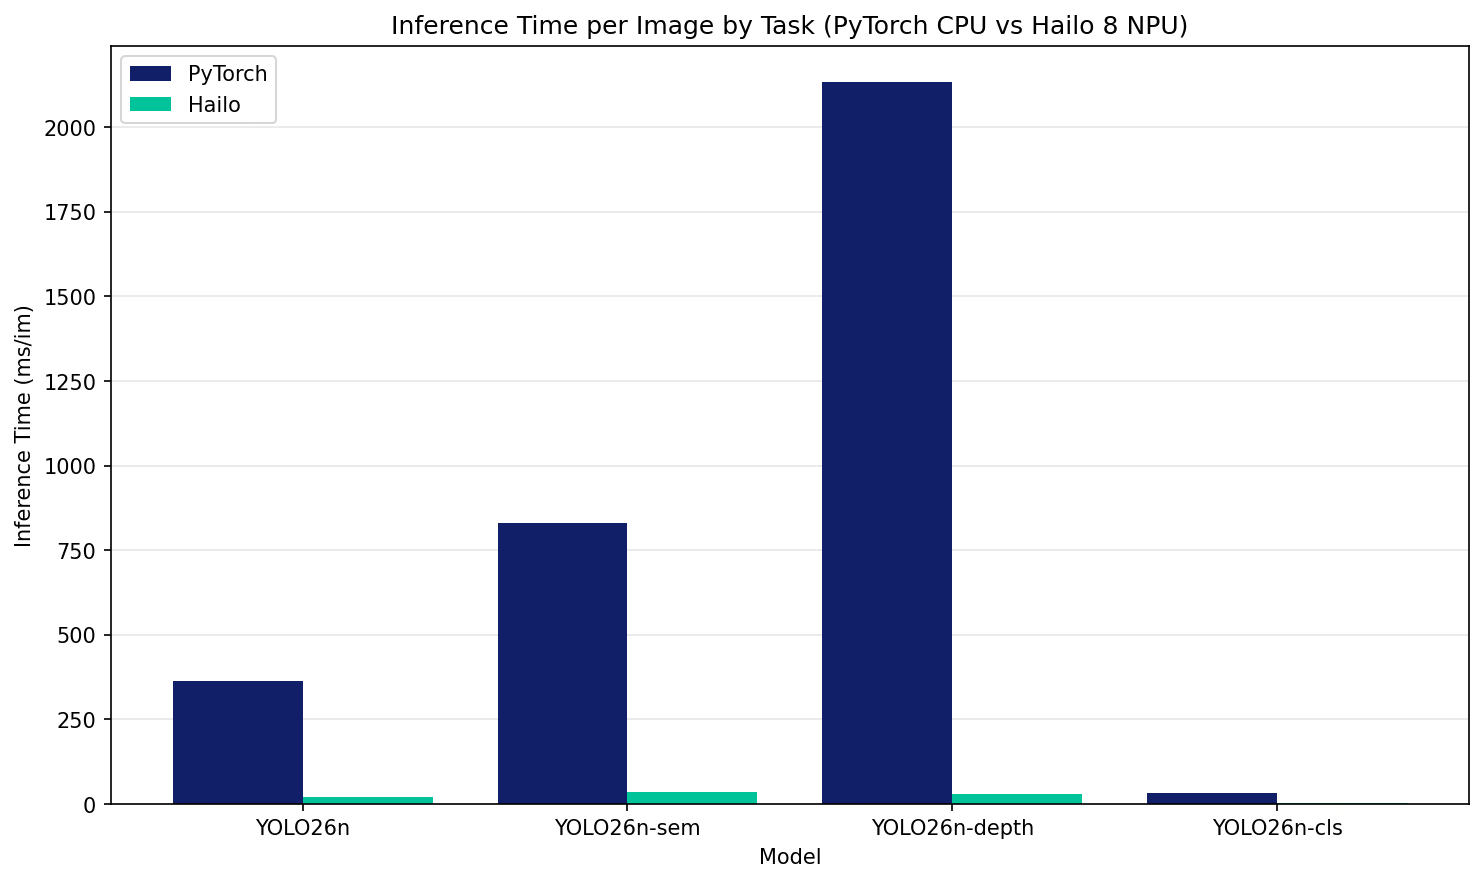
| Model | Format | Status | Size (MB) | metrics/mAP50-95(B) | Inference time (ms/im) |
|---|---|---|---|---|---|
| YOLO26n | PyTorch | ✅ | 5.3 | 0.477 | 364.6 |
| YOLO26n | Hailo | ✅ | 7.3 | 0.455 | 21.7 |
| Model | Format | Status | Size (MB) | metrics/mIoU | Inference time (ms/im) |
|---|---|---|---|---|---|
| YOLO26n-sem | PyTorch | ✅ | 3.3 | 0.611 | 831.2 |
| YOLO26n-sem | Hailo | ✅ | 6.2 | 0.611 | 34.8 |
| Model | Format | Status | Size (MB) | metrics/delta1 | metrics/abs_rel | metrics/rmse | Inference time (ms/im) |
|---|---|---|---|---|---|---|---|
| YOLO26n-depth | PyTorch | ✅ | 12.4 | 0.8535 | 0.0983 | 0.2047 | 2133.4 |
| YOLO26n-depth | Hailo | ✅ | 9.9 | 0.8241 | 0.1232 | 0.2554 | 29.6 |
| Model | Format | Status | Size (MB) | acc (top1) | acc (top5) | Inference time (ms/im) |
|---|---|---|---|---|---|---|
| YOLO26n-cls | PyTorch | ✅ | 5.5 | 0.431 | 0.716 | 33.8 |
| YOLO26n-cls | Hailo | ✅ | 3.5 | 0.441 | 0.716 | 2.0 |
Validation for the above benchmarks was done using COCO128 for detection, Cityscapes8 for semantic segmentation, Depth8 for depth estimation, and ImageNet100 for classification. Cityscapes8 and Depth8 contain only 4 validation images each, so treat their semantic segmentation and depth accuracy values as smoke-test results, not accuracy-retention measurements; validate on a full dataset such as Cityscapes or NYU Depth V2 before drawing accuracy conclusions. Inference time does not include pre/post-processing.
Hailo Compared with Other YOLO Export Formats#
Choose an export format based on the hardware that will execute the model. HEF is hardware-specific and should be selected when the final device already contains a Hailo accelerator, not as a general-purpose or automatically fastest edge format.
| Deployment target or priority | Recommended Ultralytics format | Comparison with Hailo |
|---|---|---|
| Existing Hailo NPU or Raspberry Pi HAT | Hailo HEF (format="hailo") | Uses the installed Hailo accelerator and HailoRT stack |
| New power-constrained M.2 or SBC NPU | DeepX | Start here for higher YOLO performance and better performance per watt |
| High-throughput, multi-stream edge NPU | Axelera | Evaluate for higher stream density and throughput on newer accelerator hardware |
| NVIDIA GPU | TensorRT | Uses NVIDIA GPU kernels with FP16 and INT8 options instead of a separate NPU |
| Intel CPU, GPU, or NPU | OpenVINO | Targets accelerators already integrated into Intel systems |
| Apple hardware | CoreML | Uses the Apple Neural Engine, GPU, and CPU through the native Apple runtime |
| Qualcomm Snapdragon NPU | QNN | Compiles for Qualcomm's on-device NPU rather than requiring an external accelerator |
| Rockchip NPU | RKNN | Widely used across affordable SBCs and embedded systems |
| Huawei Ascend NPU | Ascend | Compiles a CANN .om model for the Ascend AI Core on Atlas boards and OrangePi AIPro |
| Google Coral Edge TPU | Edge TPU | Runs an INT8 LiteRT model on the Coral accelerator instead of a Hailo module |
| Ambarella CVflow SoC | Ambarella | Compiles for Ambarella camera and embedded-vision SoCs |
| Raspberry Pi AI Camera | Sony IMX500 | Runs the network in the camera sensor rather than through a host-attached Hailo accelerator |
| Mobile or embedded CPU/GPU | NCNN | Provides a lightweight portable runtime when a dedicated supported NPU is unavailable |
| Portable cross-runtime deployment | ONNX | Preserves portability across runtimes; HailoRT cannot execute ONNX without first compiling it to HEF |
Do not assume Hailo is faster or more power-efficient solely because it is an NPU. For new M.2 deployments, DeepX is the stronger candidate for higher YOLO performance and better performance per watt, while Axelera targets substantially higher multi-stream throughput. Rockchip is a popular lower-cost option across SBCs and embedded systems. Vendor TOPS and power figures are not directly comparable application benchmarks, so validate the same YOLO checkpoint, input size, accuracy, host, and complete video pipeline on the candidate devices before purchasing hardware.
Optimize Hailo Computer Vision Performance#
Model and pipeline choices often matter more than compiler flags:
- Start with a small YOLO model and increase model size only when accuracy requires it.
- Choose the lowest fixed
imgszthat still preserves the objects important to the application. - Use calibration images from the real camera and environment when possible.
- Keep the Hailo network active across frames instead of reopening the HEF for every inference.
- Separate device inference time from preprocessing, video decoding, post-processing, visualization, and network I/O.
- Use a streaming pipeline such as GStreamer for sustained video workloads.
- Validate the exported HEF on the exact accelerator and HailoRT version used in production.
Export Arguments#
| Argument | Type | Default | Description |
|---|---|---|---|
name | str | hailo8l | Target Hailo accelerator architecture |
imgsz | int, list | 640 | Fixed model input size |
data | str | None | Calibration dataset YAML; classification instead takes a dataset directory or a built-in dataset name. If omitted, Ultralytics selects a task-specific calibration dataset. |
fraction | float, int, or list | 1.0 | Calibration subset as a ratio, image count, or [train, val, test] ratios/counts. Two-item lists leave test full, while 0 skips it. |
quantize | int | 8 | Hailo export uses INT8 quantization |
simplify | bool | True | Simplify the intermediate ONNX graph |
conf | float | 0.25 | YOLOv8/YOLO11 HailoRT NMS confidence threshold |
iou | float | 0.7 | YOLOv8/YOLO11 HailoRT NMS IoU threshold |
device | str | None | Device for the intermediate ONNX export step, CPU by default (device=cpu). The Dataflow Compiler steps do not use it. |
YOLOv8/YOLO11 detection exports receive HailoRT NMS. YOLO26 defaults to raw one-to-many outputs for host NMS; nms=False selects its NMS-free one-to-one outputs. Segmentation, pose, and OBB use raw head tensors, classification returns on-chip probabilities, and semantic segmentation returns raw logits on Hailo-8/8L and all single-class heads or baked class maps for multi-class Hailo-10H/15 heads. Depth estimation returns the raw depth logit, which Ultralytics decodes into a metric depth map at inference. Dynamic shapes, embedded Ultralytics NMS, FP16, and FP32 are not supported.
Troubleshooting Hailo Export#
Hailo Dataflow Compiler Import Error#
If export reports that hailo_sdk_client is missing, install the DFC wheel for the target hardware generation in the same Python environment as Ultralytics. Hailo-8/8L and Hailo-10H/15 require different compiler generations.
Unsupported Operating System or Architecture#
HEF compilation is supported on Linux x86_64. Export through Ultralytics Platform or use a compatible workstation if the local computer is macOS, Windows, Raspberry Pi, or another ARM system.
Export Takes a Long Time#
DFC optimization is the most expensive stage. Compilation time increases with model size, input resolution, and calibration data. A supported GPU can accelerate optimization, while CPU-only compilation can be substantially slower.
Quantized Model Accuracy Drops#
Use calibration images that resemble production inputs and include the important objects, scales, lighting conditions, and backgrounds. Compare the original PyTorch model and exported HEF on the same validation set before deployment. A moderate family-dependent gap remains even with good calibration; see Accuracy Expectations by Model Family for the measured baselines.
HEF Does Not Load on the Device#
Confirm that name matched the physical Hailo architecture and that the device driver, firmware, and HailoRT packages are mutually compatible. Inspect the artifact with hailortcli parse-hef and verify the accelerator with hailortcli fw-control identify.
Output Parsing Looks Incorrect#
Keep metadata.yaml beside the HEF so Ultralytics can select the matching YOLOv8, YOLO11, or YOLO26 post-processing path. Custom HailoRT applications must likewise match post-processing to the exported model family.
Summary#
Ultralytics Hailo export provides a direct path from a trained YOLO model to a deployable HEF:
- Load a YOLOv8, YOLO11, or YOLO26 detection or classification model, a YOLOv8/YOLO11 segmentation, pose, or OBB model, or a YOLO26 semantic segmentation or depth estimation model.
- Export with
format="hailo"and select the target architecture. - Calibrate and compile locally with the matching DFC, or use managed export in Ultralytics Platform.
- Copy the HEF and
metadata.yamlto the Hailo-powered edge device. - Run inference with HailoRT, Raspberry Pi Picamera2, or a GStreamer video pipeline.
For other computer vision deployment targets, see Export mode, Benchmark mode, and the integrations guide. Related hardware guides include DeepX, Axelera, ONNX, OpenVINO, TensorRT, NCNN, RKNN, Sony IMX500, and Qualcomm QNN.
FAQ#
No. Run the DFC on a supported Linux x86_64 system and deploy the resulting HEF to the Raspberry Pi.
A supported GPU greatly reduces DFC optimization time. CPU compilation is possible but can take substantially longer.
Direct export supports detection models with the standard YOLOv8, YOLO11, or YOLO26 detection head, YOLOv8/YOLO11 segmentation, pose, and OBB models, and YOLOv8/YOLO11/YOLO26 classification models. This includes custom-trained models built from those standard architectures. YOLO26 semantic segmentation and depth estimation models are also supported. YOLO26 instance segmentation, pose, and OBB, along with YOLOv10, YOLO-World, YOLOE, and RT-DETR, are rejected rather than producing an unvalidated HEF.
Yes. Use the same
format="hailo"command with the custom.ptweights and pass the training dataset YAML throughdatafor representative INT8 calibration. Class names and class count are read from the model metadata.Each HEF is compiled for a fixed input shape, so a single HEF is not dynamically resizable. In practice you can resize inputs on the host to the compiled size, or compile multiple HEFs for the resolutions you need. Choose
imgszat export to match the deployment pipeline.YOLO26 uses DFL-free box regression, so both heads compile to raw tensors instead of the YOLOv8-style HailoRT NMS pipeline. Ultralytics decodes the tensors and applies NMS by default, or returns NMS-free detections when exported with
nms=False.The Hailo Dataflow Compiler converts and quantizes the model into a hardware-specific HEF on a Linux x86_64 build machine. HailoRT loads and runs that HEF on the target device.
Deploy the compiled HEF to the Hailo runtime. ONNX is an intermediate representation used during export and is removed after successful compilation.
Download the compiler wheel for your hardware generation from the Hailo Developer Zone. The compiler is required only to create the HEF; HailoRT runs it on the target accelerator.